Balanced-power parties are ideal

This post was inspired by my response to Robert J. Schwalb’s blog post about the Killer DM within.  A quick aside: I found Robert’s blog via a link on Sarah Darkmagic – a fellow RPG Blogger Network member whose blog I regularly follow.  I love the way RPG Bloggers leads me to so many interesting items online.

Some dungeon masters / game masters hate power gamers.  These are the players who try to find every possible advantage from any available material when putting their character together.  If there’s an overpowered angle to take on a character, they’ll find and use it.  This is sometimes referred to as “character optimization” or “CharOp”.  Those who don’t approve might call it “being a munchkin” or “twinking”.  This is the character who can easily kill monsters well above their own their level without breaking a sweat.
Robert talks about the Killer DM having the potential to emerge when the DM is frustrated with the players and the way they’re playing the game.  I think DMs in general are not fans of power gamers who min-max to the hilt.

Having thought this issue through, I’ve concluded that the problem isn’t exactly power gamers per se – you can always ramp up the difficulty to make it a challenge for them.  The problem is when you have characters of vastly different power levels in the same party.

If everyone in the party is super-powerful for their level, then the DM’s job isn’t too hard – you use higher-level encounters, give monsters extra abilities that will make them more challenging, and so on.  The problem is when one or two players are super-powerful but the others are of a normal power level.  In that situation, ramping up the difficulty to challenge the power gamers will make the monsters just plain deadly to the rest of the party.

The same problem can occur in reverse if you have a party of mostly average-power characters and one or two characters who have terrible stats for combat (the weak but charismatic fighter, for instance).  Those under-powered characters are not going to be able to fight interesting battles alongside their more powerful brethren and will be reduced to either standing in the back or getting themselves slaughtered.

In my opinion, the key to a fun gaming environment is to have a party of similarly-powered characters.  They don’t have to be all the same power level, but they should be close.  In that situation, the DM can create encounters that challenge everyone but that everyone can contribute to.  That’s what we want as dungeon masters.

I’m happy to say that my online campaign feels like the party is pretty well balanced from a power perspective.  When it comes to combat, everyone can contribute.  If we ever got to the point that one character was simply outshining all of the others, I would talk to that player about ways to bring the character in line, because otherwise combats will be too easy or too deadly for some part of the party.  A balanced-power party is a happy party.

Online game recruiting

As I mentioned in my last post, I’ve started an online D&D Fourth Edition game, complete with recruiting players online (as opposed to my current game that started with an in-person game and morphed online due to distance between players and DM).  I thought my experience might be useful for anyone else who wants to start a game online, so I’m sharing it here in “real time.”

The game began with another poster on EN World, Palacer, putting up a post announcing that he really wants to play more D&D and is interested in an online game.  Several others chimed in to say that they wanted the same thing, and I said that I was also interested in either playing or DMing.  Well, no one else stepped up to DM, so I was recruited!

I put up a post in the thread laying out the overview of the game:

  • Sign-ups were now open
  • I was planning on a 5-PC campaign, starting off with more focus on combat but incorporating more role playing over time
  • Interested players should put a post in the thread and send me an email
  • Players should include their EN World handle, the name they would like to go by in the game, their preference for starting level (level 1 versus level 6), their available times to play and their thoughts on what characters they would like to play

Seven people followed the instructions, putting posts on the forum and sending me emails.  At the end of the day I put up another post saying that I would leave sign-ups open for one more day and then close them.

This evening I had seven players – well, eight if you count a couple that may be playing one character or two.  I sent an email to the group with more details:

  • We’ll get together for our first session this Friday evening
  • We’ll be on Skype and MapTool – I shared my contact information for both of those
  • I laid out character creation guidelines (no Eberron or Dragon Magazine, standard starting gold, actual characters preferred over min-maxed beasts)
  • I asked everyone to start sharing their characters in email and to send me their Character Builder files (partly so I could program up some MapTool macros for them)
  • Also, we’re going to play a session at level 1, then jump to 4, then probably to 7.  The players generally want to get to higher levels more quickly, but some players (and I) are pretty new and want to start off slowly.

So far so good!  I’ve got seven players and we’ve found a time that, in theory at least, will work for all of us.  Next step: Getting together all at the same time!  Oh, and I need to devise a campaign (little details…).  I’m thinking this may be the time to update my campaign that I discovered from years ago, at least as a good starting point.

If you have any advice on this new adventure, I’d love to hear it in the comments.

Online D&D from scratch

I knew I would eventually get to this point, given the focus of my blog, but I wasn’t sure exactly how or when it would happen.  Well, it’s here.

I’m starting a D&D campaign online from scratch.

As you probably know, I’ve been running an online D&D game for a few months now, but that game started with some friends at a wedding in Florida.  We played together in person for an evening, and since we wanted to keep the game going despite the fact that we were far apart, we started playing online.

Now I’ll be starting a game entirely online, including the recruiting process.

Another poster on EN World (Dan, who goes by the handle Palacer) started a thread yesterday, basically saying that he’s hungry to play some more D&D and was interested in an online game.  Several other people on the thread said that they felt the same way, and I chimed in to say that I would also be interested in playing or DMing.  Dan reached out to me and said, “Great – DM this game!”

All right, I’m in!  I’ve posted on that thread, saying that I’m happy to serve as DM.  We’ll use MapTool and Skype, since I know and love those programs for D&D.

I plan to use this blog in part to talk about the whole process of creating an online game.  I fully expect that the biggest challenge will be organizing the players – getting everyone to commit to the game and to show up regularly and on time.  I’ll do my best to keep everything organized.

Part of my plan is to recruit extra players.  It’s quite likely that there will be at least one or two players who want to play but then can’t for whatever reason.  Backups are a good thing!  I’ve also sent invitations to a few people whom I know personally but who don’t live near me, since this would be a good way for us to game together.

If anyone reading the blog is interested in playing, check out the thread on EN World and chime in!  Leaving a comment here on the blog is fine, too, or drop me a line at my gmail.com account – the address is OnlineDungeonMaster.

And if anyone has any advice for me on this new adventure, please let me know in the comments.

Eat what you kill

There was a post on EN World asking how people have taught the rules of D&D Fourth Edition to new players.  I shared my story there, and since it ended up being a pretty long reply, I thought it would make for a good blog post.  I’ve told a little bit of this story in my first blog post, but here’s the extended version.

I was at a wedding in Florida (I live in Colorado).  The wedding was in the morning, and the festivities were done by mid-afternoon.  I was a pretty new D&D player at that point and hadn’t DMed at all, but I had brought the DMG 2 to read on the trip.

One of my friends, Zach, noticed the book and asked about D&D.  He had played World of Warcraft and knew a little bit about D&D.  I talked to him, and he was into the idea of playing, as was his wife, Lane.  She had never played anything like D&D.  My wife, Barbara, had been playing in a game with me for about three sessions at that point, so she at least knew the rules.

I helped Zach and Lane roll up some characters in the Character Builder on my laptop, guiding them through the process.  Then the bride and groom showed up and wanted to play, too, so I had Zach guide the groom through character creation on his laptop (CB is a free download for levels 1-3, woo hoo!) while I helped the bride.  Once they all had characters, I helped transfer their stats to sheets of paper in an abbreviated format (no printer, you see).  My wife used her character from our session at home (which we saved on the laptop).

Zach drew up a battle grid (freehand) on two sheets of letter-sized paper that we had on hand, and we fished around for coins and little dried fruits to use for PCs and monsters.  I found a free adventure to run (Keep on the Shadowfell), and we dived right in, right there in the hotel room.

So picture it: Six people seated around a hotel end table that’s been pushed to the middle of the room.  Four are sitting on beds, two on chairs.  There are a couple of laptops around, one of which is mine that I’m using to run the game.  People are busting out their cell phones to use online dice rollers (we had no dice, you see).  The PCs (coins) are attacking the monsters (little dried blueberries and pineapple chunks), enjoying the pleasure of eating what they kill (if you haven’t tried this, I highly recommend it).

As for teaching the game, it went something like this:

“On your turn, you have three actions you can spend – a standard action, a move action, and a minor action.  Most of the time you won’t have anything that’s a minor action, but you can use it for drawing a weapon, for instance.  Your standard action is usually going to be an attack, and I’ve laid out your options for those on your sheets of paper.  Your move action can be moving up to your speed or, if you’re standing next to a bad guy, you might want to just move one square – if you move away from a bad guy at full speed, he gets to smack you.”

“When you attack, you pick which bad guy you’re attacking and which of your powers you’re using for the attack.  You roll a twenty-sided die and add a number to it (the number is on the power).  I’ll let you know if your total is high enough to hit the bad guy.  If it is, your power will tell you to roll a different die and add another number, which will be the damage you’ve dealt to the bad guy.”

“You have a hit point total, which is how much damage you can take before you end up unconscious and start to die.  You’re trying to wipe out the bad guys before they wipe you out.”

That was it in a nutshell, and it was enough to get us through two encounters.  We didn’t do a lot of role playing, of course, but everyone seemed to get the gist of what they could do on their turn, and they had fun beating up kobolds and goblins.  It led to a recurring online game after we went home to Colorado, so I’d call it a success!

MapTool states – bloodied, slowed and more

When I first discovered MapTool, I was excited to see that you could set states on tokens very easily, especially compared to Gametable and OpenRPG.  My first post about MapTool showed some examples of putting states on a token, and my second showed the set of states that I had programmed up.  Later, when I started looking at pre-made campaign frameworks, I realized that there were better ways to go with states.

I should clarify that when I say states, I’m using the MapTool lingo for what a lot of people would call conditions.  These are things like being bloodied, slowed, marked, dazed, etc.  A lot of people who play D&D 4e with minis will use some type of colored rings (tiny rubber bands, pipe cleaners, etc.) or beads to indicate various conditions on a PC or monster mini, but these are fiddly to deal with (though the rings are better than the beads).  With MapTool, you can make little images appear on top of the token image for the PC or monster, and they move along with the token.  Piece of cake.

My first pass at setting up states on tokens used some of the default state indicators that come with MapTool.  These are basically shapes – a big circle, square, triangle or X over the image, or a dot in a corner.  This would work fine, of course, but knowing that a blue square means “slowed” while a yellow triangle means “dazed” would get annoying.

When I opened up Rumble’s 4e campaign framework in MapTool (as described here), I found that he was using a different approach for setting states on tokens.  Specifically, he was primarily using the “grid image” option for his states.  I loved it.

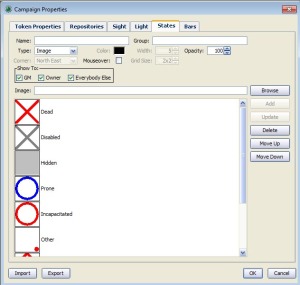
So how do you set up states in MapTool?  First, go to Edit – Campaign Properties, then click on the States tab.  By default, you’ll see a window like this:

MapTool States WindowFrom here, you can modify or delete existing states or add your own new states.  Let’s talk about adding a new state first, since it’s a little bit confusing to do.  You have to start by clicking on one of the existing states, then go up to the Name field and start typing the name of the new state you’re working on.  If you don’t first click on an existing state, just typing a new name into the Name field will not activate the Add button that you’ll need in order to put a new state on the list.  Why?  I don’t know.  I’d call it a minor bug in MapTool and move on.

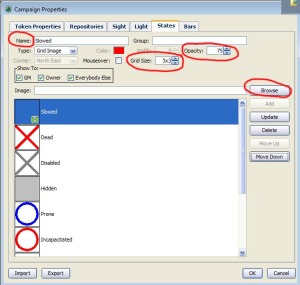
Let’s take the example of creating a state called Slowed.  We click on an existing state, then type “Slowed” into the Name field.  For Type, we’ll select “Grid Image” from the drop-down menu.  Let’s change the Grid Size field to 3×3 – this means that there can be up to nine little state squares displayed on a token at a time (2×2, the default, would only let us have four).  We should also set the opacity correctly – if the image is totally opaque, we won’t be able to see the token behind it.  I like to go with opacity of 75%, but feel free to experiment.

We’ll then need to specify what image we want to appear in a square on this invisible 3×3 grid that overlays the token when we turn on the Slowed state for it.  To do that, we click Browse and find a suitable image.  The big MapTool image download (which I’ll talk about more in a future post) has some nice state images, so we’ll use the Slowed image from that download.  Once we’ve selected it, we click Add.  The new state is now ready to use.

You’ll notice that this particular icon is a little greenish square with an hourglass on it.  All of the default icons that come with the big image download for MapTool are similarly built, and I decided to go ahead and use them.  The States window for my campaign looks something like this (there are more that are beyond the bottom of the window):

MapTool All StatesAlso, you can download the States file here and import it into your own campaign if you like.

Once you have all of these states defined, you can turn them on or off for any given token by right-clicking on the token, pointing to States, and then clicking on the appropriate state name.  Alternatively, if you’re setting a bunch of states at once, you can double click on the token to bring up the Edit Token window, go to the States tab, and then check the boxes next to all of the states that you want to turn on for that token.

If you turn on a whole bunch of states on a particular token, it will look something like this:

This is how I use states in my campaign, but I love the fact that it can be completely personalized.  If you want to do something different in your campaign, MapTool lets you do that.  It’s a pretty awesome program!

Chaos Scar third session – swallowed by frogs

We gathered at our place today for what is becoming a Monday holiday tradition – grilling and gaming!  Since we all had the day off for the Fourth of July holiday, just as we did a month ago for Memorial day, we decided to grill some burgers, ribs and veggies and play some D&D.  This was our third session in the Chaos Scar.  (Sessions number one and number two are at those links).

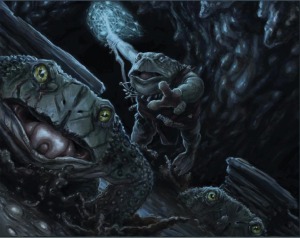
BullywugsOur party had just finished fighting bullywugs (frog people) on the first level of a ruined keep last time, and we began the day today by heading down a trap door into the next level.  Amazingly enough, our minotaur on a horse had no problem squeezing through the trap door.  🙂

We played through three battles today – some random bullywugs in a muddy chamber, some bullywugs and giant frogs in a big laboratory and some mud men in a vault.  The first battle was pretty good – nice and balanced – though my character ended up spending the entire battle stuck in the mud.   Fortunately, my Avenger, Kern, does have an at-will ranged attack, so I wasn’t TOTALLY useless!  Still, the mud that attacked at the beginning of my turn to immobilize me (save ends) was pretty annoying, but at least it only hit me and not the rest of the gang.

The third battle against the mud men was also easy, and we squeaked through the skill challenge that followed with success.  The real story of the day was the second encounter.  We fought three Giant Frogs (the link only works if you’re a DDI subscriber).  There were some other bad guys in the room, but this battle was all about the Giant Frogs.  These guys have an at-will power that lets them swallow a PC on a hit.  A swallowed PC is stunned (save ends).  That means that the character doesn’t get to do anything on their turn except take five damage (from the frog’s digestive acids, presumably) and make a saving throw.  If they fail the save, they don’t get to do anything next turn, either.

This was a miserable encounter for Nate, whose minotaur fighter was swallowed for pretty much the whole battle.  He didn’t get to take a single action until the battle was almost over (something like five rounds).  It was touch and go for the party (Nate and I both had our characters swallowed at least once), but Barbara used the healing abilities of her runepriest very wisely, which let us pull through.

This was a fun adventure on the whole, and we ended with enough experience points to move up to second level, which we’re all looking forward to.  Bree, our DM, did something I thought was really cool at the end of the session – she asked for our feedback on what was fun, what was not fun, and how to make the game more fun for us.  This leads naturally to some DM lessons.

  • The stun ability needs to be used very, very sparingly, if at all.  Certainly I wouldn’t recommend using a creature with an at-will ability that can stun (save ends).  If it’s once per encounter, okay.  If it can only stun for one turn and it is a recharge power, that’s probably all right.  But stun (save ends) at will is just too unfun for the players.
  • Similarly, monsters that daze or dominate should be used very sparingly as well.  Anything that keeps the players from doing stuff on their turns is not a lot of fun.
  • Adjusting the challenge level of encounters for a strong party is tricky.  Adding an extra monster with a stun (save ends) ability was not the way to do it in this case.  Consider increasing the damage dealt by the monsters and increasing their hit points.  MAYBE consider increasing their defenses, but don’t overdo it (having the PCs missing with all of their attacks is not fun either).
  • Flexibility is good, especially when the pre-packaged material just doesn’t work.  We faced a skill challenge that required Arcana and Nature as primary skills.  None of us are trained in either of those (except our Shaman, who was absent today).  Our DM rewarded creative uses of Athletics and Acrobatics on the fly, which made the challenge way more fun.
  • Think carefully before allowing a character a mount.  This hasn’t been a problem in our campaign so far, but we have one character with a mount, which seems really, really useful.  More speed, saving throws from being knocked prone, etc.  It’s all upside, and it seems to be pretty significant upside.  As a DM, I would make mounts an all or none proposition – either the players are all on foot, or they’re all on mounts.

Bree is doing a good job as a DM, and it’s clear that she really cares about getting better and making the game fun.  I think that’s the most important thing – a DM who is focused on fun for the whole party.  If you’ve got that, you’ve got a very important ingredient for a good game.

A nice little addendum – Bree ended up using some of my monster tokens for minions today.  They worked great!  I’m looking forward to using them in my LFR game (which Nate has said he wants to play in – cool!).

Advice I’ve received for my LFR session

For my last several posts, I’ve been talking about my decision to plunge into dungeon mastering a Living Forgotten Realms game at my friendly local game store, Enchanted Grounds.  That game will be three weeks from today.  I’ve already put the maps and minis together, so all that remains is for me to get comfortable with the adventure itself and then to run it well.

To that end, I’ve been seeking advice from other DMs, both here on my blog and over on EN World.  Here is the advice that I’ll be trying to keep in mind as I get ready to run my first adventure in public:

  • Be enthusiastic!  Enthusiasm from the DM means enthusiasm and fun for the players.
  • Make sure to really know the story of the adventure, not just the monster stats and skill challenge mechanics.
  • Get a feel for the personalities of the NPCs, especially in skill challenges.  Try to make them memorable and act as they would act.
  • At the table, set up a sheet that reminds me of who the PCs are:
    • Name
    • Class and race (optional, but it helps me for roleplaying)
    • Passive perception and insight
    • Defenses, including non-asset class defenses
    • Initiative modifiers
  • Have a flexible method of keeping track of initiative.  I’ve seen some DMs with little tags that they move around, or I’ve seen people using index cards.  I’ve also seen a dry-erase board, or ultimately D&D 4e Combat Manager (which I love, but not for this particular session).
  • When announcing whose turn it is, also announce who will be after that so that the next person can be thinking about what they plan to do.
  • Look for opportunities for bad guys to do cool or unexpected things – grabbing an item a PC drops, trying a stunt, etc.  This may encourage the players to think creatively, too!  Just make sure I’m ready to handle the rules for cool stuff.
  • Have the bad guys taunt the PCs or otherwise talk or yell or whatever during combat.  Make them characters, not just stat blocks with weapons.
  • When the battle is over except for a meaningless minion or two, just call it.  Don’t take the time to make the PCs hunt down that last little dude who can’t really hurt them.  Have him surrender, or just say that the PCs eventually finish him.

Naturally, these tips apply to dungeon mastering in general, not specifically for Living Forgotten Realms.  What other suggestions do you have in order for me to make this fun for myself and, more importantly, for my players?  Have I forgotten anything obvious?

LFR Maps – Finished products

Amazingly enough, I think I’m now ready for the Living Forgotten Realms game that I’ll be running in three weeks (WATE1-1 Heirloom), at least in terms of putting together the materials.  I blogged yesterday about the tokens I’ve created for the enemies and the day before about the maps that I drew in MapTool.

To bring things full circle, I thought I’d share the finished map files in all three forms:

I’m excited about the prospect of running this adventure now!  If our in-person game on Monday runs out of prepared material (unlikely, but you never know), maybe I’ll bust this out as an impromptu game.  More likely, I’ll ask if we can run it some future weekend before I run it for real.

Creating tokens for in-person gaming

Victory is mine!  In my last couple of posts, I’ve talked about the fact that I’m going to be serving as dungeon master for a real-life D&D game at my local game store, Enchanted Grounds, on July 24, 2010.  It will be a Living Forgotten Realms game.  I don’t own any minis (little statues to represent creatures), so I decided to make my own tokens (little flat representations of creatures) using the guidelines from Newbie DM’s blog.

After a little bit of trial and error, I succeeded terrifically.  The steps are as follows:

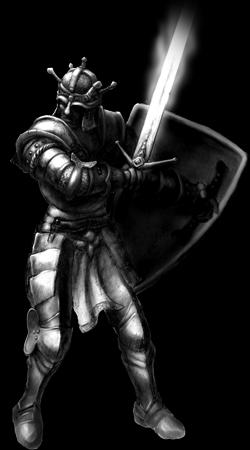
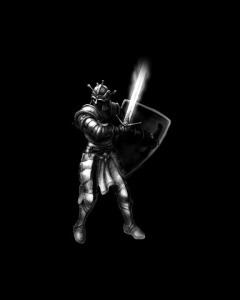
  • Find a good image for a token online, such as this one for a paladin: Paladin
  • Drag the token into PhotoShop
  • Resize the canvas in PhotoShop to be way bigger than the current image, and fill the additional background space to match the background that came with the image (I recommend using the eyedropper tool to get the right color and the paint bucket tool for the fill):Paladin2
  • Open up Token Tool and drag this new image from PhotoShop into Token Tool
  • Pick a nice border in Token Tool.  Also, go with 256 x 256 for the token size
  • Resize and re-center the image in Token Tool to look the way you want
  • Drag the image from the top right corner of Token Tool into PhotoShop:Paladin Token
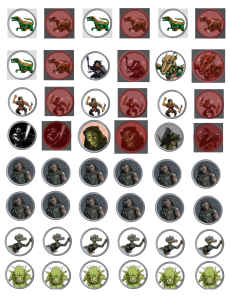
  • From here, follow the instructions from NewbieDM to copy the token to a new letter-sized image (8.5″ x 11″), duplicating the token image, dragging a bloodied layer over it and making the bloodied layer semi-transparent (note that minions don’t get bloodied, so minion tokens don’t need a bloodied image – you can put one minion on one side of a token and another minion on the other side)
  • Rinse and repeat until you have a whole sheet of these tokens:Token Sheet

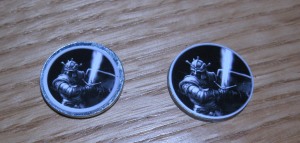
Play around with the size a little bit; I found that you actually want them to be a bit bigger than 1″ across, even though the ultimate size you’ll be punching out is 1″.  I like to have no border on my physical tokens – I like them to take up the whole 1″ circle if possible.  You’ll want to get a 1″ hole punch (I paid $10 for one at Michael’s – it’s pretty heavy duty) and a bunch of 1″ fender washers (I paid $8 for a box of 100 at the local hardware store) and a glue stick.  Below you can see my first pass at the paladin token (when I was aiming for 1″ exactly) and my second pass (when I went bigger) – the second looks way, way cooler.Paladin Tokens

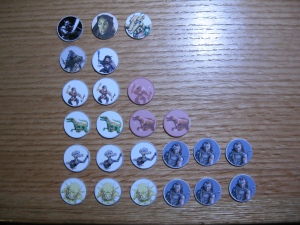
The overall result was awesome, in my humble opinion.  I made tokens for the paladin I play in LFR games (Rhogar), the Avenger I’m playing in my in-person game (Kern), Barbara’s dragonborn Runepriest (Zaaria), and the enemies I’ll need for the LFR module.  These include a wererat, a gnome arcanist, some gnome skulks, some guard drakes, and a whole bunch of human bandits (generally minions).  On the back of the bandits I put goblins and kobolds (common minions, I think).

Tokens

I’m really happy with the way these turned out.  I now have all of the minis that I need for my LFR game, and the maps that I shared yesterday ended up working out great when I used PosteRazor to print them out (I’ve just printed them in black and white for now as a proof of concept, but I know they’ll be fine in color, too).  I’m feeling good about this!

I’ll make the individual token files that I created available on the Downloads page of my blog, too, so you can get them all one by one.

Living Forgotten Realms DM Preparation – Maps

As I mentioned in my last post, I’ll be a first-time DM for a Living Forgotten Realms (LFR) session at my local store on July 24, 2010.  I’ve gotten the adventure module (WATE1-1 Heirloom) and read through it once, which is a good start.  The things I haven’t been certain about are what to do about maps and what to do about tokens.  I’m pretty sure I’ll follow Ismael_DM’s suggestion in the comments of using the tutorial on Newbie DM’s blog to make flat tokens using metal washers.  More on that as I actually give it a shot.  (Thanks for the tip, Ismael_DM!)

As for maps, I’m pretty sure I’m going to stick with what I know: MapTool! While I’d love to set up a projector with my laptop to project a MapTool screen onto the tabletop (and there is a person at the local store who does exactly this), I’m not ready to lay out the cash required to build that sort of thing.

I’m pretty sure, though, that I can build my maps in MapTool and then print them out as “posters” to put on the table for my players to use.  DM Samuel has talked on his blog about doing this, building the maps in a program called GridMapper (which I probably would have loved a few weeks ago before I learned how to really use MapTool) and then printing them out to scale using a program called PosteRazor.  I haven’t tried the printing part yet, but I figured I’d start by building the maps in MapTool.  Printing can come later.

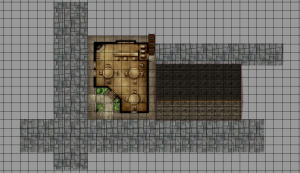
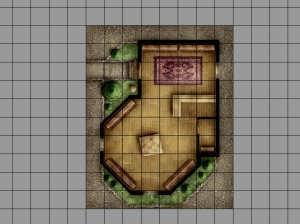
There are three combat encounters in the module I’ll be running (no real spoilers here).  There’s a battle outside of a random inn on a random street, a battle inside a shop and the room beneath it, and a battle that can take place either in a room in an inn, next to a stable, or on the city streets depending on what has happened earlier in the adventure.

The adventure describes how to build each encounter area using Dungeon Tiles.  Now, I don’t have any Dungeon Tiles myself, but Wizards of the Coast has a program called Dungeon Tiles Mapper that you can download for free and which contains images for a bunch of different tiles (not all of them, but a good variety).  Combining that with the big MapTool image download that I have, I was able to recreate the maps pretty well (in my humble opinion).  In some cases I tried to be as faithful as possible to the original, but there were some cases where I decided to make my own improvements.

First, I created a map that serves as both the inn exterior for the first battle as well as for the last battle (the downstairs part of the inn).  I used a texture to paint the cobblestone streets, a Dungeon Tile image for the inn itself, a stairs object from the big MapTool download and a roof object from that same download to represent the building next door.Inn Exterior

Next, I created the main room of the shop from the second encounter.  This was dead simple – one Dungeon Tile image.

Shop Interior

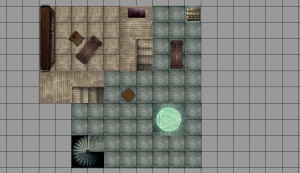
After that, I created the hideout beneath the shop.  This one was much more involved.  I used some Dungeon Tiles for the spiral staircase, the blue rune, the wooden stairs and the trap door.  I used some flooring from the Dungeon Tiles to paint the stone floor as well as the wooden platform floor.  I used images from the MapTool download for everything else (tables, bookshelves, chair, chest).  I think it turned out really nicely.

Hideout

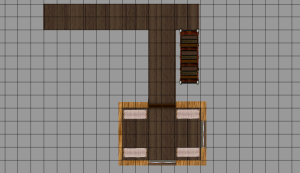
Next up was the room in the inn.  Nothing here was from Dungeon Tiles.  The stairs, beds and windows were from the MapTool download and the floors and walls were painted using various wood textures from that download.

Inn Room

Finally, the exterior of the stable.  It’s a lot like the inn exterior with the streets and the roof.  The horse and cart came from the big MapTool download.

Stable Exterior

My next task will be to try to print these out using the correct scale in PosteRazor.  Wish me luck!  And as always, I’d love to hear your feedback, whether about the maps themselves or about the general idea of printing these out to use at the table (probably on card stock).