Free encounter (with map and monsters): Steeder Breeder

I had fun posting a full adventure here last week, so I thought I would follow it up by posting a single encounter that I ran in a recent home game.

The encounter is called Steeder Breeder, and it is inspired by the monsters of the Advanced Dungeons and Dragons module “The Gates of Firestorm Peak.” I adapted parts of that adventure for use in my Dungeons and Dragons 4th Edition home campaign, including this encounter.

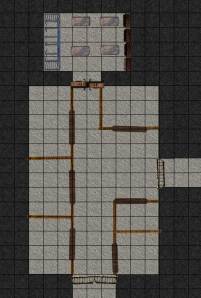
The encounter pits the players against a duergar spider master and his beasts – giant riding spiders called Steeders, along with young versions of those creatures. Full stats for the monsters are included in the adventure, along with an encounter map.

Please let me know any feedback you have on this encounter, the map or the monsters. Should I continue publishing this sort of thing in the future?

Download the full encounter here.

Monster: Duergar Spider Master

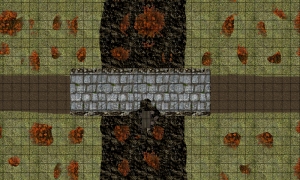
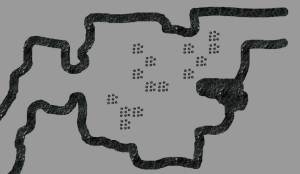
Map: Steeder Breeder encounter

Free D&D4e Adventure: The Staff of Suha (aka The Stolen Staff)

Edit 9/8/2011: I’ve updated this adventure; the new version is called The Stolen Staff, but it’s the same adventure. You can find more about it with updated maps at this link.


At Genghis Con this past weekend, I ran two Living Forgotten Realms games. One of them was a MyRealms game that was an adaptation of a non-Realms home game I had run a few months ago. The updated version ended up being a lot of fun to run, so I’ve cleaned it up and posted it here as an ordinary adventure for the world to use.

Download the full adventure here.

The adventure is called the Staff of Suha (edit: now The Stolen Staff). It’s a pretty straightforward delve, aimed at characters of around 5th level (give or take a level or two).

The party is summoned to the manor home of a minor noble named Charles Suha for a job. Charles explains that a family heirloom, the titular staff, was stolen three nights ago by what appeared to be a band of orcs. He asks the party to track the orcs down and recover the staff. Doing so requires that the PCs infiltrate the orc stronghold and fight their leader, Grak.

The PDF above has all of the details of the adventure, monsters, maps, etc. If you want bigger maps for use in a game table program, those are below. And if you want the MapTool file that I used to actually run the game, you can download that here (note that it is built using MapTool version 1.3b66).

I’d really appreciate feedback on this adventure. I’ve never shared a complete adventure before, and I’m curious to see what other people think. Any feedback, positive or negative, is very welcome.

And if you end up actually USING this adventure, please tell me how it goes at your table!

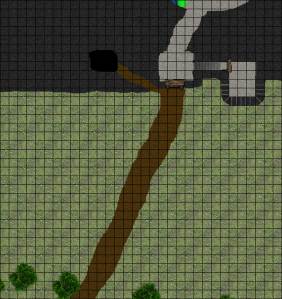
Overview map

Guard tower / Garbage pit

Temple

Grak’s Chamber

Meet the Monster Vault solo

I’m writing this post at the urging of two of the players in my Friday night online game in the War of the Burning Sky campaign. That’s unusual – I’ve never had someone tell me, “I can’t wait to see what you write on your blog about this!” but that’s exactly what happened this evening.

Well, I hate to disappoint my players – and I loved the solo I used from the Monster Vault tonight, so I thought I’d share my thoughts.

Lots of people have written elsewhere that solo monsters from the Monster Vault are vicious and exciting, and I have to say that I agree. My players had a run-in with a slightly modified Young Blue Dragon – a level 6 solo artillery creature. Since my party consisted of four level 8 characters, I nudged the dragon up toward level 7 (raising the defenses and attacks by a point or two, as I saw appropriate). I left its hit points alone, though. Also, since the encounter with the dragon was taking place in a semi-submerged temple, I gave it a swim speed equal to its fly speed.

I also threw two Stormlizards (level 9 brutes) into the mix. The encounter began with the party seeing the Stormlizards coming out of a hole in the temple floor. The dragon was sleeping farther down in the hole, and I intentionally gave it an initiative at the bottom of the first round. The Stormlizards emerged, the PCs set up their strategy and positioning for fighting them…

And then the dragon emerged.

This was the first solo my party has faced, and they’re at level 8 now. I wanted this to be special, and it was. The things that I especially loved about this monster were:

  • It gets an instinctive action at 10 plus its initiative roll, which lets it move its speed and make an area burst 2 attack. If it’s dazed or stunned and can’t make that attack, it instead shakes off the condition.
  • Both its breath weapon and its at-will lightning burst (area burst 2) deal lots of damage on a hit and half damage on a miss. They also target reflex, which was a scary surprise for my AC-heavy defenders.
  • When it becomes bloodied, it becomes scarier. It recharges and uses its breath weapon, and it develops an aura that deals lightning damage to anyone who ends their turn in the aura. Nasty.

The fight would have been easier if the dwarf fighter in the party would have been able to get to the dragon and mark it earlier, but he was stuck dealing with the Stormlizards. This initially left just our warlock and our shaman to face the dragon, and they were quickly bloodied.

I had a few simple terrain features in this encounter as well. I hand-waved the difficult terrain for the waist-deep water in the chamber – I didn’t want everyone moving at half speed throughout the battle. I included an altar that PCs could climb on for an attack bonus. I also had the dragon’s chamber include a magic fountain, which had long since stopped running, that contained two doses of magic water that would fully restore HP and shake off any negative conditions. My PCs used up both doses during the battle (and ironically didn’t get attacked again after that).

This was probably the most challenging fight my party has faced in eight full levels of play, and I think we all enjoyed it. The dragon fought hard – he was out to kill the PCs – but the heroes fought back harder. Winning was in doubt right until the end, and the party definitely considered fleeing. Victory was hard-earned and sweet.

In short, I really like my experiences with Monster Vault solos so far.

Post Script – farewell Thorfin!

This was the last session for the player who runs Thorfin, our dwarf fighter. He’s taking a job on the other side of the world that’s going to make it impossible for his schedule to line up with the rest of the gang for gaming, and we’re all sad to see him go. I tried to send him out in a blaze of glory by killing Thorfin off tonight, but the heroes wouldn’t be denied. Thorfin lives to fight another day, just in case our friend returns in the future.

And on that note, we now have an opening for one more player in our Friday night MapTool game in War of the Burning Sky. We could really use another defender. If you’re interested in joining the game, drop me a line at onlinedungeonmaster@gmail.com, or leave a comment below.

Creating D&D converts

Ah, the Christmas season.  That magical time of year when friends and family gather together and give the D&D fans in their lives the chance to talk about what a fun game this is and to turn them into brand-new gamers.

My wife’s brother and his family are staying with us for two weeks over the holidays.  My wife and I talked about D&D several times in the first few days of their visit, and they were interested in hearing more.

I received the Castle Ravenloft board game for Christmas, and my brother-in-law and I played it a couple of times .  Castle Ravenloft is a pretty good introduction to the concepts of D&D 4th Edition:

  • You have a standard and move action on your turn, with the option to turn the standard into a second move
  • You roll a d20, adding a modifier and comparing it to an armor class
  • There are D&D classes with the appropriate roles and flavors
  • There are D&D monsters with reasonable approximations of their feels

My sister-in-law joined in a five-player Castle Ravenloft game on the evening of Christmas Day, and while she was a little overwhelmed, she seemed to enjoy it.

So, the day after Christmas I showed them the online Character Builder (figuring that Essentials characters would be better for beginners) and helped them roll up their very first RPG characters.  My brother-in-law went with an elf hunter ranger named Homer, while my sister-in-law created a half-elf warpriest named Stasi.  My wife rolled up the sister of her beloved swordmage (another swordmage named Sora), and everyone was anxious to try out their new toys.

Sunday evening, the day after Christmas, we all sat down at the gaming table to really introduce my family to D&D.  I gave my in-laws a choice of three different low-level Living Forgotten Realms that I had prepared on the computer (using MapTool and my projector setup to run the game), and they chose to play a Luruar adventure in which they would be helping people at a magical college shore up some problems underground (LURU 2-3 Forgotten Crypts, Hidden Dangers, which I’ll be running at my friendly local game store this evening).  While my wife finished putting her character together, I ran my in-laws through a simple encounter with some orc minions, just so they got a feel for how battle works.

And then we were off!  We ran through the entire LFR adventure, with me scaling it down for 3 PCs on the fly.  Apparently I did a lousy job with the scaling, as I managed to kill off my brother-in-law’s character in the first battle (only the second time I’ve killed a PC).  All three of the bad guys in the battle had the ability to deal ongoing damage, and all three players had a horrible time with their saving throws.

The party decided that they wanted to take the dead character out of the catacombs and get him resurrected (rather than either give up or create a new character).  I introduced a cleric at the magical college who would resurrect him in exchange for a promise that they would work off the debt for the resurrection later.  The living PCs accepted the deal, but used some good diplomacy to persuade the cleric to give them a discount because the dead PC was working for the same organization as the cleric.  Good stuff!

Back into the catacombs, and the party made it through a skill challenge to get to the lair of the big bad guy.  They realized that the room was trapped, and they killed off the monster from the first battle that had caused them so much trouble before fleeing (a Kobold Rat Master, quickly renamed Rat Bastard).  They then retreated and took a short rest before coming back for the last two bad guys.  I had those characters move to a different part of the catacombs, and I’m glad I did – the original room for the final fight is pretty boring for the PCs if the trap is in effect.

They had such a good time on Sunday, that they asked what was next for the party on Monday!  They made it clear that they were really interested in the setting and wanted to do some more adventuring there, so I took a half day off work on Monday to whip up a brand-new adventure for them, which we ran Monday night.

This new adventure was a much better balance for the three-PC party.  They fought zombies, tracked some wraiths, bypassed a skeletal dragon (though they were sorely tempted to fight it), chased some skeletons through a series of rooms, and ultimately came to the crypt of a ghost who was using some portals to channel necrotic energy and bring more wisp wraiths into the world.  I’m quite proud of this encounter – it worked out even better than I had hoped.  I’ll write about it in more detail sometime – maybe I’ll write up the whole adventure as a PDF.

Anyway, I’ve created two new D&D players!  Now the trick will be to figure out how to keep their gamer fires burning.  We’ll probably play a little Gamma World before they head home, and maybe find time for one more D&D adventure (though I won’t have time to write a whole new one from scratch).  Maybe we’ll play using MapTool after they go home – who knows?  It’s been a fun experience so far, and I hope we get to play more in the future.

Virtual Table issues so far

Since getting my invitation to the Dungeons and Dragons Virtual Table beta a few days ago, I’ve had a chance to dig into the program a little bit more.  I’ve put together two encounters, and I plan to run one or both of them Monday evening at 7:00 PM Mountain Time (so if anyone is interested, feel free to join the game – look for 4e Home Encounters).  Keeping in mind that I’m spoiled by all of the features of MapTool, there are the issues I’ve discovered.

The obvious limitation at the moment is on the map creation side of things.  The Virtual Table has a few Dungeon Tiles to choose from, and I think it’s pretty clear that they plan to make Dungeon Tiles the main mapping tool in the future.  I won’t be surprised if they charge DMs to get access to new Dungeon Tile sets or something like that, but that might be overly pessimistic on my part.  The current Dungeon Tiles that are available are all for underground maps, and the maps I’m making right now are wilderness maps, so the tiles are useless for me at the moment.  The drawing tools that are available are… well, think “crayon drawing” and you’re on the right track.  I’m sure this will get better eventually, but it’s pretty painful right now.

The panels cannot be resized, which is a pain.  In MapTool, you can resize all of the various windows however you wish.  In Virtual Table you can either have the panel on the right side of the screen displayed or hidden, but not stretched or condensed.  That’s a big pain when you’re trying to select from multiple monsters in that panel that have similar names (Blackwinter Wolf, Blackwinter Wolf Pack Leader… they look very similar when their names are truncated).  Yes, you can get around it by abbreviating names, but it’s still a pain.

There’s no way to manipulate multiple tokens at once.  For instance, I’d like to be able to start with a map where all of the monsters are invisible (note: you CAN make monsters invisible, which is a good feature) and then highlight all of them and make them all visible at once, rather than having to click on each individual token and navigate through its menu to make that one token visible.  If the battlefield has a bunch of minions on it, this is just a pain in the butt.

On a related note, a useful MapTool feature that the Virtual Table currently lacks is a “View as player” option for the DM to look at the map.  When I’m drawing a map and I’ve set certain features to be visible to the players and others to be invisible, it’s VERY helpful to have a way for me to see what the map will look like to the players.  My Friday night players can tell you stories about the times that I’ve talked about the window that the bad guys are jumping out of or the wall of fire that’s coming toward them, only to find out that said window and wall of fire were invisible to my players!  Oops.  Not having a way to check that will make these issues crop up more frequently in the Virtual Table.  This is especially true since making parts of the map visible or invisible doesn’t discernably change anything that I’ve been able to see in the DM view.

Selecting a token is also a little strange.  You can click on a token and move it around and adjust its hit points, but its powers don’t show up on the right side unless you right click on the token and choose “View Token Detail” or select the token name from the monster drop-down.  This is something that should be automatic on a double-click or even a single-click.  Click the token, and its details should appear in the right panel (attacks, notes, etc.).

I like the fact that editing one copy of a token edits all of them.  If I add a new power to a token of which there are already five on the map and then save that change, all five of those tokens have the new power.  However, I believe it is impossible to edit a token’s image once you’ve created it.  I’m sure they’ll change this someday, but it’s a pain for now.

Finally, given that I like to run games in-person using MapTool and my projector, I would REALLY like a full-screen mode that I can run in a second window of the Virtual Table to put onto the table for the players to see.  There’s no full-screen mode right now, and even if there were I’m pretty sure I would need a second D&D Insider subscription in order to be able to run both the DM version of the campaign and the player version at the same time.  Obviously this is not the targeted use for the Virtual Table, but it would still be nice to have.  I’d also need to be able to run it without being connected to the internet (such as at a convention), which is probably never going to happen.

Overall impressions

So far, I’m impressed that there don’t seem to be many bugs per se in the Virtual Table.  Its features are limited, but the features that are in the tool all seem to work properly.  The features are SO limited, though, that playing with this program compared to something like MapTool is just a huge pain.  I’m going to keep playing with it just so I can get to know the tool, but there’s no way that I’m going to switch any of my regular games to it any time soon.

The killer features that the Virtual Table will probably be able to offer eventually are:

  • Automated character and monster importing from DDI tools
  • Full selection of Dungeon Tiles for quick map construction
  • An integrated lobby to find a game

Until these features come about, though, there’s no reason to use Virtual Table over MapTool except for curiosity and a desire to make the program better.  For those of you who don’t have beta invites yet and worry that you’re missing out – you’re not, unless you just like playtesting.  MapTool and its ilk are far better for now.  But the Virtual Table has potential to surpass them someday if those killer features get added.

In the mean time, I will keep playing with the program and posting updates here.  Actually running a game will be enlightening, I’m sure!

Finishing the Fire Forest (maps included)

Last night, my weekly online D&D 4e party finished the Fire Forest adventure, which is the second adventure in the War of the Burning Sky Series.  We only had four of the five players (sorry you couldn’t make it, Jaks!) but we played on for the climactic final encounters.

SPOILERS AHEAD

I haven’t written about each week of this adventure as I had the previous one, so I thought it would be good to recap our experiences.  The Fire Forest starts off with a couple of encounters with creatures of the forest that have been affected by the everlasting flames.  Amusingly, the very first encounter has two different fiery creatures fighting one another… with no way to hurt each other!  All of their attacks deal fire damage, and they’re immune to fire.  Oops.  Anyway, these encounters are good for giving the party a flavor of the Fire Forest, but that’s about all.

A devil, hired by the empire that is chasing the party, pops up a few times to harass and taunt the players before disappearing.  He ended up be an interesting little NPC to play with, but the party did finally get a shot to finish him off (I gave him a 50/50 shot of fighting for one more round or teleporting away – the dice said that he chose to fight, and die).The party met a dragonborn sorcerer who was researching the forest fire and attempting a ritual to put out the fire in a dryad’s grove.  The party went into some caverns to collect some mushrooms and flint that the sorcerer needed for the ritual and ended up fighting some fungus creatures.  They also found some treasures here, including a magical badge on the body of an eladrin knight.  There was a book that was discovered and discarded by the none-too-intellectual shaman in the party (I was amused by this later when we talked about it out of character).  The party helped the sorcerer put out the burning grove, though he was swallowed by the earth and surrounded by more fungus creatures that the adventurers went down to fight off.  This was a combined combat encounter and skill challenge, and I think it went pretty well.

Leaving the sorcerer to recuperate from his wounds, the party continued deeper into the forest and was contacted by a creature calling itself Indomitability, asking the party to silence some singing elves at a lake whose song was keeping him trapped in the forest.  The party agreed to help the creature (sort of).

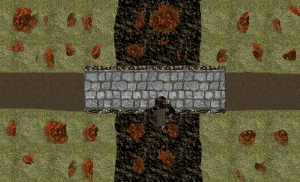
Next up was a bridge crossing a wide river, with a tower in the middle of the bridge.  A magical mace trap made it hard to get into the tower, but the PCs found a way and discovered some background information about the forest in a journal, plus some mysterious seeds.

Map of the stone bridge with the tower - gridded

Gridless version of the stone bridge with tower map


On the far side of the bridge lay a ruined elf village, crawling with more fiery forest creatures.  This was another forgettable battle that, in retrospect, I probably should have skipped over.  The village did reveal some flavorful little treasures, such as a necklace of ivory leaves that would let the wearer understand and speak Elvish – but only Elvish.  Cute.

Near the village was a shrine in the shape of a willow tree, with a ghast and some skeletons living around it.  After fighting off the ghast, the party met an eladrin spirit in the shrine and finally was able to put together more of the back story of the Fire Forest.  This led them to head down the river toward the village of the seela (the magical winged elves of the forest).  It was on this journey that they encountered and finished off the devil.  They also found one of the winged elves back at the bridge, being attacked by some of the other elves.  Curiouser and curiouser.

Tiljann, the seela

At the seela village, the party did some investigating and learned about the main dryad of the forest, Timbre, who had walled herself off in her grove.  They also learned of the lake nymph, Gwenvere, who had transformed into a hag and had stolen a relic of the elf hero who had been Timbre’s love.  The party found the hag and recovered the relic, which they used to get close to the dryad.  A skill challenge with the dryad ensued, which the party succeeded on, and she agreed to help them.

Gwenvere, the lake hag

Timbre, the Fire Forest dryad

This brought us to the final session, wherein the party needed to head to the bottom of a lake to fight the creature Indomitability, trapped in the form of a flaming stag.  They rowed out in two boats and were beset by aquatic ogres. The ogres succeeded in sinking one boat, but the party was able to get back to shore.

After a short rest on shore, three of the party members piled into one boat, one swam, and one walked along the lake bed with the help of some magic boots.  The boot-wearer was the one to draw the sword out of fiery stag, which allowed Indomitability to be fought.  The interesting thing here is that the boot-wearer is a hybrid swordmage-wizard and followed up drawing the sword with casting a Web to try to immobilize the beast on the lake bed.  Unfortunately, the party’s fighter was also caught in the Web.

Indomitability

Indomitability tossed the fighter deeper into the web and then used a power that would leave the fighter dominated if he failed a saving throw- which he did.  The fighter failed, I believe, six saves in a row to continually be dominated, all while the battle was moving toward shore and the fighter was left with nothing interesting to do, even against his allies.  I felt bad about the way that turned out.

Once the stag got to shore, it started trampling all over the place, leaving fire in its wake.  It took a lot of opportunity attacks but dealt a lot of damage in the process, killing some of the seela.  I felt good about the range of the battle – it wasn’t held all in one little area.  I also used some of the Monster Vault dragon rules for Indomitability, giving him an extra attack at 10+his initiative roll and making it easier for him to shake off conditions that would leave him helpless.  Those made him much more interesting as a solo.

In the end, the fighter in the party did shake off the domination and got to the battle just in time to deal the killing blow.  That was quite satisfying for all concerned!

Now the party is finally able to leave the Fire Forest and continue on its quest southward, toward the town of Seaquen.  I believe we’ve now played either 14 or 15 sessions together.  I’m so happy with this online game – I’ve got a great group of players.

Virtual Table – first experience

Well, it seems that Thursday, December 9, was the day that Wizards of the Coast decided to really open up the Virtual Table to lots and lots of interested players.  I got my invitation, as did a whole bunch of other people I talked to.  So, I’m not a special snowflake, but at least I get to try this out!

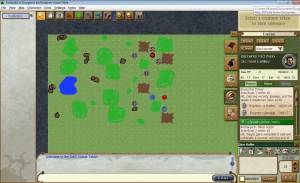
I spent probably about two hours playing with the Virtual Table today, and I immediately had a goal in mind: Set up the first 4e Home Encounters adventure!  I had already built this encounter in MapTool, so all I had to do was re-create it in the Virtual Table.

The login process with the beta invite is a little unusual.  I received a welcome email with links to FAQs, five “passes” that I could use to play in Virtual Table games, and a link to the beta group on the WotC home page.  From that group, I had to find a link to a forum post that had the actual link to the beta itself.  From THAT link, I got a pop-up that asked for a user name and password.  Sheesh, what a lot of work!

Once I was in, things got a little easier.  I could browse open campaigns with short descriptions and indications of how many seats were open.  But I didn’t have time to play – I wanted to try setting up my own game.  Thus, I used the New Campaign button.

When you create a new campaign in Virtual Table, you start by editing its name, campaign system (which edition of the game you’re using), campaign world (core world, Forgotten Realms, etc.) and campaign format (ongoing campaign or one-shot).  I like the nod to older editions of D&D, though I’m not particularly experienced with them myself.

After you edit the info, you click the Launch button.  At this point, a Java program loads up and you are left in the map editor window.  All I’ve done so far is draw a map and create monster tokens.

It took a little bit of fooling around with the controls, but I was ultimately able to draw a rudimentary map for the first 4e Home Encounter.  Dungeon Tiles weren’t going to be an option because the beta currently has only tiles for, well, dungeons.  This first encounter takes place in the wilderness, so all of that stone wasn’t going to be helpful.  This meant that I had to draw on the virtual battle mat – old school!

The tools available for drawing are very simple.  Think Microsoft Paint with fewer options.  You can draw freehand lines, straight lines, empty ovals, filled ovals, empty rectangles and filled rectangles.  You can adjust the thickness of your lines to narrow, medium or thick.  You have a choice of six colors for your lines and shapes – red, yellow, black, blue, brown, or green.  You also have a choice of backgrounds – Battle Mat, Sand, Dirt or Grass.

Yes, I know that this is just a beta, and I’m guessing the drawing tools will be improved later.  But in a strange way, I kind of like the limited choices right now.  It feels more like drawing on an actual battle mat, and it makes it so that I’m not focused on making the map look awesome – I’m just making it look serviceable for my players.  Drawing the map did not take long at all – maybe 10 minutes once I understood the controls.

The final step for me was creating the monsters.  You begin by picking the monster image token that you want.  The selection here is limited for now, too, but I was able to pick a wolf and an orc, and I used a drake instead of an alternate wolf picture (there are two different kinds of wolves in this encounter).  Once you have the picture, you name the token and enter its max hit points and defenses.  You can also enter in notes.  Finally, you create powers.

Now this is an area where the creation is easy but the results currently stink.  You can create a “power” and within that you can create various die rolls associated with that power.  To run the die rolls, you have to click each button separately.  So, if the wolf has a Bite power, you create the power and any notes you want to see alongside it, then a die roll button that will display “Bite versus AC” and then the result of 1d20+10 or whatever.  You can also create a separate die roll button that you can call “Bite damage” that will display “Bite damage” and then the result of the damage roll.  When you want your wolf to attack a PC, you click the “Bite versus AC” button, ask if it hits, and if so you can click the “Bite damage” button.  It’s nowhere near as flexible as MapTool, of course, but it works.

I’m going into oral surgery Friday morning (I’ve scheduled this post to go up later in the day on Friday), but I’m hoping to run this encounter a time or two, perhaps over the weekend.  I’ve also put a post on EN World to say that I’m going to run it Monday evening at 7:00 PM Mountain time for anyone who wants to play, just to give the program a test drive.  Feel free to drop me a line via email or in the comments if you’re interested in playing with me (assuming you have a beta invitation yourself, of course).  Let’s see how this runs!

Map – Collapsing Bridge

I’ve realized that people seem to love maps.  And I suppose that makes sense.  Those of us who play D&D online, for instance, love being able to pick up a map and load it into our game and go.

I tend to draw most of my maps myself in MapTool.  Now, I’m no great artist, but MapTool makes it pretty easy to draw simple maps that look pretty good.  Given that the online D&D community seems to love maps, it only makes sense that I should start sharing these on my blog.

Today, I’ll share a map from the War of the Burning Sky’s second adventure, the Fire Forest.  This particular map is of a collapsing bridge.  The party encounters this bridge over a deep gorge (60 feet deep) with the remains of the wagon at the bottom of the gorge.  Flaming brush surrounds the area off the road, and more flaming brush lines the bottom of the canyon.  A section of the bridge has crumbled away.

I’ve included both a no-grid and a square grid version of the map.  Which version is more useful for you?  Should I also include a PDF from PosteRazor that would let you print out and tape together the map for use at a physical table?

Please let me know if you want me to keep posting maps – I’ve got lots of them!

Images for use with MapTool

Edit September 5, 2014: It appears that sometime in the last 4 years, rptutorials.net has gone away so this post is significantly less useful now. Alas, my apologies.


I’ve talked at length about how much I love MapTool, but it’s important to understand that having the MapTool software itself is only half the battle. You also need images.

MapTool comes with a few images pre-installed, but if you want maximum power and flexibility in creating maps and running games, you’re going to want a larger library of images.  This includes images of objects such as tables, stairs, roofs, etc.  More importantly, though, it includes textures – dirt, grass, stone, snow, water, fire, wood and many more.  With textures, you can easily draw great-looking maps.

So where do you get these images?  Why, at rputorials.net!  What you’re looking for is a big file with a lot of data – and that means a torrent.  No, not some illegal pirated stuff – this is just a big file put together to share for the role-playing game community.  The link to that file is here.

Once you have the file downloaded and saved to your MapTool directory (or wherever you like), you’ll need to tell MapTool where to find it.  Open MapTool and go to File – Add Resource to Library.  Browse to the location of the library on your computer, and voila!  You’ve got images!

The folks over at rptutorials.net have put together videos about drawing maps and so on, which I won’t even bother to try to replicate – they’ve done it right the first time!  Here instead are just a few basic pointers for creating nice-looking maps in MapTool.

  • Start with a new map, picking a good background color or texture.  I’ll often pick a grass texture for an outdoor map and either a gray color or stone texture for a dungeon map.
  • Click on the Drawing Tools icon and select the Background Layer from the window that pops up.  This is important!  You don’t want your floors and walls in the same layer as your tokens – the tokens should be on top.
  • To make a building, click on the top left box in the drawing window and browse to a stone texture.  Click on the top right box and browse to a wood plank texture.  Set the line width (the stone) to about 40% of your grid box (I use 20 pixel walls for a 50 pixel grid).  Select the rectangle tool from the top menu.  Click on a spot, let go, drag out a box, and click again.  Poof – it’s a building with stone walls and a wood floor!
  • The same process works with irregular filled shapes, too (cavern rooms, lakes, lava pools, pits, etc.).  If you don’t want a border (I usually don’t when drawing caves, for instance), left click on the white box with the red slash through it (this will set your border color to “none”).  Use the freehand line tool instead of the rectangle tool to draw these.
  • To just draw lines, right click on the white box with a red slash through it (that will set your fill color to “none”) and left click on the top left box.  Select the line texture you want.  Select the line width you want.  If you want freehand lines or straight lines, select the appropriate tool from the upper toolbar.
  • For objects, go back to the Interaction Tool (the default tool on the upper left toolbar, to the left of Drawing) and select the Object layer.  Browse to things like doors, stairs, beds, etc. and drag them onto the map.  Resize them by clicking on the box in the lower right corner and dragging.
  • Don’t use TOO many objects in maps that people will be accessing online.  The more different types of objects you have on your map, the longer it will take to load.  Try to draw background objects (such as pits) rather than using an actual object image whenever possible.
  • Feel free to add multiple maps to your campaign file and set them as not visible to players, then make them visible as needed during the game session.  This seems to help with loading times as well.

That should get you started on the path to creating great maps in MapTool!

United Kobolds of the Living Forgotten Realms

This evening I ran a Living Forgotten Realms game at my friendly local game store, Enchanted Grounds.  The amazing thing is that it wasn’t a big deal.

You might remember my post from July where I ran my first LFR game at the store.  That was a big deal to me.  I spent a month preparing for that game.  I talked on the blog and on EN World, asking for advice about running a game in public.  I had to work to create paper maps and tokens for the bad guys.  I read and re-read the adventure to make sure I understood the ins and outs (even though I had been through it already as a player).  I over-prepared.  And to be fair, I had a blast running the game.

This time I realized at some point over the weekend – oh yeah, I’m running a game on Tuesday!  No problem.  It helps that I had already run this particular adventure at TactiCon and I therefore had all of the files I needed on the laptop in MapTool, ready to run with the projector.  (This is TYMA 2-1 Old Enemies Arise.) Still, I really didn’t stress about it.

Fortunately, I didn’t need to stress.  Aside from my accidental unplugging of the projector during the game (twice – but fortunately never in combat), it all went very smoothly.  The party battled some kobolds by the side of the road.

They met with some farmers to investigate the kobold menace.

They fought in a cave full of spike traps.

And they battled the big bad guy in another part of the cave.

The first battle was fair – the defender took some serious damage, but never dropped.  The spike cave battle was lots of fun – I got to push and pull players into spikes all encounter long, when they weren’t stumbling into them on their own.  The final battle was kind of boring – I really need to find a way to spice up that encounter if I ever run this adventure again.

Part of what I enjoyed about this particular adventure was that two of my players are DMs whom I respect – Rich and Aarun.  You might remember Aarun’s name from my very first experience with Living Forgotten Realms – he was the dungeon master for my first game, and I absolutely LOVED the experience of playing under him.  He mentioned this evening that the blog post where I mentioned his name (with its unique spelling) shows up when you Google that name.  Well, Aarun – here’s another Google hit for you!

Anyway, it’s great to run a game for people you respect and for them to clearly have a good time.  I also hung around the store afterward to chat with Wes, another DM I greatly respect.  I’ve already signed up to play in some LFR games in December, and I specifically sought out games that Aarun and Wes are running.  If I can run a game for that type of person and they have a good time, I feel good about my dungeon mastering!