Madness at Gardmore Abbey – MapTool campaign file

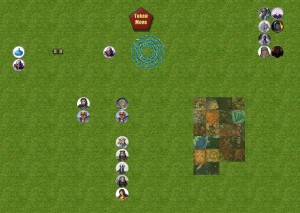
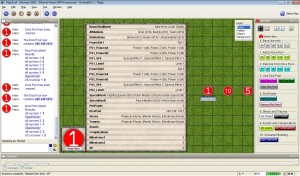
At long last, I have finished putting together my complete MapTool campaign file for the Madness at Gardmore Abbey adventure. Huzzah! You can download it right here.

I’m pretty sure this is the largest MapTool campaign file I’ve built to date (around 33 MB), and I’m quite happy with it. It has all of the maps, all of the monsters, all of the Deck of Many Things tokens, all of the traps. I’ve got a template token for PCs and a template token for monsters.

The campaign file consists of eight maps with encounters from the adventure, plus a ninth map that’s a holding pen for NPCs, the Deck tokens and some background stuff for the campaign (library token, templates). The maps are labeled according to the encounter numbers that are included on the map. For instance, the map named 01-04 Village has the encounter maps that take place in the outer part of Gardmore Village (Encounter 1: Main Gate; Encounter 3: Double Talk; Encounter 4: Ruined Garrison; plus the overland map of the abbey and the map of Winterhaven).

Because of the number of maps that are in this adventure, I’ve included Wolph42’s Bag of Tricks macros – specifically the Teleport Pads. To use these, you’ll need to click the “Back of Tricks Macros” button in the Campaign pane and then the Initialize Pads button. Once you’ve done that, you can drag tokens around the various maps by dragging them to the teleport pad corresponding to the map where you want them to go. The 01-04 Village map has the portals to every other map.

I hope that folks find this campaign file to be useful. I know that I’ve had a lot of fun with Madness at Gardmore Abbey so far, and I’m looking forward to running the rest of the adventure!

– Michael the OnlineDM

Madness at Gardmore Abbey: Session Five

Past sessions: Session OneSession TwoSession Three, Session Four

After a six-week break, I was finally able to gather again via MapTool with my wife, her brother, and his wife for our continuing adventure in Gardmore Abbey. At this point I pretty much have the entire adventure prepared in MapTool (still a few wrinkles to work on before it’s done, though), so I’m ready for unexpected twists.

As always, SPOILERS AHEAD.

The party’s current quest is to help Sir Oakley, paladin of Bahamut and scion of Gardmore Abbey, to recover three relics he needs in order to purify the main Temple of Bahamut in the abbey. Sora the dragonbornn swordmage, Homer the elf hunter and Stasi the half-elf warpriest are currently with Sir Oakley in the catacombs beneath the abbey.

At the end of the last session, they had finished a difficult battle against undead monstrosities and had found a magic fountain of Bahamut that granted some necrotic resistance. Some of them were talking about an extended rest, but they really weren’t ready for that yet (not enough adventuring). As they stood by the Font of Divine Health discussing their plans, they heard some footsteps from the stairs leading up to the Temple.

Homer crept over to the nearby door and tried to peer through the keyhole (sure, let’s say there’s a keyhole). His perception roll was terrible, though, so he could only tell that there were some humanoid-shaped creatures (more than two), that they were talking (but he couldn’t make out the language, let alone what they were saying) and that they were carrying a light source (but he couldn’t tell what it was). He decided to head around to the Memorial Chamber to spy from there, but he wasn’t very stealthy about it. As he got into the Memorial Chamber, he heard footsteps hurrying back up the stairs and saw the light around the corner getting dimmer.

The rest of the party came over to join Homer and they decided not to pursue the other people.

Though I didn’t tell them this, they had just had their first encounter with the rival adventuring party. I was supposed to have made it so that the Altar of Glory had already been cleared out by the other party when our heroes arrived, but I forgot. So instead I decided to have them come down, find the Altar of Glory already cleared by our heroes, and then skedaddle when the heroes detected them. It worked out really well.

After this, the group pressed on to a large chamber in which they could hear something heavy dragging along the floor in the darkness.

Encounter 27: Great Hall

Vadin Cartwright

Since they weren’t particularly stealthy in entering this chamber, Vadin Cartwright called out in a cold voice, “Ah, we have visitors. Get them, friends!” This was the first Villain encounter, where a bad guy was drawing cards from the Deck of Many Things. Vadin drew the Knight, which gave him a flanking buddy. I ruled that he could use a move action to move the Knight, who would otherwise have been useless since Vadin was so far from the action.

The basilisk was the first problem. Sir Oakley, Sora and Stasi were clustered together, ripe for the basislisk’s venomous gaze. Some vampire minions soon closed to melee and started grabbing PCs left and right. Homer did his traditional chicken impression, staying out of the room and shooting from the hallway. Vadin Cartwright himself waited until the end of the second round to make his move, coming in with a terrifying howl that stunned the three melee characters.

Since stunned can be such an un-fun condition, I house rule it a little differently at my table:

OnlineDM’s house rule for stunned: A character who is stunned is dazed and cannot attack.

I’ve experimented in the past with saying that a stunned character can’t take standard actions, but if someone wants to make a heal check or take second wind or total defense as their entire turn, I’m fine with that.

In this case, Stasi used her one action to grant Sir Oakley a saving throw and then made her own saving throw at the end of her turn, so the team was back in the game quickly. Vadin was a tough opponent to hit; I ended up lowering his AC from 26 to 24 (de-soldierifying him) just because I saw that this encounter could get grindy otherwise. I also left the Snaketongue Vampire out of the fight since we had only three PCs plus Oakley (who is a full participant in combat).

Vadin drew the Donjon card when he was down to two-thirds of his starting hit points. The villain effect on this card gives adjacent enemies a -2 penalty to attack rolls, which is exactly the kind of ability I hate. Anything that results in missed attacks slows the game down. So, I changed it to an aura that gave enemies vulnerable 2 to all damage. When the Sun card was drawn later, I had the same problem; as written, it gives the villain concealment, which would be another -2 to hit. I switched this to a fiery halo that dealt 5 fire damage to the first PC to hit Vadin in melee (which, combined with the vulnerability, was painful and fun).

During the battle, Homer eventually dashed over to the niche in the wall where Vadin was keeping a vial of a strange red liquid. This vial was glowing, and Homer couldn’t resist picking it up and taunting Vadin with it. This definitely got Vadin’s attention, which was a good thing since Oakley was unconscious and on two failed death saves and Stasi the healer had just joined him on the ground. My brother in law asked if Homer could still shoot his bow while holding the stopperless vial, and I said sure. He carefully lined up his shot and critically hit Vadin! But some of the goop in the vial crept out and onto his bow hand; that’s some bad news right there.

Once Vadin had turned his attention to Homer, Sora was able to perform first aid on Sir Oakley, letting him spend his second wind, and he then healed Stasi. With all four characters back in action, they were able to take Vadin down. Oakley had no surges left; Sora had two, I believe. It was an exhausting series of fights for the party, but they had acquired three more cards from the Deck of Many Things from Vadin. They also found a magic sword and some money in a compartment in the room. The sword is called Moonbane and is an ancestral item from the Markelhay family that currently rules Fallcrest. I decided to make it a +3 sword since it would otherwise be pretty unexciting (as written, it’s +2). Sora was happy to wield it. This also switches her from a broadsword to a longsword, so she should hit more often now.

The group then spent the rest of their day holed up in the secret chamber in the catacombs, with Stasi tending to Homer. The red liquid had left Homer infected with unpleasant boils up his left arm, and he lost a healing surge. Stasi’s healing skill wasn’t very useful for Homer, but at least he didn’t get any worse. After an extended rest in the chamber, Homer woke up feeling better (a good endurance check), and the disease was cured – although he carries the scars still.

Red goop diaries

Next question: What to do about the red liquid? Vadin had raved about Tharizdun, the Chained God, and the substance definitely seemed evil. Homer and Stasi decided to pour some holy water from the Font of Divine Health in the next room into the vial to see what would happen. What happened was that the water started bubbling over, and Homer threw the vial against the far wall. The red goo seemed to have emerged mostly unscathed, and it started creeping up the wall. Sora scooped it up in a bottle that previously held a healing potion, and stoppered the thing shut.

After some discussion, the group decided to tie the bottle to a rock, unstopper it and drop it in the fountain. The font started frothing over and turning a bit pinkish for a minute or two before calming down. The magical energy from the fountain has dissipated, but the overwhelming evil of the red stuff doesn’t feel strong any more.

From here, the adventurers explored the easternmost chamber of this floor They opened a door to reveal – a curtain of dragon scales obscuring the next room! But beyond that lay more sarcophagi – and undead monsters.

Encounter 26: Dragonslayers’ Tomb

A couple of ghasts emerged from the darkness, followed by a wraith surrounded by swirling winds (a vortex wraith). The curtain of dragon scales blocked Homer’s shot into the room, so Sora yanked it to the ground. The vortex wraith started off being dazed thanks to Homer’s disruptive shot, so I ruled that its aura wasn’t working at first. Once it started up, though, its automatic damage and pulling of PCs toward the wraith had a major effect on the battle. Fortunately Stasi and Sir Oakley were doing their best to keep dealing radiant damage, and Sora’s Moonbane sword was ignoring the wraith’s insubstantiality.

Meanwhile, a regular non-vortex wraith had phased through a wall to come after Homer in the hallway. He pulled out the Sun card and managed to activate it to give himself some concealment, but the wraith’s invisibility every time it got hit made it a tough fight.

Things only got worse when a second vortex wraith joined the battle in the third round. Sir Oakley finished off the first one, which promptly exploded, sending the party flying all over the place. The one remaining vortex wraith focused on Sora, bringing the dragonborn to the ground briefly before she was rescued by Stasi and the wraith was at last destroyed.

Once all of the monsters were dealt with, the explorers discovered one of the relics Sir Oakley had been seeking – the Bowl of Io’s Blood. Huzzah! A great victory was shared by all.

I’m still having a ton of fun with this adventure. Ad-libbing the reaction of the red goo to the holy water was lots of fun, and I plan to have Homer’s scars from the disease come into play in the future. The mystery of the other people investigating the catacombs has worked out beautifully. And with five cards in their possession, the group is much more interested in and aware of the Deck of Many Things and its power. Now that I have almost everything prepped in MapTool, I’m ready for whatever they want to do next.

– Michael the OnlineDM

Marvel Heroic RPG MapTool framework – minor update

Just a quick post to let anyone who’s using my Marvel Heroic RPG framework know that you’ll probably want to re-download it. @SenatorChatty discovered that my Build Character macro totally left off the part where it’s supposed to ask you to pick specialties for your hero! Oops.

It’s fixed now. Thanks Christopher!

Earlier post on this topic – click here.

– Michael the OnlineDM

MapTool – Creating monster power macros with a macro

Strap in, macro lovers – you’re in for quite a ride!

As I mentioned in my last post, I’ve wanted for a while to create monster power macros using another macro. I’d like to be able to click an “Add Power” button, specify the details of the attack, and see a new button for that attack get created. And now, at long last, I’ve done exactly that.

It’s not a simple macro, to be sure. But I think it’s quite slick. Read on, if you dare! And note that you can download the macro here. My current D&D 4e campaign framework is available here.

First, some new properties

As I was going through this process, I realized that I would need to update my monster properties to better handle the tracking of encounter and recharge powers. I previously handled this with properties E1 through E7, which begin with a value of 1 and then get set to 0 once the encounter power is used, after which it can’t be used again. I did similarly with R1 through R5 for recharge powers.

Since my new macro is going to be creating encounter powers, it needs to know which encounter power slots are already taken. The cleanest way to do this was with pairs of JSON arrays as properties.

EncounterPowersCharged:'[1, 1, 1, 1, 1, 1, 1, 1, 1, 1]’
EncounterPowersDeclared:'[0, 0, 0, 0, 0, 0, 0, 0, 0, 0]’
RechargePowersCharged:'[1, 1, 1, 1, 1, 1, 1, 1, 1, 1]’
RechargePowersDeclared:'[0, 0, 0, 0, 0, 0, 0, 0, 0, 0]’

These are ten-item arrays, allowing for ten separate encounter powers and ten separate recharge powers. When I assign a new encounter power to one of the slots, I change the appropriate slot in the EncounterPowersDeclared array to 1. When that power is used up, it changes the appropriate slot in the EncounterPowersCharged array to 0, preventing it from being used again. And so on for recharge powers.

More on this later.

Macro structure

This macro has three main sections.

– There’s the first input box, where I ask for the name of the power, what range it targets, whether it’s standard or minor or whatever, what order I want the power to appear in, the usage (at-will, encounter, recharge), how many targets it has, whether it requires an attack roll and/or damage roll, and whether there are various other lines of text in the power (a Requirement line, a miss effect, etc.).

– There’s a second input box, where I ask about extra bonuses to the attack roll, what level of damage is being dealt, and what should appear in the various lines of text of the power.

– There’s the actual construction of the macro command text, which gets rather complicated.

First input box

I’ll present the code as a big dump, then explain it.

[h: listActionTypes = “2. Traits, 3. Standard Actions, 4. Move Actions, 5. Minor Actions, 6. Triggered Actions”]
[h: listDamageLevel = “Minion, Very Low, Low, Normal, High, Very High, Extreme”]
[h: listUsage = “At-Will, Recharge, Encounter, Not Applicable”]
[h: x = input(
“MacroName | NewPower| Power Name || WIDTH=20”,
“TargetRange | (M1) | Targets-Aura-Etc || WIDTH=10”,
“ActionType | ” + listActionTypes + ” | Action Type | LIST | VALUE=STRING SELECT=1″,
“SortOrder | 1 | Sort order || WIDTH=2”,
“Usage | ” + listUsage + ” | Usage | LIST | VALUE=STRING SELECT=0″,
“NumberOfTargets | Single-Target, Multi-Target, No Targets | Number of Targets | LIST | VALUE=STRING SELECT=0”,
“AttackRollRequired | 1 | Attack roll? | CHECK | “,
“DamageRollRequired | 1 | Damage roll? | CHECK | “,
“RequirementIncluded | 0 | Requirement line? | CHECK | “,
“PreAttackEffectIncluded | 0 | Pre-attack effect? | CHECK | “,
“MissEffectIncluded | 0 | Miss effect? | CHECK | “,
“AftereffectIncluded | 0 | After-save effect? | CHECK | “,
“PostAttackEffectIncluded | 0 | Post-attack effect? | CHECK | “,
“SpecialEffectIncluded | 0 | Special effect? | CHECK | ”
)]
[h: abort(x)]

The first three lines just set up some string lists that the user will be able to choose from for action type, damage level and usage. Then I have a big input box where I ask the user to make some choices. It’s probably easiest to just look at it in action:
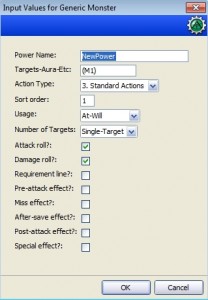
The user is invited to type in the name of the power and any information about its range (such as M1 for melee 1 or AB1 in 10 for area burst 1 within 10 squares). A drop-down lets you pick whether it’s standard, minor, etc. The sort order only matters if you have multiple powers of the same action type – which standard action do you want first, then second, etc. The targets are either Single-Target, Multi-Target or No Targets. Then we have a series of check boxes that ask whether different possible parts of a power are present in this power. Note that the default options assume an attack roll and a damage roll and nothing else, but that’s all easy to edit with a click.

Second input box

[h: DefenseTargeted=’AC’]
[h: Enhancement=0]
[h: DamageLevel=”Normal”]
[h: DefaultDamageLevel=3]

Here I set up a few default values. These are useful in case I’ve said in the first input box that the power has no attack roll, in which case I won’t be picking a defense to target or a possible enhancement for critical rolls. That can be a problem later in the macro, so I need some defaults.

The DefaultDamageLevel is a variable that determines where the starting position in the damage drop-down will be. Position 3 is “Normal”. But in certain cases I want to default to things other than “Normal”:

[h, if(getProperty(“Role”)==”Brute”): DefaultDamageLevel=DefaultDamageLevel+1]
[h, if(Usage==”Recharge”): DefaultDamageLevel=DefaultDamageLevel+1]
[h, if(Usage==”Encounter”): DefaultDamageLevel=DefaultDamageLevel+2]
[h, if(NumberOfTargets==”Multi-Target”): DefaultDamageLevel=DefaultDamageLevel-1]
[h, if(getProperty(“SubType”)==”Minion”): DefaultDamageLevel=0]

Brutes deal more damage than other creatures. Recharge powers should do a bit more damage than normal, other things being equal. Encounter powers should do more still. Now, if the attack hits multiple targets, that should bring the damage down a bit. And of course if we’re building a power for a minion, we should use fixed minion damage.

Okay, now things start getting complicated.

[h: RechargeTargetInputString=if(Usage==”Recharge”,encode(“RechargeTarget | 2, 3, 4, 5, 6 | Recharge Target | LIST | VALUE=STRING SELECT=3″),””)]

What’s going on here? Well, I’m getting ready to build another input box. I want to be slick with this one, so it’s only going to ask the user for information that’s relevant. This means that if I’m building a recharge power, I want to ask for a recharge target number, but if I’m building an at-will or encounter power I don’t want to bother asking for a recharge number.

So, I create a string that will show up in the next input() command for the recharge target line. If I am building a recharge power, the string will be encoded to ask for a variable called RechargeTarget, which could range from 2 to 6. It will ask the user for a Recharge Target value in a drop-down list and save the choice as a string. The default selected in the drop-down will be at index 3 of the list which, because MapTool starts counting at 0, is actually the fourth item – which is the number 5, the most common recharge target.

However, if I’m NOT building a recharge power (Usage is anything other than Recharge) then instead of encoding this big string, I just set RechargeTargetInputString equal to “” – a blank string.

I then do similar things for lots of other possible inputs.

[h: DamageRollInputString=if(DamageRollRequired==1,encode(“DamageLevel | ” + listDamageLevel + ” | Damage Level | LIST | VALUE=STRING SELECT=” + DefaultDamageLevel),””)]
[h: EnhancementInputString=if(DamageRollRequired==1,encode(“Enhancement | 0 | Extra damage on crit? | CHECK | “),””)]
[h: ExtraAttackBonusInputString=if(AttackRollRequired==1,encode(“ExtraAttackBonus | 0 | Extra attack bonus | | WIDTH=2″),””)]
[h: JustEffectInputString=if(AttackRollRequired==0,encode(“JustEffect | . | Effect line | | WIDTH=50″),””)]
[h: DefenseInputString=if(AttackRollRequired==1,encode(“DefenseTargeted | AC, Fortitude, Reflex, Will | Defense targeted | LIST | VALUE=STRING SELECT=0″),””)]
[h: HitStringInputString=if(AttackRollRequired==1&&DamageRollRequired==1,encode(“HitStringWithDamage | damage | Hit line after damage roll | | WIDTH=50”),if(AttackRollRequired==1&&DamageRollRequired==0,encode(“HitStringNoDamage | . | Hit line | | WIDTH=50”),if(AttackRollRequired==0&&DamageRollRequired==1,encode(“EffectStringNoAttack | damage | Effect line after damage roll | | WIDTH=50″),””)))]
[h: RequirementInputString=if(RequirementIncluded==1,encode(“Requirement | . | Requirement | | WIDTH=50″),””)]
[h: TriggerInputString=if(ActionType==”6. Triggered Actions”,encode(“Trigger | . | Trigger | | WIDTH=50″),””)]
[h: PreAttackEffectInputString=if(PreAttackEffectIncluded==1,encode(“PreAttackEffect | . | Pre-Attack Effect | | WIDTH=50″),””)]
[h: MissEffectInputString=if(MissEffectIncluded==1,encode(“MissEffect | . | Miss Effect | | WIDTH=50″),””)]
[h: AftereffectInputString=if(AftereffectIncluded==1,encode(“Aftereffect | . | Aftereffect | | WIDTH=50″),””)]
[h: PostAttackEffectInputString=if(PostAttackEffectIncluded==1,encode(“PostAttackEffect | . | Post-attack effect | | WIDTH=50″),””)]
[h: SpecialEffectInputString=if(SpecialEffectIncluded==1,encode(“SpecialEffect | . | Special Effect | | WIDTH=50″),””)]

All of these things could be suppressed if the power in question doesn’t need them. I’ve tried to present them as intuitively as possible. I only ask for the damage level if there’s a damage roll (and the default selection was set up above). I ask if this power should have a little extra on the attack roll (like for a ranged artillery attack). If this power is just an effect (no attack, no damage – like a trait), then I ask for that. And so on.

Now it’s time to actually generate the input box that will ask for this stuff:

[h: x = input(
decode(RechargeTargetInputString),
decode(RequirementInputString),
decode(TriggerInputString),
decode(PreAttackEffectInputString),
decode(ExtraAttackBonusInputString),
decode(DefenseInputString),
decode(DamageRollInputString),
decode(EnhancementInputString),
decode(HitStringInputString),
decode(MissEffectInputString),
decode(AftereffectInputString),
decode(PostAttackEffectInputString),
decode(SpecialEffectInputString),
decode(JustEffectInputString)
)]
[h: abort(x)]

Yep – it’s all just a bunch of decoding of the stuff above. If the conditions are right, there will be an item in the input box. If not, the item will be skipped. For instance:

This is what I get if I pick a triggered recharge power with all of the check boxes checked. Conversely:
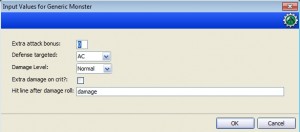
This is what I get if I choose the default options (single target at-will power with an attack and damage roll). And for the extreme simplicity case:

This is what I get if I pick a power with no targets, no attack roll, no damage roll and no boxes checked. It’s a pure text power – just an effect. Most move actions and traits will be this way, for instance.

Building the macro command

At this point, we have a lot of input from the user saved as variables. Now it’s time to use those variables and turn it all into command text for our new macro.

[h, switch(DamageLevel), code:
case “Minion”: {
[h: NumDice=0]
[h: DieSize=”MinionDamage”]
[h: DamageBonus=”MinionDamage”]
[h: Enh=1]
[h: CritDamageDie=”MinionDamage”]
};
case “Very Low”: {
[h: NumDice=”NumDice50″]
[h: DieSize=”DamageDie50″]
[h: DamageBonus=”DamageBonus50″]
[h: Enh=Enhancement]
[h: CritDamageDie=”DamageDie50″]
};
case “Low”: {
[h: NumDice=”NumDice75″]
[h: DieSize=”DamageDie75″]
[h: DamageBonus=”DamageBonus75″]
[h: Enh=Enhancement]
[h: CritDamageDie=”DamageDie75″]
};
case “Normal”: {
[h: NumDice=”NumDice100″]
[h: DieSize=”DamageDie100″]
[h: DamageBonus=”DamageBonus100″]
[h: Enh=Enhancement]
[h: CritDamageDie=”DamageDie100″]
};
case “High”: {
[h: NumDice=”NumDice125″]
[h: DieSize=”DamageDie125″]
[h: DamageBonus=”DamageBonus125″]
[h: Enh=Enhancement]
[h: CritDamageDie=”DamageDie125″]
};
case “Very High”: {
[h: NumDice=”NumDice150″]
[h: DieSize=”DamageDie150″]
[h: DamageBonus=”DamageBonus150″]
[h: Enh=Enhancement*2]
[h: CritDamageDie=”DamageDie150″]
};
case “Extreme”: {
[h: NumDice=”NumDice175″]
[h: DieSize=”DamageDie175″]
[h: DamageBonus=”DamageBonus175″]
[h: Enh=Enhancement*2]
[h: CritDamageDie=”DamageDie175″]
}
]

This rather inelegant piece of code does something simple in the end. It takes the indication of the damage level (from Minion to Very Low all the way up to Extreme) and sets some text variables that will show up in the final macro. I have properties in my campaign for number of dice, damage die size and damage bonus that are derived from a monster’s level. I also have tweaks from the 100% “normal” damage expressions to have 50% versions, 75%, 125%, 150% and 175%. That’s all I’m doing here – getting ready to tell the final macro what damage level to pull from the monster’s properties.

[h: AttackBonus=if(DefenseTargeted==’AC’,’DefaultAttackBonusVsAC’,’DefaultAttackBonusVsNAD’)]

This is a simple one. I have two monster properties for attack bonuses: One versus AC and one versus non-AC defenses (which is two points lower). I’m just telling the macro which one to use.

[h: MyCommand=””]
[h: MyCommand=MyCommand+encode(“<b>” + MacroName + “</b> ” + TargetRange + “<br>\\n”)]

As you saw in my last post, this is the way I build the “command” property that I’m setting for the new macro. I’m just adding the name and range at this point. The \\n at the end enters a new line (carriage return) in the macro itself, not in the output.

[h, if(RequirementIncluded==1): MyCommand=MyCommand+encode(“<i>Requirement:</i> “+Requirement+”<br>\\n”)]
[h, if(ActionType==”6. Triggered Actions”): MyCommand=MyCommand+encode(“<i>Trigger:</i> “+Trigger+”<br>\\n”)]
[h, if(PreAttackEffectIncluded==1): MyCommand=MyCommand+encode(“<i>Effect:</i> “+PreAttackEffect+”<br>\\n”)]

Here I add lines for Requirement, Trigger and Effect before the attack in the case that those exist for this power.

[h, if(AttackRollRequired==1), CODE: {
[h: MyCommand=MyCommand+encode(“[h: AttackBonus=” + AttackBonus + ” + ” + ExtraAttackBonus + “]\\n”)]
[h: MyCommand=MyCommand+encode(“[h: Defense='”+DefenseTargeted+”‘]\\n”)]
[h: MyCommand=MyCommand+encode(“[h: d20roll=d20]\\n”)]
[h: MyCommand=MyCommand+encode(“[h: Enh=”+Enh+”]\\n”)]
[h: MyCommand=MyCommand+encode(“[h: CritDamageDie=”+CritDamageDie+”]\\n\\n”)]
[h: MyCommand=MyCommand+encode(“[h, if(CritDamageDie > 0), CODE:\\n { [CritBonus=roll(Enh,CritDamageDie)] }; \\n { [CritBonus=0] }\\n ]\\n\\n”)]
[h: MyCommand=MyCommand+encode(“[h: AttackRoll=d20roll+AttackBonus]\\n”)]
}
]

These lines are only added to the macro if there’s an attack roll. The macro will have the attack bonus, the defense targeted, the result of a d20 roll, etc.

[h, if(DamageRollRequired==1), CODE: {
[h: MyCommand=MyCommand+encode(“[h: DamageString='”+HitStringWithDamage+”‘]\\n”)]
[h: MyCommand=MyCommand+encode(“[h: NumDice=”+NumDice+”]\\n”)]
[h: MyCommand=MyCommand+encode(“[h: DamageDie=”+DieSize+”]\\n”)]
[h: MyCommand=MyCommand+encode(“[h: DamageBonus=”+DamageBonus+”]\\n\\n”)]
[h: MyCommand=MyCommand+encode(“[h: DamageRoll=roll(NumDice,DamageDie)]\\n”)]
[h: MyCommand=MyCommand+encode(“[h: NumDice=”+NumDice+”]\\n”)]
[h: MyCommand=MyCommand+encode(“[h: MaxDamage=NumDice*DamageDie+DamageBonus+CritBonus]\\n”)]
[h: MyCommand=MyCommand+encode(“[h: RegularDamage=DamageRoll+DamageBonus]\\n\\n”)]
}
]

These lines only show up if there’s a damage roll. Pretty standard stuff.

[h, if(NumberOfTargets==”Single-Target” && AttackRollRequired==1), CODE: {
[h: MyCommand=MyCommand+encode(“<i>Attack:</i> [d20roll] + [AttackBonus] = <b>[AttackRoll]</b> versus [Defense]<br>\\n”)]
[h, if(DamageRollRequired==1), CODE: {
[h: MyCommand=MyCommand+encode(“[if(d20roll==20), CODE:\\n”)]
[h: MyCommand=MyCommand+encode(” {<font color=red>–CRITICAL HIT–</font><br>\\n”)]
[h: MyCommand=MyCommand+encode(” <i>Hit:</i> [NumDice*DamageDie] ([NumDice]d[DamageDie]) + [DamageBonus] + [CritBonus] = <b>[MaxDamage]</b> [DamageString]<br>\\n”)]
[h: MyCommand=MyCommand+encode(” };\\n”)]
[h: MyCommand=MyCommand+encode(” {<i>Hit:</i> [DamageRoll] ([NumDice]d[DamageDie]) + [DamageBonus] = <b>[RegularDamage]</b> [DamageString]<br>}\\n”)]
[h: MyCommand=MyCommand+encode(“]\\n”)]
};
{[h: MyCommand=MyCommand+encode(“<i>Hit:</i> “+HitStringNoDamage+”\\n”)]
}
]
};{}
]

And now we have the “punch line” part of the code for the single-target attack case. This part of the code displays the result of the attack and damage rolls in the chat window.

[h, if(NumberOfTargets==”Multi-Target” && AttackRollRequired==1), CODE: {
[h: MyCommand=MyCommand+encode(“[h: x=input(‘NumberOfTargets|0|Number of targets’)]\\n”)]
[h: MyCommand=MyCommand+encode(“[h: abort(x)]\\n\\n”)]
[h: MyCommand=MyCommand+encode(“Attacking [NumberOfTargets] [if(NumberOfTargets==1,’target’,’targets’)].<br>\\n”)]
[h: MyCommand=MyCommand+encode(“[count(NumberOfTargets,'<br>’), CODE: {\\n”)]
[h: MyCommand=MyCommand+encode(” [h: d20roll=d20]\\n”)]
[h: MyCommand=MyCommand+encode(” [h: AttackRoll=d20roll+AttackBonus]\\n”)]
[h: MyCommand=MyCommand+encode(” <i>Target [r:roll.count+1]:</i> [d20roll] + [AttackBonus] = <b>[AttackRoll]</b> versus [Defense]\\n”)]
[h, if(DamageRollRequired==1), CODE: {
[h: MyCommand=MyCommand+encode(” [if(d20roll==20), CODE: {<font color=Red> –CRITICAL HIT–</font> [NumDice*DamageDie] ([NumDice]d[DamageDie]) + [DamageBonus] + [CritBonus] = <b>[MaxDamage]</b> [DamageString]};{} ]\\n”)]
[h: MyCommand=MyCommand+encode(” }\\n”)]
[h: MyCommand=MyCommand+encode(“]<br><br>\\n”)]
[h: MyCommand=MyCommand+encode(“<i>Hit:</i> [DamageRoll] ([NumDice]d[DamageDie]) + [DamageBonus] = <b>[RegularDamage]</b> [DamageString]<br>\\n”)]
};
{[h: MyCommand=MyCommand+encode(“<i>Hit:</i> “+HitStringNoDamage+”\\n”)]
}
]
}
]

Same thing, but for the multi-attack case.

[h, if(AttackRollRequired==0&&DamageRollRequired==1): MyCommand=MyCommand+encode(“<i>Hit:</i> [DamageRoll] ([NumDice]d[DamageDie]) + [DamageBonus] = <b>[RegularDamage]</b> [DamageString]<br>}\\n”)]

In the odd case where you have no attack roll but a damage roll (such as an auto-hit power that still rolls for damage), we need to display the appropriate string.

[h, if(MissEffectIncluded==1): MyCommand=MyCommand+encode(“<i>Miss:</i> “+MissEffect+”<br>\\n”)]
[h, if(AftereffectIncluded==1): MyCommand=MyCommand+encode(“<i>Aftereffect:</i> “+Aftereffect+”<br>\\n”)]
[h, if(PostAttackEffectIncluded==1): MyCommand=MyCommand+encode(“<i>Effect:</i> “+PostAttackEffect+”<br>\\n”)]
[h, if(SpecialEffectIncluded==1): MyCommand=MyCommand+encode(“<i>Special:</i> “+SpecialEffect+”<br>\\n”)]
[h, if(AttackRollRequired==0): MyCommand=MyCommand+encode(“<i>Effect:</i> “+JustEffect+”<br>\\n”)]

We now display the extra lines if they were included. Note that JustEffect is only displayed in the “no attack roll” case.

[h: FontColor=”green”]

Setting another default here; my at-will powers default to green,

[h, if(Usage==”Encounter”), CODE: {
[h: EncountersArray=getProperty(“EncounterPowersDeclared”)]
[h: FirstEmptyEncounter=-1]
[h, for(i, 9, -1, -1), CODE:
{[h: PowerCheck=json.get(EncountersArray,i)]
[h, if(PowerCheck==0): EncounterPowerNumber=i]
}
]
[h: FontColor=”red”]
[h: NewArray=json.set(EncountersArray, EncounterPowerNumber, 1)]
[h: setProperty(“EncounterPowersDeclared”, NewArray)]
[h: MyCommand=MyCommand+encode(“[h: PowerNumber=”+EncounterPowerNumber+”]\\n”)]
[h: MyCommand=MyCommand+encode(“[h: PowersCharged=getProperty(‘EncounterPowersCharged’)]\\n”)]
[h: MyCommand=MyCommand+encode(“[h: IsPowerAvailable=json.get(PowersCharged,PowerNumber)]\\n\\n”)]
[h: MyCommand=MyCommand+encode(“[h, if(IsPowerAvailable==0), CODE:\\n”)]
[h: MyCommand=MyCommand+encode(” {[assert(1==0,add(‘This power has already been expended.’),0)]};\\n”)]
[h: MyCommand=MyCommand+encode(” {[h: NewArray=json.set(PowersCharged,PowerNumber,0)]\\n”)]
[h: MyCommand=MyCommand+encode(” [h: setProperty(‘EncounterPowersCharged’, NewArray)]}]\\n”)]
[h: MyCommand=MyCommand+encode(“[h: setMacroProps(getMacroButtonIndex(), ‘color=darkgray’) ]”)]
}
]

All right, this is admittedly a complicated piece of code. I’m proud of it, but you’ll have to bear with me.

The first line sets up that we’re only doing the remaining lines for Encounter powers. We then fetch the EncounterPowersDeclared array that I described earlier. This is the one that starts off as ten zeroes.

We then start with the last element of the array (element nine, since MapTool starts counting from zero) and check to see if that last element is a zero. If so, we set EncounterPowerNumber equal to the element number (9).

We then repeat with the next-to-last element of the array (item 8) and check to see if IT is zero. If so, we overwrite EncounterPowerNumber with 8. We keep going through the first element in the array (item 0). Whatever the last non-zero element of the array is, that becomes our new EncounterPowerNumber. And you’ll note that the FOR loop goes to -1 because it doesn’t execute an iteration where the iterator equals the end point. Yeah, it’s weird.

From here, we set the font color of the macro button to red (for an encounter power) and then set the token’s EncounterPowersDeclared array to put a 1 instead of a 0 in this new macro’s spot in the array.

I finish by adding the appropriate new lines to the macro I’m creating. These check to see if the appropriate slot in the array still has the power charged. If so, it de-charges it and moves on. If not, it throws off an error message, saying that the power is already expended.

[h, if(Usage==”Recharge”), CODE: {
[h: RechargeArray=getProperty(“RechargePowersDeclared”)]
[h: FirstEmptyRecharge=-1]
[h, for(i, 9, -1, -1), CODE:
{[h: PowerCheck=json.get(RechargeArray,i)]
[h, if(PowerCheck==0): RechargePowerNumber=i]
}
]
[h: FontColor=”purple”]
[h: NewArray=json.set(RechargeArray, RechargePowerNumber, 1)]
[h: setProperty(“RechargePowersDeclared”, NewArray)]
[h: MyCommand=MyCommand+encode(“[h: RechargeTarget=”+RechargeTarget+”]\\n”)]
[h: MyCommand=MyCommand+encode(“[h: RechargeRoll=d6]\\n”)]
[h: MyCommand=MyCommand+encode(“[h: PowerNumber=”+RechargePowerNumber+”]\\n”)]
[h: MyCommand=MyCommand+encode(“[h: PowersCharged=getProperty(‘RechargePowersCharged’)]\\n”)]
[h: MyCommand=MyCommand+encode(“[h: IsPowerAvailable=json.get(PowersCharged,PowerNumber)]\\n\\n”)]
[h: MyCommand=MyCommand+encode(“[h, if(IsPowerAvailable==0 && RechargeRoll<RechargeTarget), CODE:\\n”)]
[h: MyCommand=MyCommand+encode(” {[g: assert(1==0,add(‘Recharge roll = ‘, RechargeRoll, ‘. The power fails to recharge.’),0)]};\\n”)]
[h: MyCommand=MyCommand+encode(” {[h: NewArray=json.set(PowersCharged,PowerNumber,0)]\\n”)]
[h: MyCommand=MyCommand+encode(” [h: setProperty(‘RechargePowersCharged’, NewArray)]}]\\n”)]
[h: MyCommand=MyCommand+encode(“[h: setMacroProps(getMacroButtonIndex(), ‘color=gray’) ]”)]
}
]

This is the same kind of thing, but for recharge powers. The button font is purple instead of red. And when it comes time in-macro to see if the power has been expended, there’s also a recharge roll made. If the roll succeeds, then the power proceeds.

[h, if(Usage==”Not Applicable”): FontColor=”black”]

If we’re talking about a trait rather than an at-will or encounter or recharge power, then the button text should be black.

[h: MacroProps='{“autoexecute”:1, “label”:”‘+MacroName+” “+TargetRange+'”, “group”:”‘+ActionType+'”, “sortBy”:’+SortOrder+’, “fontColor”:”‘+FontColor+'”, “command”:”‘+decode(MyCommand)+'”}’]
[h: createMacro(MacroProps)]

And at long last, we actually build the macro! We stick together the JSON object that contains all of the macro properties, including decoding the MyCommand string that we’ve been building for the past 150 lines of code, and we then create a macro with those properties!

Whew – I need a drink or something.

I’m happy to say that this thing works really, really well for me so far. I’m sure I’ll tweak it over time, but I’m excited about it.

Congratulations if you’ve made it this far!

– Michael the OnlineDM

MapTool – Creating macros from macros, plus encode and decode

MapTool macros can apparently do just about anything, including BUILDING OTHER MACROS! They’re like nanobots; they’re going to take over the world with an army of macros. Save yourselves from the coming macro revolution!

Or take advantage of it by leveraging the power of MapTool macros to build other macros. Why might you want to do such a thing? Well, in my case it’s because I wanted a better way to build monster powers. My previous approach was to have template buttons for every type of macro I might want on a monster, and then delete the buttons I don’t need. That’s a pain in the butt; it would be much easier to just add the macros I need instead of deleting the macros I don’t need.

Thus, I learned about the createMacro() function. This is one of those “exactly what is says on the tin” macros – it creates another macro. I’d say that this is definitely an intermediate to advanced MapTool topic, at least by my standards. You’ll want to have a working knowledge of JSON objects before using createMacro.

Setting up the createMacro input JSON object

The arguments for createMacro are most easily put together in a JSON object. You can set pretty much anything you can think of for a macro button – its name, the colors of the text and background, what group you want it in, what sort order, whether players can edit it and so on. To do this, set up a JSON object with each of these properties set to the value you want.

For instance, let’s say that you want a macro called Longsword to show up in the Attacks group as the 3rd macro, and you want it to have green text. First, set up the JSON object with these properties:

[h: MacroProps='{“autoexecute”:1, “label”:”Longsword”, “group”:”Attacks”, “sortBy”:3, “fontColor”:”green”, “command”:””}’]

Then run the createMacro function with your new properties as the argument:

[h: createMacro(MacroProps)]

Voila! Problem solved. Well, that was a short article…

Oh right – we need some macro text to carry out, don’t we? This particular set of properties has no real instructions to carry out (that’s what “command”:”” means – a blank macro command box). If we’re going to be putting together strings that include macro instructions, we’re going to need to learn about encode() and decode().

encode() and decode()

The encode() function lets you create a string that contains quotes and brackets and so on. You’ll obviously need this sort of thing in your macro command, so it makes sense to encode the various lines of macro text, stick them together in a string list, and plop that into the “command” property of your JSON for createMacro. A useful trick I learned is that if you’re encoding a line break, you have to use \\n to represent it (for “new line”).

I don’t believe encode() is strictly necessary in all of these cases, but it’s getting the job done and I’m sticking with it!

When you’re ready to unpack what you’ve encoded, you can use decode().

A simple example

Let’s say I want to use a macro to create another macro that will roll a die and output the result with a little formatting and a friendly message. I’m going to call the created macro “New Macro 1”. I want it to roll a d6. And I’m going to pass my choice of a d6 to the macro as a variable.

[h: MacroName=”New Macro 1″]
[h: DieSize=6]

Here I’ve set a variable for the name of the macro and another for the die size that I want to roll. Now I’m going to start setting up the “command” text to pass to the createMacro() function.

[h: MyCommand=””]
[h: MyCommand=MyCommand+encode(“[h: DieToRoll=”+DieSize+”]\\n”)]

The first line above initializes a blank string as the variable MyCommand (not strictly necessary, but it helps me follow what’s going on). The second line takes whatever is in MyCommand (a blank string at this point) and adds some encoded text to it.

You’ll note that the text I’m encoding is in double-quotes, and when I want to add the value of my DieSize variable I close the quotes, add a plus sign, then the name of the variable that I want to be evaluted, then another plus sign and re-open the quotes. Note also that I’m encoding a full line of MapTool text, including square brackets, the h: roll option, and the \\n for a line break in the code itself (as opposed to <br>, which would output a line break to the chat window).

[h: MyCommand=MyCommand+encode(“Die Result = <b>[r: roll(1, DieToRoll)]</b> – Good job!”)]

I now add another line of code to the command sting I’m building up. This one is a full line of MapTool code within double quotes – no breaks to bring in variables from this macro, but there is a reference to a variable that exists in the new macro (DieToRoll).

[h: MacroProps='{“autoexecute”:1, “label”:”‘ + MacroName + ‘”, “fontColor”:”green”, “command”:”‘ + decode(MyCommand) + ‘”}’]
[h: createMacro(MacroProps)]

I now build the JSON object that I’ll be using for createMacro. I do want the macro to auto-execute, so I set that property to 1 (true). I’m calling on my MacroName variable for the name. And I’m decoding the MyCommand string as the command text for the new macro.

When I run the macro, I get a new button, labeled “New Macro 1” in green text. If I open up that macro to edit it, I see:

[h: DieToRoll=6]
Die Result = <b>[r: roll(1, DieToRoll)]</b> – Good job!

And when I execute New Macro 1, I get a message in the chat window:

Voila – a macro created from a macro!

Now what?

This is a proof-of-concept: You can indeed create a working macro using a macro. But what I really want to do is to create a macro that will ask me for input, and then use that input to create another macro. For instance, a macro that will ask me for the name of an attack, the damage, whether it’s at-will or encounter or recharge, etc., and then build a new power for a monster with those characteristics.

That, my friends, is the topic of my next post. I have built such a thing, and it is wondrous to behold!

Stay tuned.

-Michael the OnlineDM

Lich Chess: Sacrifice your king!

Sometimes I’m at the computer doing D&D prep work, and I want to take a quick break. Nerd that I am, I’ve often found myself playing a game or two of the Chess Titans program that came with Windows 7. I’m happy that I generally win when I play on level 3; I’m sad to know that it’s level 3 out of TEN. Yeah, I’m not a chess master.

Anyway, lots of role playing gamers are familiar with chess, so I’m sure I’m not the only one who’s had fantasy RPG thoughts about the game. I was recently thinking about the rule in chess that allows you to promote a pawn to any other piece in the game if it reaches the far side of the board. I had two main thoughts about this:

1. You’re pretty much always picking a queen. I mean sure, there might be a corner case where you want a knight, but a queen can do everything that a bishop or rook can do, only better.

2. You can’t pick another king.

That second point got me thinking about D&D. What would happen if you had a second king? Would your opponent have to kill both of them in order to win? That was a fun idea, but it’s still going to be better to opt for offense (a queen) over defense (a second king). So, even if it were an option, it would hardly ever be taken.

The concept of having a back-up king intrigued me, though. The main thing that this would allow you to do would be to sacrifice a king. You never get to do that in normal chess, of course. It would be interesting if you could.

This eventually led me to think about Lich Chess. In this rules variant, each player’s king is a lich, which can’t truly die unless its phylactery is also destroyed. Maybe I’ve been reading too much Order of the Stick or something. Once I started thinking along these lines, I thought of several variants you could try.

Lich Chess variant 1: Secret phylactery, vulnerable lich. Before the game, each player secretly designates one piece as the phylactery bearer (probably easier to do in a virtual chess game, but you could perhaps outfit each piece with a sticker on the bottom that you could mark on to show which one is the lich each game – or just write it down on a piece of paper). If the phylactery bearer is captured, the information is revealed and the king has no backup plan any more. If the king is captured but the phylactery bearer is not, the game continues until one side’s king and phylactery bearer are both captured. Either the king or the phylactery bearer can be captured first.

Lich Chess variant 2: Secret phylactery, indestructible lich. As with variant 1, except that the king is invulnerable until the phylactery bearer has been captured. Now the king goes on offense – not even the opposing queen can take him down!

Lich Chess variant 3/4: Revealed phylactery, vulnerable/indestructible lich. A visible token marks the phylactery (I’m picturing a little ring to put around a piece). Any piece can hold the phylactery at the beginning of the game. On your turn, either before or after you move, you may move the phylactery from the current bearer to any adjacent piece (including the king itself if you wish). Pass the phylactery! This can be done with the “either piece can be destroyed first” variant or the “indestructible lich” variant, where the phylactery has to be captured first.

Lich Chess alternate rule 1: Limited bearers. Designate only certain pieces as being eligible to bear the phylactery (whether secret or revealed). For instance, it has to be a pawn or it has to be a knight/bishop or whatever. Especially in the “revealed phylactery” variant, there’s probably a lot of temptation to just give the queen the phylactery since she can defend it pretty well. This mixes things up a bit.

There are probably other tweaks you could make to this game, too. Personally, the most interesting variant to me is number 2 – indestructible lich, secret phylactery. I just love the idea of the king wading into battle, lopping heads off of knights and bishops until the phylactery is discovered.

Now, I haven’t actually tried these rules yet, but they sound interesting to me. If anyone out there gives them a whirl, let me know how it goes!

Review of Heroes of the Elemental Chaos

I’m continuing my recent habit of D&D book reviews. I loved Heroes of the Feywild. I wasn’t all that crazy about Heroes of Shadow.

Heroes of the Elemental chaos comes in somewhere between those two for me. As I said on Twitter, “It’s… okay.”

Chapter 1: Into the Maelstrom

This is the all-fluff chapter, and I think it’s awesome for dungeon masters who want to involve adventures in the Elemental Chaos. We learn about the nature of elemental magic and how it relates to the power sources. We get a few brief write-ups of locations in the Chaos (City of Brass, Kaltenheim, etc.).

Then we get into elemental-touched races. For those players who were hoping to get more racial options in this book, this is where you get disappointed. We get some ideas for being elemental-origin dragonborn, drow, dwarves, genasi, half-orcs and orcs. Then a paragraph each on how other races might be elemental-touched. Good fluff if you’re going for that kind of character concept, but this is not a crunch section.

The meaty, most interesting part of this chapter (at least for me) is the second half that gets into stories of the primordials. I’m new to D&D as of Fourth Edition, and I haven’t read the Plane Below or Manual of the Planes. So, whenever I’ve seen references to “primordials” in other books I’ve never really known what they meant.

Now I do. I know who Yan-C-Bin and Imix and Ogremoch and friends are. I especially liked the massive table at the end of the chapter that documents all 74 “known primordials” including those from places like the Forgotten Realms and Dark Sun. Useful stuff, and great for inspiration for high-level baddies.

Chapter 2: Character Themes

I’ve only recently begun using themes in my game, specifically the setting-focused themes for my ZEITGESIT campaign. I love the potential for themes to tie characters to settings; I’m not as crazy about more generic themes like the ones we get here. Still, some of them are interesting.

We get ten themes. Four of them correspond to the basic elements (air, earth, fire, water) plus one for “elemental metal”. We get a monk-focused theme (Elemental Initiate), a demon theme (Demon Spawn), a general “from the chaos” theme (Moteborn), a Primordial Adept and a Janissary (servant of genies).

The pure elemental themes are fine if you just love the elements. I didn’t find them especially exciting, but they’re all right. The Ironwrought theme (elemental metal) just felt odd to me, but it’s a fine theme.

Demon Spawn can work if you want a character who struggles against a dark nature. Not my own cup of tea, but some people might enjoy it.

The coolest theme in my opinion is the Janissary. You’re a servant of genies, and the back story is well done. The mechanics mainly give you a bonus to charging, but the flavor has a lot of potential for character hooks.

Chapter 3: Classes

No brand-new classes here, but we get some new options and new builds.

The druid sees support for both the Sentinel Druid (a Living Zephyr companion for the Druid of the Wastes) and the pre-Essentials Druid (Primal Wrath aspect and new powers at all levels).

The monk gets two new monastic traditions: Desert Wind (flurry lets you shift a square and can give a target -2 to attack) and Eternal Tide (flurry has reach and pulls the target). We also get new powers at all levels – fire- and water-themed.

The sorcerer gets a whole new build – the Elementalist. This is what some might call the “Essentialized” sorcerer. It does not get daily powers, and its encounter powers are spelled out for it. You pick an element and get your choice of two at-wills tied to that element. This is a really good build for someone who just wants to blast things with magic. And it’s a pretty darn good striker, too!  If you go with fire, you have an at-will single target attack that deals 1d12+Cha+Con+1d6 fire damage at first level, and another at-will that deals 1d10+Cha+Con in an area burst 1 and creates a zone of fire.

The regular sorcerer also gets new utility power choices, but no attack powers.

Warlocks get a new pact option – the elemental pact. You randomly get a new elemental affinity after each rest, which affects the type of damage you deal with certain attacks. There’s also a new option for Hexblade Warlocks, an elemental pact, which comes with elemental allies to summon at random at level 9 and 25. The regular warlock does get new attack and utility powers, too.

The wizard gets a new build – the Sha’ir, which I believe is originally from the Al Qadim setting. It’s a lot like a regular wizard, except that it has a Gen Servant (basically a familiar) who goes and gets spells for it each day rather than pulling them from a spellbook. This gives the Sha’ir a lot of flexibility (the Gen can get any appropriate-level spell), and I like that the player is encouraged to think about their Gen Servant from a role playing perspective, too.

Sha’ir spells are available to other wizards, and the at-wills don’t deal any damage directly. Several of them are nods to spells from older editions, like Alter Self and Reverse Gravity. I especially like Crack the World at level 29.

Chapter 4 – Elemental Options

This is the “everything else” chapter. It starts with ten paragon paths; my favorite is the Prince of Genies, who has a Genie in a Bottle to help it out. This path also gives us Limited Wish as a utility power – and compared to what I understand of earlier editions, this is a very, very limited wish!

There are only two epic destinies – Emergent Primordial, in which a primordial is basically taking you over from within, and Lord of Chaos, which has so much potential but a REALLY disappointing level 26 and level 30 power. Jeremy Morgan of Stormin’ Da Castle and @TriskalJM on Twitter was similarly disappointed when we talked about this on the Tome Show (episode forthcoming), so he took a crack at rebuilding the Lord of Chaos epic destiny. I chimed in with some edits of my own, leading to this:

-Level 21: As written, for now, though I’d personally like something cooler than the enhanced magic weapon / armor / neck slot.

-Level 24: As written

-Level 26: Upgrade the created zones to hazardous terrain as an improved Whim of Creation:

-Level 30: An improved Master of Chaos feature:

Whenever you bloody an enemy or score a critical hit against an enemy, roll a d6.
– 1: You teleport to any location within 10 squares; if the destination square is occupied by another creature, that creature teleports to your former location.
– 2: You gain 20 temporary hit points.
– 3: The enemy immediately takes an at-will action of your choice.
– 4: You become invisible until the end of your next turn and may immediately make a Stealth check to become hidden.
– 5: One ally within 10 squares immediately takes an at-will action of your choice.
– 6: The enemy makes a saving throw. If the saving throw fails, the enemy dies. If it succeeds, the enemy is dazed until the end of your next turn.”

After the epic destinies, we get feats. Strangely, we get Tome Expertise even though the Sha’ir doesn’t use tomes. Also strangely, there are a couple of illustrations of tome-reading Sha’ir earlier in the book. Anyway, we get a Born of the Elements feat that mainly serves to open the door to a bunch of other elemental feats. The most interesting of these is the Elemental Companion, which is similar to a beast companion. As with the Gen Servant, elemental companions are encouraged to be played for role playing potential. Personally, I’d let someone take the Elemental Companion feat without first taking Born of the Elements if they wanted it.

Finally, we get some magic items. Demonskin Armor has a good marriage of flavor and mechanics (wearing the skin of a demon makes you more intimidating). We get one weapon per element. We get a few tomes, including the Demonomicon (yes, as a tome implement). There are primordial shards, which I’ll admit I still don’t really understand flavor-wise. And lastly, we get Elemental Gifts, which are similar to Divine Boons. My favorite is the Gift of Chaos, which has an interesting random effect once per day when you roll a 1 or 20 on an attack roll or saving throw; I’d personally have it happen EVERY time you roll a 1 or 20 on an attack roll or saving throw. Yay for chaos!

Closing thoughts

As I said, I fell that Heroes of the Elemental Chaos is… okay. It’s great for DMs and players who want some flavor for elemental campaigns and primordials. The class crunch is available in DDI, and the class fluff isn’t worth the price of admission by itself. I definitely enjoyed Heroes of the Feywild more; the Bard’s Tales from that book were more entertaining and flavorful to me than the Elemental Viewpoint sidebars that pepper this book, providing commentary from various elemental denizens.

It’s not a must-buy, but it’s not bad.

– Michael the OnlineDM

Marvel Heroic RPG – MapTool Framework – Second Draft

The blog post about my first draft can be found here. You can download the new framework right here!

Over the weekend, I had some time to improve my MapTool framework for the Marvel Heroic Roleplaying game. @MattHawke provided the key assistance: He showed me how to use custom frames to create a very, very useful character sheet.

Frames in MapTool include the Selection frame (which holds the buttons with various macros for each token), the Chat frame (which shows the output of the chat window and macros), and the Campaign frame (which holds macros common to everyone in the campaign). You can also create your own frame to hold whatever you want.

The syntax for doing this is surprisingly simple: You just use the frame roll option, followed by the name you want to give this new frame (held inside quotation marks inside parentheses). You then fill up your new frame, largely using HTML. Since I wanted to create a frame called DataFile (the Marvel RPG name for a character sheet), I used the following code:

[frame("DataFile") : {

From there, I used a bunch of HTML to fill the frame:

<html>
 <head>
 <title>[r:getProperty("Name", MyToken)] ([r: getProperty("RealName", MyToken)])</title>
 </head>
<body>

The other awesome MapTool function that @MattHawke showed me is the macroLink function. This lets you create a link to a macro within your HTML frame. The macroLink function lets you provide the linked text, the function that’s linked to, and the people to whom the output of the function should be displayed.

This allowed me to make the DataFile frame into the entire character interface. My goal is to make it so that players will never have to use the Selection window except at the very beginning of the session, to open the DataFile frame. After that, all of the stuff they can do can be done via links in the Data File itself.

I also decided it would make my life easier if I created a library token to hold all of the macros, and then simply call those macros from the Data File.

I know that other MapTool frameworks already do a lot of cool stuff with custom frames; I never really understood them until now. This is a much better way to use a character sheet, rather than looking at the pop-up window that MapTool uses by default. I’d love to re-work my D&D 4e framework to take advantage of this, but man, that would be a lot of work at this point! For now, the Marvel RPG fans are the ones who will benefit.

Please check out this updated framework. It’s light-years better than what I started with in the first draft. Feedback is invited!

– Note that you’ll need to set your stack size in MapTool to at least 4 in order for this framework to work properly. I personally set mine to 10. This is an option in the pop-up window that opens when MapTool first starts. The default stack size of 2 doesn’t cut it.

– Michael the Online Dungeon Master

Marvel Heroic RPG – MapTool framework – First draft

Among the big, exciting news in the world of role-playing games this past month was the release of the Marvel Heroic Roleplaying Game from Margaret Weis Productions. Cam Banks (@boymonster on Twitter) was the design lead, and by all accounts he and his team had done a fantastic job with the game.

I’m not a comic book guy myself, so I wasn’t really planning to do anything with the game. However, I was asked by a couple of folks on Twitter (@MattHawke and @SenatorChatty) if I would be willing to put together a Marvel RPG framework in MapTool so that they and others could play the game online.

Hmm, intriguing! This is the closest I’ve come so far to doing “commission work” in role playing games (although I’m not getting paid or anything like that).

One stumbling block was that I did not own the PDF for this exciting new game. Now, it was only $12.99 on Drive Through RPG at the moment (now marked down to $9.74 for DM’s Day through March 7), but still. If I wasn’t going to play the game myself, I didn’t really want to have to pay money to do commission work.

Inspiration struck, though: Why not ask the game’s creator if he’d like me to put this together as a service to the online Marvel RPG community, and in exchange he could provide me with a copy of the PDF. Brilliant! Cam, being the awesome guy that he is, agreed.

And thus, the OnlineDM framework for the Marvel Heroic Roleplaying Game was born. You can download it right here.

How does it work?

I’m calling this particular version 0.11. It’s not at all polished yet, but it does work. Some instructions:

– The framework was created in version 1.3.b86 of MapTool, but it should work in any later version, too.

– There are three tokens: One for a hero (which can also be used for villains), one for The Watcher, and one for the Scene.

– The Hero token has all kinds of properties that will pop-up on a mouse-over; the Watcher and Scene are more limited, naturally.

– To build a Hero token, click the Build Character macro on the token itself and enter the various characteristics

– To build a dice pool, either click the Build Dice Pool macro or click the individual add/remove dice buttons

– To roll the dice pool or clear it, click the button labeled as such

– There are buttons to add and remove plot points from tokens (or from selected tokens if the Watcher wants to award them from the campaign panel)

– There are also buttons to set Stress, Trauma, Assets and Complications

Click to enlarge to see the framework's features in action

Room for improvement

Admittedly, this is not very pretty yet, and there are things I’d definitely like to tweak.

– Following a suggestion from @MattHawke, I’d like to use a custom frame instead of the pop-up character sheet to hold all of these properties. It really needs more formatting.

– In the dice pool building macro, I’d like to have drop-downs to pick the actual Distinctions and Powers and so on, rather than just typing in a number of dice

– And I’m sure that play-testing will reveal lots of things that need improvement!

Still, this version should be functional for play. All you really need are the dice pool and doom pool macros.

So, try out the new game and try out my framework – and let me know what suggestions you have for improvements!

– Note that you’ll need to set your stack size in MapTool to at least 4 in order for this framework to work properly. I personally set mine to 10. This is an option in the pop-up window that opens when MapTool first starts. The default stack size of 2 doesn’t cut it.

– Michael the OnlineDM