War of the Burning Sky Session 8

My online group gathered for its eighth session in the War of the Burning Sky campaign yesterday evening.  Eight sessions for a group of strangers spread across the US plus one person in London – that’s pretty impressive.  I honestly expected when I first gathered folks for an online campaign that people would flake out, drop out, not show up, etc.  But my players are flat-out awesome, and I love them.

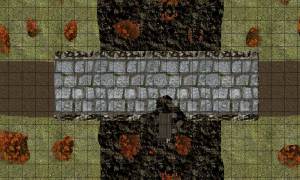
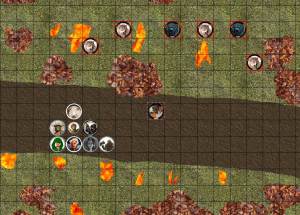
The session began with the party having recently entered the Fire Forest.  They had easily defeated some fiery bats, and now found themselves faced with a precarious-looking bridge.The bridge had clearly collapsed in one area, with the wreckage of a wagon visible in the canyon 60 feet below.
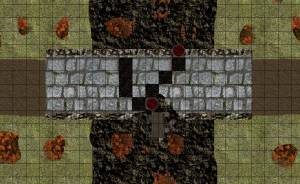
None of the players had enough Dungeoneering skill to identify the weak points, so Fudrick the gnome shaman started heading across.  He soon learned that if all of the weak points were stepped on and the monsters living beneath the bridge were revealed, it would look like this:

Fudrick’s reflexes weren’t quick enough to jump out of the way of the collapsing stones, and he fell 60 feet, taking 33 damage. His maximum hit points were only 37.  Ouch.

The bat swarms sleeping under the bridge were alerted by this, but I granted everyone in the party a full round of initiative before adding the bats.  Some of the characters started working together to tie two ropes together to lower to poor Fudrick.  Others moved forward to attack.  Jaks, the minotaur druid, used perception to identify two more fragile squares.  However, on the next round when the swarms moved in, Jaks hit with an attack that let him shift – and he shifted right onto one of those weakened squares!  Down he went, falling unconscious.

It looked grim for a while, but the healers in the party got Jaks up on his feet and out of the canyon while the defenders handled the swarms.  It made for a pretty exciting fight!

Next, the party was confronted by a hell hound who dropped a bone at their feet.  The bone had a message saying that they should “leave the case” (a case of military secrets they were trying to get through the forest) and take the bone if they wanted to escape with their lives.  They quickly discovered a loophole – the message didn’t say the plans had to be IN the case!  This let them avoid combat with the hell hound and his fiery wolf friends and also gave them some quest XP to boot – not bad!After that, the party was confronted by the devil who had written the message on the bone.  He wasn’t happy about the empty case and he attacked, but the PCs beat him up easily before he teleported away.

We ended the session after the gang met a dragonborn sorceror who was researching the magic of the fire forest and agreed to help him collect some mushrooms so that he could complete a ritual to quench the fire in a nearby glade with a dryad.  I hadn’t prepared the next encounter area, so we called it a night a little early.

I definitely am enjoying the fire forest adventure in this campaign.  It allows for a lot of branching and meaningful player decisions.  Most of those choices will come later, but there are some even now.  It helps to have such a great group of players!

Two-hit minions (and another gaming hiatus)

One-Week Hiatus (from gaming, not blogging)

After three Fridays in a row of running my online D&D game, it looks like we’re finally going to have to take a week off.  My wife and I have a date Friday (yes, I have a life outside of D&D!) and two of the five players have scheduling conflicts or potential scheduling conflicts, so we’re going to take the week off.  This is probably a good thing since I’ll be on a business trip to New York next Monday through Wednesday and probably won’t have a ton of time to get ready during the trip (although I’ll admit that several hours on a plane with the laptop does make for a lot of D&D planning time if I wish).  I’m pretty much set for the next session already, so getting a little ahead would be a good thing.

TactiCon Prep

Dark Skull - The Black Knight of Arabel

I’m also going to start getting ready for the Living Forgotten Realms game that I’ll be running at TactiCon over Labor Day weekend.  I’ve been through the adventure once as a player, and I’ve just finished reading through the published version this evening.  The DM who ran it was pretty creative with rearranging things on the fly; I might take some of his modifications into the game when I run it.

One thing that the DM who ran this adventure did that I liked was making minions a little tougher.  Minions in D&D 4e are enemies that only take one hit to kill, no matter how little damage they take.  That’s fine – it gives the wizard in the party a gang to blow up.  But honestly, minions end up feeling a little bit pointless.  I’ve been making a lot of my minions two-hit minions instead, and I think it makes them more fun.  The rules I use are as follows:

Two-hit minions

  • Minions begin with two hit points
  • Whenever a minion takes damage, that damage is reduced to 1 hit point
  • This first hit bloodies the minion (so any PC abilities that kick in on bloodying an enemy kick in)
  • Damaging a bloodied minion drops it
  • Dealing a critical hit to an unbloodied minion drops it
  • Dealing damage to an unbloodied minion of a type that the minion is vulnerable to drops it
  • Rule of cool – anything that should wipe out a typical enemy drops a minion even if it’s not bloodied (massive damage, etc.)
  • And if the PC does something that would wipe out an unbloodied minion but the minion is already bloodied, feel free to have the attack drop the bloodied minion and then bloody an adjacent unbloodied minion (or drop another adjacent bloodied minion)

These aren’t hard and fast rules, but I think they make minions more interesting.  Now that Magic Missile is an auto-hit (my players have already started calling it “Magic Hittle”), regular minions just seem boring.  Sure, the wizard has to use his standard action to drop one rather than doing something awesome someplace else, but it still feels boring.  I am against boring!

MapTool Macro Updates

I’ve continued to tweak my MapTool macros on the Downlaods page.  First, I’ve discovered that WordPress supports a fixed-width font that lets me show you the proper indenting for the macros.  This makes IF blocks and WHILE loops much easier to follow.  Second, I’ve added new Basic properties and new code to PC macros to handle Brutal weapons.

A weapon with Brutal X means that you re-roll any dice that are X or lower.  So, a Brutal 1 weapon means you re-roll any 1s for damage, Brutal 2 means you re-roll 1s and 2s, and so on.  I first programmed this very manually for the dwarven fighter in my campaign who was using a Brutal 2 Craghammer.  Then I realized from searching online that a d10 weapon with Brutal 2 is exactly the same as a d8+2 weapon.  With d10 Brutal 2, you have an equal chance of getting a 3, 4, 5, 6, 7, 8, 9 or 10.  And with a d8 + 2, you have exactly the same chance of getting exactly the same numbers.  Sweet!

My code now contains the following lines:

[h: DamageDie=Wpn1Dmg-Wpn1Brutal]
[h: NumDice=1]
[h: DamageRoll=roll(NumDice,DamageDie)+NumDice*Wpn1Brutal]

So, if your weapon doesn’t have the Brutal property, Wpn1Brutal will be zero, and the damage roll will be one weapon die plus zero.  However, if it’s Brutal 1, the damage roll will be a roll of a die that’s one number smaller than the regular damage die, and then one point will be added to the roll.  Note that for Brutal 1 this means that you’ll be rolling a d9 or a d7 or something like that.  This is obviously impossible in real life, but MapTool doesn’t care!  Feel free to roll a d23 in MapTool if you like.

Summing up

I’ll be okay without my online game for a week, but I’m really hoping that the in-person game that I play in will start up again soon (the DM has not been feeling well for a while).  I’ll throw myself into future prep work, which, I must admit, has led me to keep on dreaming about the projector setup that I talked about last time.  What’s wrong with me?  🙂

I’m curious: Do any of you out there use house rules for minions, or are they all one hit all the time?

MapTool – updated macros and using it for in-person games

It’s been a while since I’ve done a post about the nitty gritty of using MapTool, so I thought that would be a good topic.  I’ve been using MapTool for my online War of the Burning Sky campaign (we’re three sessions into the game so far), and it’s worked like a charm.  The only glitches that have come up have been minor errors on my part (putting the wrong power on a PC, forgetting to update an armor class, etc.).  MapTool continues to be an awesome program.

I’ve updated everything on my MapTool Macros page on the Downloads section of this site to reflect the properties I’m using today.  There are package files available to download for a PC and for a monster, as well as sample tokens for a PC and a monster with all of those macros included.  You’ll still find the single target and multi-target attacks, along with damage, healing, initiative (I’m actually using MapTool’s initiative window now), visibility toggling for monsters, and a macro I wrote for our shaman PC to summon and dismiss his spirit companion.

Of additional interest to me right now is a visit I made to the friendly local game store, Enchanted Grounds, to see a wonder in action: A local GM (Ian) who uses a laptop and projector to put the map and monsters on the game table.  With this setup, the players still use minis for their characters and move them around on the table, but the GM prepares the map in advance along with the monsters and creates a projected image for everyone to move around on.  If I had a setup like that, I wouldn’t need to worry about printing out my maps with PosteRazor – I could just take the electronic version with me and have the ability to change it on the fly.  Given my love of MapTool for my online games, this would be great!

In order to run a setup like this, I would need to do several things.

The hardware

If I go the projector route, I need to build a projector setup.  This, of course, is the biggest obstacle to this approach.  Building a setup with a projector and game surface is expensive and difficult.  However, it’s been done before.  I like the approach laid out by Sean Pecor on his web site.  Check out the image of his setup:

I like!  It cost him just under $800 to get this together, and most of that (about $550) was the cost of the projector itself.  I could swing this if I REALLY wanted to, but unless I had a regular home game, I don’t think it would be worth it.  Still, if I go this route I will probably use this design.

For what it’s worth, Ian’s setup (the one at the local store) is a great deal more involved than this.  It consists of a free-standing wooden stand that has a table for the DM’s laptop/papers/dice, which then extends far upwards (probably about 8 feet off the ground) to an upside-down mounted projector that shoots forward onto a mirror and from there onto the table.  There isn’t a fixed surface – Ian just uses a large piece of white foamboard that he puts on the game table.  It’s neat, but Sean’s setup looks way more portable (a big win, in my opinion – especially if I want to use this for LFR or convention games).

It pretty much goes without saying that another necessary piece of hardware is the laptop to run the game.  I have a Dell laptop that I got in May 2010, so I’m in fine shape there.

The software

Ian spent some time showing me the software he uses for his game.  First, he builds maps in Dundjinni.  From what I’ve seen, Dundjinni is a fine mapping program, but I’ve settled on MapTool and I don’t see myself changing.  Apparently Dundjinni creates maps that are sized for A4 paper, and if you want a bigger area than that you’re making multiple maps.

Ian then exports the Dundjinni files as JPEGs and sticks them together in Photoshop.  He also resizes them to 60% of their native size, which evidently makes them the right size for his setup to project them at a one-inch square scale.

The software that I was REALLY interested in turned out to be a homemade program that Ian had written in Visual Basic.  This program lets him load up a map and send whatever part of it he likes to the table.  It also lets him pop monsters onto the map, show attack rolls, etc.  He showed me a lot of its features and I realized something:

MapTool does all of that already.  It’s also free, and I know how to use it.

Now, the one software piece that I didn’t understand at all going in was how Ian managed to project one image onto the table (one that only shows what he wants players to see) while still seeing the full image on his laptop (with all of the hidden monsters, traps, stats, etc.).  It turns out that he has set up his laptop in “Extend mode” with a projector.

This essentially means that he is using two monitors.  The one on the “left” is his normal laptop screen with everything that the DM should see.  The one on the “right” is the projector.  His homebrew program just sends whatever he wants to the monitor on the “right” (that is, the projector) while keeping the full image on the “left” (his laptop screen).  It’s ingenious in its simplicity.

Laptops vary, but there are two basic ways I’ve seen to set the Extend Mode up:

  • On Ian’s laptop, which is an HP machine running Windows Vista, he right clicks on the desktop, goes to Display, and chooses the two-monitor option from a drop-down menu and then the Extend mode from a list of options that pops up.
  • On my laptop, which is a Dell machine running Windows 7, I go to Control Panel – Appearance and Personalization, and then under Display choose Connect to a Projector and select the Extend option that pops up.

Now, I haven’t actually tried this with my laptop yet (I don’t have a projector, you see), but I think it should work.

The best part is that I think I’ve figured out how to do it in MapTool.  I don’t have Ian’s homebrew program to send images to the projector side of the extended screen.  However, I think the following steps will work:

  • Open up MapTool on the main monitor and load up the campaign that I want to run.
  • Start a server on this instance of the MapTool program.
  • Open a second instance of MapTool.
  • In the second instance, connect to the server that’s running from the first instance (which should be available in the LAN tab of the server connection box).  This second instance is now connected to the game as a player, not a DM, so only the player content will be visible.
  • Move the second instance onto the projected monitor (the one off to the right).
  • In that second instance, hit Ctrl-Alt-Enter to put it into fullscreen mode (or go to View – Fullscreen mode).
  • Run the game as you would online on the main instance.  Everything you reveal with fog of war, unhiding monsters, etc. will show up on the table, but nothing else will.

I’ve got to say that I’m really excited to try this idea out, and I may just hook my laptop up to a regular computer monitor and treat that monitor as the “projector,” just to see if this works!

Has anyone else tried using MapTool with a projector to run a game as I’ve described?  What about using other software?  Do you have any tips on where to get a good deal on a projector?  And am I totally nuts for thinking about doing this?  Discuss!

MapTool campaign frameworks

After I had done a lot of work to start building macros for my D&D game that I’m running in MapTool, I discovered something – it’s not necessary to reinvent the wheel if you don’t want to.  It turns out that a number of people on the MapTool forums have created what are known as campaign frameworks.

A campaign framework is a work of art.  It’s a MapTool campaign file that contains within it everything you need to run a campaign under a given rule set (D&D Fourth Edition, d20 System, as well as other RPGs).  The particular framework I’ve played around with is from a MapTool forum user called Rumble.  His framework for D&D 4th Edition is in this post.

The framework is basically a campaign template.  If you want to start a new campaign, you start with the template file.  When you open the file, you’ll see something like this:

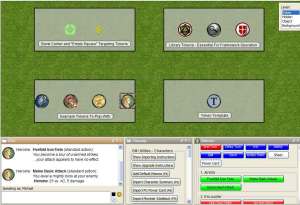
Rumble FrameworkWhat you see here is several pre-made tokens on the top part of the screen, some campaign macros (including those that will let you import character or monster info), and some macros for the sample PC token that’s selected.  The campaign file has an extensive set of properties to keep track of the sort of things my properties do and then some.  For instance, I hadn’t thought of keeping track of action points or experience points in the character sheet, but this property set does it.

Furthermore, the macros that are built in for both PC and monster tokens are all-encompassing and way cool.  They include everything I’ve done (hit point management, attack powers, skills) as well a bunch of things I haven’t done (delaying one’s turn, pulling up a formatted character sheet and power cards).  There are even macros to make editing the character stats easier, rather than having to directly fiddle around with properties.  The attack macros take into account who the target is, figure out their defenses, establish whether the attack hits or not, and so on.  It’s very, very detailed, and from what I understand it all works!

So, I learned that I don’t have to write all of these macros from scratch – others have done it for me.  Macro-writing over, right?

Nope.

See, I LIKE writing macros!  I’m not a professional programmer, but I’m pretty good at programming.  When it’s for a hobby, it’s something I just enjoy doing.  Plus, I like the idea of being able to customize my macros for my players.

Now, I would be foolish if I completely ignored the existence of excellent MapTool frameworks like Rumble’s.  If I’m having trouble with my own macros, I can see how Rumble implemented something.  I’ll certainly take inspiration from some of his ideas (such as tracking XP and action points).  But I don’t feel like using a pre-packaged setup like this because then I would deprive myself of the fun of discovering how to write my own MapTool macros.

All that said, if you’re not into the idea of writing your own macros for the pleasure of writing them and you just want a bunch of macros that work for your D&D 4e game, start your campaign from a template like this one.  There are lots of others on the MapTool forum for a variety of games, and they look fantastic to me.  I love the MapTool community!

MapTool Macros – Damage and healing

Edit 7/19/2010: Since I first wrote this post, I have learned more about MapTool macros, and you can find the improved information at this post.  However, I’ve left the original post below for posterity – and as an example of how to learn how to improve your macro writing, rather than just giving the finished product.

During our first actual gaming session with MapTool, I was pleasantly surprised to discover that my players liked keeping track of their characters’ hit points within the program, right on the character sheet that pops up whenever they would mouse over their character’s token.  They did this despite the fact that changing their HP involved double-clicking the token, navigating to the Properties tab of the Edit Token dialog, deleting the current HitPoints value and entering the new value.

Given that they like keeping track of HP in MapTool, I figured the least I could do would be to make it easier for them.  I wanted to create a button that would let them decrease their HP and another button that would let them heal.  And while I COULD have stopped there, I got into it and wanted to make this even slicker.

Before I could put the new macros into action, I had to edit my characters’ properties.  I needed the MaxHP value (so that healing couldn’t take the character above it).  And while I didn’t technically NEED the Bloodied value to be on the character sheet (macros could calculate it based on MaxHP), I discovered that MapTool will let you specify factors that are derived from other factors.  Here are the properties I now use for the Health section of my characters’ stat sheets:

Health properties

*@—–HealthStats—–:-
*@HitPoints:10
*@TempHP:0
*@MaxHP:10
@BloodiedHP:{FLOOR(MaxHP/2)}
*@SurgesLeft:6
*@SurgeValue:{FLOOR(MaxHP/4)}
@DailySurges:6

Note that the * means that the variable will be displayed on the mouse-over character sheet and the @ means that it will be visible only by the token’s owner and the GM.  (Side note: This means that my players won’t be able to see stats for monsters, since they don’t own the monster tokens – this is good.)  The header line (HealthStats) is technically a property with an assigned value of “-“, which I’ve added just for looks on the pop-up sheet (there’s a separate section now for defenses and so on).  SurgeValue isn’t used in my macros, but I wanted it on the sheet so my players could look it up easily whenever they spend a surge.

These macros ended up getting more complex than I intended for them to be, so I’ll just put the finished versions below and then discuss each one.  I’ll start with the macro that adds temporary hit points, as it’s the simplest.

Temporary hit points macro

[h: TempsAdded=AmountOfTempHPGained]
[h: CurTemps=getProperty(“TempHP”)]

[if(CurTemps>=TempsAdded), CODE:
{Already has [CurTemps] temporary hit points, so no temps were  added.};
{[h: setProperty(“TempHP”,TempsAdded)]
Now has [TempsAdded] temporary hit points.}
]

This macro first creates a prompt that asks the player to enter a value for AmountOfTempHPGained.  There are ways using the INPUT command to make this look prettier, but I haven’t bothered with them yet.  Once the player has said how many temps they’re gaining (let’s say 3), that’s stored as TempsAdded.  The macro finds out how many temps the player has at the moment (CurTemps) and then checks to see if the new temps are greater than the old.  Since temporary hit points don’t stack in D&D 4e (if you have 5 and gain 3 more, you just have 5, not 8), the macro simply prints a “no new temps for you” message if they already have at least as many as they’re adding.  Otherwise, it sets the TempHP value on the character sheet to the amount of temps that were added and tells the player the new total.  Not too hard.

Next up is the macro to gain actual hit points – the healing macro.

Healing macro

[h: Heal=AmountOfHPGained]
[h: CurHP=getProperty(“HitPoints”)]
[h, if(CurHP>=0), CODE:
{[NewHP=CurHP+Heal]};
{[NewHP=Heal]}
]

[h, if(NewHP>getProperty(“MaxHP”)), CODE:
{[NewHP=MaxHP]
[Heal=MaxHP-CurHP]};{}
]

[h: setProperty(“HitPoints”,NewHP)]
[h: Bloodied=getProperty(“BloodiedHP”)]

Gains [Heal] hit points and is at <b>[NewHP]</b> hit points.

[if(NewHP>Bloodied && CurHP<=Bloodied && CurHP>0), CODE:
{She is no longer bloodied.
[h: setState(“Bloodied”,0)]};
{}
]
[if(CurHP<=0 && NewHP<=Bloodied), CODE:
{She is no longer dying, but she is still bloodied.
[h: setState(“Unconscious”,0)]};
{}
]
[if(CurHP<=0 && NewHP>Bloodied), CODE:
{She is no longer dying, and she is no longer bloodied.
[h: setState(“Unconscious”,0)]
[h: setState(“Bloodied”,0)]};
{}
]

[if(NewHP==MaxHP), CODE: {She is at maximum health.}; {}]

This one starts like the last one, popping up an input box that asks the player to say how many hit points they’re gaining, saving that number as Heal.  It then gets the character’s current HP.

  • If current HP is greater than zero, the macro sets the player’s HP to the current HP plus the healed amount.
  • If current HP is less than zero, the macro follows D&D 4e rules by setting the player’s life total to the healed amount (healing starting from zero rather than from a negative number).

The macro also checks to see if the healing would put the character’s hit points at or above their maximum hit points; if so, it only heals up to the maximum.  It prints a message with the amount of HP healed and the new HP total.

The macro also gets the PC’s bloodied value from the character sheet and prints out some additional messages depending on where the character started with HP and where they ended up.

  • If the PC was conscious but bloodied and is not bloodied any more, the macro prints a message saying as much and then removes the “Bloodied” state from the character (which shows up in my campaign as a little red icon in the corner of the token).
  • If the PC started off dying and ended up not dying but still bloodied, the macro says as much and then removes the “Unconscious” state from the character (which shows up in my campaign as a gray X across the character’s portrait).
  • If the PC started off dying and ended up unbloodied, the macro says so and removes both the “Bloodied” and “Unconscious” states from the character.

Finally, if the PC ends up at maximum hit points, the macro says that, too.  This is helpful in cases where the amount healed is less than the amount entered because the full amount would have put the PC above their max HP.  This way, the player understands what happened.

Now for the damage macro.  I originally wrote this one before the healing macros, and I forgot about temporary hit points when I wrote it, so it had to be re-done.  This has made it rather complex in appearance.

Damage macro

[h: Dmg=AmountOfDamageTaken]
[h: CurHP=getProperty(“HitPoints”)]
[h: CurTemps=getProperty(“TempHP”)]
[h: Bloodied=getProperty(“BloodiedHP”)]
[h: Dead=-1*Bloodied]

[if(CurTemps==0),CODE:
{
[h: NewHP=CurHP-Dmg]
Takes [Dmg] damage and is at <b>[NewHP]</b> hit points.
[h: setProperty(“HitPoints”,NewHP)]
};
{
[if(Dmg<=CurTemps), CODE:
{
[h: setProperty(“TempHP”,CurTemps-Dmg)]
[h: NewHP=CurHP]
Takes [Dmg] damage, losing [Dmg] temporary hit points.  She how has [CurTemps-Dmg] temporary hit points and <b>[CurHP]</b> regular hit points.
};
{
[h: HPDmg=Dmg-CurTemps]
[h: NewHP=CurHP-HPDmg]
[h: setProperty(“TempHP”,0)]
[h: setProperty(“HitPoints”,CurHP-HPDmg)]
Takes [Dmg] damage, losing [CurTemps] temporary hit points and [HPDmg] regular hit points.  She now has no temporary hit points and <b>[NewHP]</b> regular hit points.
}
]
}
]

[if(NewHP<=Bloodied && CurHP>Bloodied && NewHP>0), CODE:
{She becomes bloodied.
[h: setState(“Bloodied”,1)]};
{}
]

[if(NewHP<=0 && NewHP>Dead && CurHP>0), CODE:
{She is now dying.
[h: setState(“Unconscious”,1)]};
{}
]

[if(NewHP<Dead), CODE:
{She is dead.
[h: setAllStates(0)]
[h: setState(“Dead”,1)]};
{}
]

All right, let’s break this down.  This macro starts by asking the player how much damage they’re taking.  It pulls in the current hit points, current temporary hit points and bloodied value from the character sheet and calculates the “Dead” HP value (the negative of the bloodied value).  The code then branches.

  • If the player doesn’t have any temps right now, the new HP is set to the old HP minus the damage taken, and the player is told how much damage is taken and where their hit points stand now.
  • If the player does have temporary hit points, the macro checks to see whether they’ll all be used up by the damage or not.
  • If they have more temps than they’re taking in damage, the damage is subtracted from the temps and the player is told how much damage they took, how many temps they have left and what their total HP is.
  • If the damage is enough to eat all of the temps and then some, the temps are wiped out, the remainder is subtracted from the actual hit points, and a message tells the player what happened.

Now the branches are done (the player has gotten a message telling them how much damage they took and where their HP situation is now).  The rest of the code checks to see if the character went from unbloodied to bloodied, conscious to unconscious, or alive to dead.  If any of those happen, the proper states are set and the proper messages are sent to the text window.

Finally, I realized that players will probably want to keep track of their healing surges as well, so I created a simple little macro to let them remove a surge from their total (note that actually gaining hit points is handled independently through the healing macro above).  Having done that, I figured I might as well create a macro to let them add a surge back (useful in case they click the “spend a surge” button by accident or take an extended rest).  The code for these is as follows:

Remove a surge:

[h: CurSurges=getProperty(“SurgesLeft”)]

[if(CurSurges>0), CODE:
{[h: setProperty(“SurgesLeft”,CurSurges-1)]
Spends 1 healing surge.  She has [CurSurges-1] [if(CurSurges!=2, “surges”, “surge”)] remaining.
};
{Has no healing surges left to spend.}
]

Regain a surge:

[h: CurSurges=getProperty(“SurgesLeft”)]

[if(CurSurges<getProperty(“DailySurges”)), CODE:
{[h: setProperty(“SurgesLeft”,CurSurges+1)]
Regains 1 healing surge.  She has [CurSurges+1] [if(CurSurges!=0, “surges”, “surge”)] remaining.
};
{Already has her full daily allotment of [CurSurges] healing surges.}
]

You’ll note that these macros do a couple of minorly fancy things.  First, they check to make sure that the player either has a surge left to spend or isn’t already at their maximum surge value on the adding side.  Second, they appropriately handle the singular/plural on surge/surges.  I didn’t bother with this on the hit points macro, so there you can see things like “Violet: Takes 10 damage and is at 1 hit points.”  Annoying, but not worth fixing because the code is messy enough already!

In case you were wondering, yes, I did use feminine pronouns throughout these macros because all three of my players are using female characters (despite the fact that one player is male).  If this were not the case, I could:

  • Awkwardly switch to gender-neutral pronouns
  • Edit the pronouns in the macros independently for each character
  • Create a property that indicates whether the character is male or female and then edits the pronouns appropriately

If I were doing this for broad distribution, I’d take the latter approach.  In my small game, though, I’ll probably go with the second approach if a male character ever comes up.

I’ve stored these macros in a package (along with skill checks, which I’ll cover in a later post) in case you’re interested (available here or on the downloads page).  I’m excited to see how my players will like them!

MapTool initiative – This is how I roll

Edit 7/19/2010: Since I first wrote this post, I have learned more about MapTool macros, and you can find the improved information at this post.  However, I’ve left the original post below for posterity – and as an example of how to learn how to improve your macro writing, rather than just giving the finished product.

Now that I’ve discussed the attack macros I’ve created in MapTool, I thought I’d mention one other macro that I’ve written for my current campaign, one that involves some additional functions of the MapTool language.  This is a macro that rolls initiative.

As you may recall from my last post, I use the token properties in MapTool to store values for hit points, character level, ability scores, melee weapon die, etc. for my PCs.  One of the properties that I store is Initiative – that is, the character’s initiative modifier.  I also have the ability to do this for monsters.  If I can write a macro that retrieves the initiative modifier from each token’s character sheet in MapTool, I can then roll up initiative.

I’ll start by mentioning that I like to roll initiative for each group of monsters only once (as I think is pretty standard in D&D 4e).  So, if I have my party of three PCs facing down ten goblins, I roll initiative once for each PC and once for the goblins as a group – four separate rolls.  If they’re facing 10 goblin warriors and 2 goblin dragonshields, I’ll roll separately for the warriors and dragonshields.

The macro that I’ve written looks at each token on the screen as I run it (whether visible to the players or covered by the fog of war – a topic for a future post), gets that token’s initiative modifier from its properties, and then rolls initiative.  Now, if every goblin on the map has an initiative modifier, my macro will roll initiative separately for each one.  My kludgy solution: Set the initiative modifier to the appropriate number for the FIRST monster of each group, and set the initiative modifier to the letter Z for all of the other monsters in the group.  I can make Z the default value for initiative in the Campaign Properties if I like, to make this easier.

I’ll present the finished macro in all its glory, and then I’ll break it down for you.

<font size = 10><b>Initiative!</b></font><br>

[h: TokenList = getVisibleTokenNames()]
[FOREACH(name, TokenList, “”), CODE:
{[IF(getProperty(“Initiative”,name)!=”Z”), CODE:
{<b>[name]:</b> [d20+getProperty(“Initiative”,name)]<br>};{}]
}
]

The first line is easy enough.  It prints the word “Initiative!” in large letters (the <font size=10></font> tags) and in bold face (the <b></b> tags).

The next line is a little more interesting.

  • The h: means that the result of this line will be hidden from the chat window (typical for background calculation commands in MapTool macros)
  • TokenList = means that we’re creating a variable called “TokenList” and then assigning it a value
  • getVisibleTokenNames() calls a MapTool function that creates a list of the names of all of the tokens on your screen.  If you zoom in to just one token, it will get just the name of that token.  If you zoom out and have 20 tokens on the screen, it will create a list of 20 names.  This list of names is assigned to the variable called “TokenList”.

Next we have a FOREACH function.  This says: For each name in the array called “TokenList”, I want you to execute whatever comes after the word CODE: in curly brackets.  When you’re done executing the code for the first name and then for each subsequent name, I want you to not put any separator showing that you’re done (that’s what the “” means).  If you don’t put the empty quotes there, MapTool will put a comma after the output of the CODE block when it’s done with each name.

Now we get into the first set of curly brackets (remember, I use indenting to help match up opening brackets with closing brackets to make the code easier to follow).  The line that begins with IF means:

  • Get the value of the property called “Intiative” for the token with the name that we’re currently working on from our FOREACH loop.
  • If the Initiative value for this token is not equal to “Z” (the != means “is not equal to”), then do some code (which is going to be in the next set of curly brackets).

The next line starts with some curly brackets that enclose what we’re going to do if the current token’s initiative isn’t equal to “Z”.  That is, it will print the name of the token in bold face (that’s the <b>[name]</b> bit).  It will then roll a d20 and add the value of the Initiative property of the current token and print the result in the chat window.  It will then print a line break (the <br>).

After that, you see the curly bracket close – which means that we’re done specifying what to do if the token’s Initiative value is not equal to “Z”.  What comes next – the semicolon followed by the empty curly brackets – tells MapTool what to do in case the token’s Initiative value IS equal to “Z”.  That is, nothing.  If the token has a Z for initiative, then don’t roll initiative for it.

We then see a closing square bracket (matching the square bracket that opened right before the IF statement), then a closing curly bracket (matching the curly bracket that opened right before the IF statement), then a closing square bracket (matching the square bracket that opened right before the FOREACH statement.  The result of this macro would look something like this:

Initiative!

Blue Slime: 3
Naivara: 23
Kana: 11
Ochre Jelly: 9
Surina: 7
Rat 1: 22

This is how I like to roll initiative in MapTool, though I know there are other ways.  What is your preferred method?

OnlineDM: Initiative!

MapTool Macros – Multi-Target Attacks

Edit 7/19/2010: Since I first wrote this post, I have learned more about MapTool macros, and you can find the improved information at this post.  However, I’ve left the original post below for posterity – and as an example of how to learn how to improve your macro writing, rather than just giving the finished product.

Building on my recent post in which I described how to create a rather complicated macro to accurately run a basic attack, it’s time to talk about a somewhat more complicated attack – one that targets multiple enemies.  Some characters in D&D Fourth Edition might only rarely have one of these attacks, but a controller like a Wizard or Druid or even a character like Barbara’s Swordmage with her close burst 1 attacks will run into these a lot.

If you have an attack that targets every enemy within a given burst, you could program the attack a few different ways.  The simple approach would be to click the button once per enemy, and only use the damage roll from either the first or the last click (since in D&D 4e multi-target attacks generally only have a single damage roll).  Alternatively, you could create separate macro buttons for the attack (which you would click once per enemy) and the damage roll (which you would only click one time at the end).  You might prefer this latter approach to begin with – separate attack rolls and damage rolls – even for single-target attacks, since lots of players do it that way in real life (only rolling damage if they hit).

My preferred approach is a little more elegant, I think.  It’s a macro that you click one time for the multi-target attack, which then asks you how many targets you’re attacking.  It then gives you an attack roll for each target and a single damage roll.  It also handles telling you the the max damage amount for any attack rolls that are critical hits.  The macro essentially starts with the basic attack macro from my earlier post and builds from there.

First, a recap of the basic attack macro:

[h: SkillMod=FLOOR((getProperty(“Strength”)-10)/2)]

[h: DamageDie=getProperty(“MeleeDamageDie”)]
[h: HalfLevel=FLOOR(getProperty(“Level”)/2)]
[h: Prof=getProperty(“MeleeProficiency”)]
[h: Enh=getProperty(“MeleeEnhancement”)]

[h: AttackBonus=SkillMod+HalfLevel+Prof+Enh]
[h: DamageBonus=SkillMod+Enh]

[h: d20roll=d20]
[h: DamageRoll=roll(1,DamageDie)]

[h: AttackRoll=d20roll+AttackBonus]
[h: MaxDamage=DamageDie+DamageBonus]
[h: RegularDamage=DamageRoll+DamageBonus]

<b>Melee Basic Attack</b><br>
Attack: [d20roll] + [AttackBonus] = <b>[AttackRoll]</b> versus AC<br>
[if(d20roll==20), CODE:
{<font color=Red>–CRITICAL HIT–</font><br>
Damage: [DamageDie] + [DamageBonus] = <b>[MaxDamage]</b> damage
};
{Damage: [DamageRoll] + [DamageBonus] = <b>[RegularDamage]</b> damage}
]

This macro figures out the attack bonus based on the appropriate skill modifier, weapon proficiency bonus, weapon enhancement and character level.  It gets the weapon damage die, and it calculates the damage bonus based on the skill modifier, weapon enhancement and character level.  It rolls the attack and the normal damage as well as calculating the max damage for a crit.  It tells you what the result of the attack roll was.  If it was a crit, it tells you so and gives the max damage amount.  If it wasn’t a crit, it just tells you the rolled damage amount.

The guts of the multi-attack macro will be the same.  It gets the appropriate skill modifier (which may be something other than Strength, of course), proficiency, enhancement, level and damage die.  It calculates regular and max damage in just the same way.  The difference only comes on the attack roll – it has to generate one attack roll per target.

To do this, we define a variable with no value – and MapTool will then ask the user to input a value.  Here’s what this part of the macro looks like (for the Sword Burst attack from Barbara’s Swordmage named Surina):

<b>Sword Burst</b><br>
[h: x=NumberOfTargets]
Attacking [x] adjacent
[if(x==1,”enemy.”,”enemies.”)]
<br>

When MapTool executes the line that reads [h: x=NumberOfTargets], it will pop up a box that looks like this:

Input BoxThe user then enters a number.  If you enter something else (like a word), you’ll get an error message.  Assuming you do enter a valid number – let’s say 4 – MapTool will store this as the value of x. It then confirms for the user the number that was entered for x and has a little extra piece of code to say that you’re attacking “5 enemies” but “1 enemy” (the first version I wrote could have you attacking “1 enemies,” which annoyed me).

It then moves on to the following bit of code:

[h: i=1]
[WHILE(i <= x, “<br>”), CODE:
{
…MORE CODE WILL GO HERE IN A MINUTE…
}
]

As you may have guessed, where you see “…MORE CODE WILL GO HERE IN A MINUTE…” we will soon be putting more code.  First, though, I wanted to show you the structure of this loop.  I begin by introducing a new variable, i (for “iteration”) and set its value to 1.  The first open bracket before the word “WHILE” is paired with the closed bracket at the very end of the code above.  The open curly bracket on the line below the WHILE statement is paired with the closed curly bracket two lines below it.  The expression [WHILE(i <= x, “<br>”, CODE: {…}] means:

  • Check to see if i is less than or equal to x
  • If i is indeed less than or equal to x, then do whatever is in the {…} section (note that you had better have something in the {…} section that increases the value of i!)
  • Put in a line break (that’s the “<br>”)
  • Come back to check and see if i is still less than or equal to x
  • If so, repeat what’s in the {…} section, then insert another line break
  • Do this process up until i is greater than x, then move on past the closed square bracket

This is what’s often known in other programming languages as a DO loop.  MapTool also has a FOR…NEXT loop function as well as a COUNT function that can also handle looping through lines multiple times, but this WHILE loop is the easiest to explain (the numbering on the other versions gets a little weird).

Now that we’ve set up the structure of the loop and we know it will keep repeating until we don’t want it to repeat any more, we need to put the guts of the attack roll and its result in between those curly brackets.  That means we need to roll an attack and print out the result of that attack roll first:

[h: d20roll=d20]
[h: AttackRoll=d20roll+AttackBonus]
Target [i]:   [d20roll] + [AttackBonus] = <b>[AttackRoll]</b> versus Reflex

Simple enough.  The only thing different here from our basic attack macro, aside from the fact that this particular power goes after Reflex instead of AC, is that we have it print “Target [i]” instead of just “Attack” before the attack roll.  The [i] in brackets will show whatever the value of i currently is – starting at 1, and going up from there (Target 1, then Target 2, and so on).

Next, we put in the same type of code that we saw in the basic attack to check for a critical hit, only this time we’ll put a line with the max damage right next to the attack result (no line break) since the crit will only apply to that particular attack roll:

[if(d20roll==20), CODE:
{<font color=Red>  –CRITICAL HIT–</font> [DamageDie] + [DamageBonus] = <b>[MaxDamage]</b> force damage};{}
]

Finally, we need to increase the value of i by 1 so that the loop will eventually end (otherwise it would repeat infinitely with i=1):

[h: i=i+1]

At this point, we’ve reached the end of the looping code, so we have the closed curly bracket and the closed square bracket to end the loop.  We then move on to printing out the regular damage roll, with a couple of line breaks before it:

<br><br>
Damage: [DamageRoll] +[DamageBonus] = <b>[RegularDamage]</b> force damage

Putting it all together, the macro looks like this:

[h: SkillMod=FLOOR((getProperty(“Intelligence”)-10)/2)]

[h: DamageDie=6]
[h: HalfLevel=FLOOR(getProperty(“Level”)/2)]
[h:Prof=getProperty(“MeleeProficiency”)]
[h: Enh=getProperty(“MeleeEnhancement”)]

[h: AttackBonus=SkillMod+HalfLevel+Enh]
[h: DamageBonus=SkillMod+Enh]

[h: d20roll=d20]
[h: DamageRoll=roll(1,DamageDie)]

[h: MaxDamage=DamageDie+DamageBonus]
[h: RegularDamage=DamageRoll+DamageBonus]

<b>Sword Burst</b><br>
[h: x=NumberOfTargets]
Attacking [x] adjacent
[if(x==1,”enemy.”,”enemies.”)]
<br>
[h: i=1]
[WHILE(i <= x, “<br>”), CODE:
{
[h: d20roll=d20]
[h: AttackRoll=d20roll+AttackBonus]
Target [i]:   [d20roll] + [AttackBonus] = <b>[AttackRoll]</b> versus Reflex
[if(d20roll==20), CODE:
{<font color=Red>  –CRITICAL HIT–</font> [DamageDie] + [DamageBonus] = <b>[MaxDamage]</b> force damage};{}
]
[h: i=i+1]
}
]
<br><br>
Damage: [DamageRoll] +[DamageBonus] = <b>[RegularDamage]</b> force damage

You’ll note that it’s a little different from the basic attack macro in that it doesn’t check the character sheet to get the size of the weapon damage die, since the damage die is defined in the power itself.  That’s typical for a lot of multi-target attacks in D&D 4e.  This particular macro can have pretty much any value you want for NumberOfTargets (it’s fun to run with 50 attacks, for instance), but for a number such as 4, the output will look something like this:

Sword Burst
Attacking 4 adjacent enemies.
Target 1: 20 + 4 = 24 versus Reflex –CRITICAL HIT– 6 + 3 = 9 force damage
Target 2: 3 + 4 = 7 versus Reflex
Target 3: 17 + 4 = 21 versus Reflex
Target 4: 1 + 4 = 5 versus Reflex

Damage: 5 +3 = 8 force damage

I hope this macro is helpful for you. You can use the same structure for monster multi-attacks, of course, though I wouldn’t bother with looking up attack and damage bonuses from the monster’s character sheet since there’s not much point in HAVING a monster character sheet!  Just hard-code those values in.

I’m always interested to hear about other people’s macros, and I’m also interesting in helping to program other MapTool macros that I haven’t thought of yet.  If you have macros of your own to share or would like some help in writing new macros, please leave a comment below or send me a message via email.

MapTool Macros – Basic Attacks

Edit 7/19/2010: Since I first wrote this post, I have learned more about MapTool macros, and you can find the improved information at this post.  However, I’ve left the original post below for posterity – and as an example of how to learn how to improve your macro writing, rather than just giving the finished product.

Warning: Though this post is about “basic” attacks, it’s rather epic in length.  I go through a detailed exercise of building a moderately complex macro from scratch here, which takes time to explain.  You have been warned! 🙂

Continuing my series on writing MapTool macros, it’s time to finally get to something more interesting – player attacks.  I’ve created macros for a player’s melee basic attack and ranged basic attack (very similar to one another), which can be used as the foundation for most attack powers that only target a single enemy.  I’ll talk about multi-enemy attacks in my next post.

In this post, I’ll walk you through the entire process of developing a basic attack macro, starting from a simple macro that rolls a d20, adds the hard-coded attack modifier, rolls the hard-coded damage die and adds the hard-coded damage modifier.  That macro would have to be different for every PC, and it would have to be manually changed every time the PC changes their weapon, goes up a level, etc.  We’ll end up with a generic macro that can be used for almost any PC and that will change with the character.

We’re going to write a Melee Basic Attack macro for Violet, a second-level Ranger who wields a non-magical longsword.  She has Strength of 17 (a +3 modifier) and a +3 proficiency bonus to hit with the longsword.  She’ll also get +1 to hit from half of her level.  Her total attack bonus is therefore +7.  The longsword does d8 damage (plus Violet’s +3 Strength bonus) on a hit.

To create a new macro for a Violet, we’ll click on Violet’s token on the MapTool map.  One of the windows we should see at the bottom of the screen is the Selection window (if you can’t see it, go to Window – Selected).  This window will show the token image and name, with a little bit of text below it that reads, “No Macros.”  We’ll right click where it says “No Macros” and choose Add New Macro.  This will create a new button in that window labeled (new).  Right click on the (new) button and choose Edit.

Now we’re editing the macro.  Start by changing the name from (new) to Melee Basic Attack.  Down in the Command box we’ll type the following:

Attack: [d20+7]
Hit: [d8+3]

When we then click the Melee Basic Attack button, we get:

Violet: Attack: 25 Hit: 11

Now, we could call it a day here.  This works.  If Violet’s player (or anyone else) hovers their mouse over the 25 for the attack roll, it will show a ToolTip that explains this comes from a d20+7 roll (18+7=25).  The same goes for the damage roll.  We can do better, though.

Let’s start with some basic formatting.  Having Violet spout off with a couple of numbers in the chat window works, but it might be nice for her to mention that this is a Melee Basic Attack, that it’s attacking Armor Class, and that it’s dealing regular damage.  It might also be nice to have some line breaks added between the attack roll and the damage roll.  Here is a “prettified version” of the macro:

<b>Melee Basic Attack</b><br>
Attack: <b>[d20+7]</b> versus AC<br>
Hit: <b>[d8+3]</b> damage

The <b> and </b> HTML tags put whatever is between them in bold face.  I’ve put the name of the attack and the numeric results of the rolls in bold face to make them stand out.  I’ve also added <br> tags at the end of each line (except the last one) to create line breaks.  I’ve also added the note that the attack is versus AC and that the hit roll is damage.  Now the output will look more like this:

Violet: Melee Basic Attack
Attack: 21 versus AC
Hit: 7 damage

So, this looks nice now and it works.  If you want to keep things simple, you can stop now.  But every time anything changes for Violet, we’ll have to manually edit the numbers within her attack macros individually.  In an ideal world, we would have Violet’s character sheet in MapTool and our macro could look to that sheet to figure out her Strength modifier, her weapon proficiency, her weapon damage die, any magical enhancement on the weapon and the half-level value.  That way whenever Violet gets new equipment or levels up, we only have to modify that character sheet, not every one of her attack macros.

Fortunately, MapTool does have Properties for tokens.  If you double click on a token and click on its Properties tab, you will see the default basic properties for a token in MapTool listed.  These might be great for some games, but for D&D Fourth Edition I’ve found a different set to be useful.  To change the available properties for your tokens, go to Edit – Campaign Properties.  Click on Basic on the left side of the window that pops up, delete the existing block of properties and replace them with the following:

@Level:1
*@HitPoints:10
*@ArmorClass:10
*@Fortitude:10
*@Reflex:10
*@Will:10
*@Speed:6
*@Initiative:0
*@Strength:10
*@Constitution:10
*@Dexterity:10
*@Intelligence:10
*@Wisdom:10
*@Charisma:10
@MeleeEnhancement:0
@RangedEnhancement:0
@MeleeProficiency:0
@RangedProficiency:0
@MeleeDamageDie:6
@RangedDamageDie:6
@MagicEnhancement:0

The @ symbol in front of each property means that only the owner of the token and the GM (that’s you, Sparky) will be able to see the property’s value.  The * in front of some properties means that the property and its value on the character’s stat sheet that will pop up when you mouse over the token (though they will only be visible to the token’s owner, of course).  The colon with a number after it sets the default value for the property (and as far as I can tell is the only way that you can make the values editable for any given token).  The reason that I’ve made the properties visible to the owner and GM only is that I will be using them for monsters as well as PCs, and I don’t want the PCs seeing the monsters’ defenses, hit points, etc.

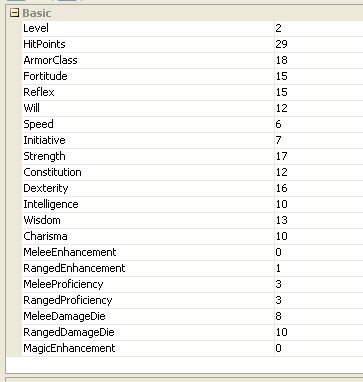
Once you’ve saved these as your default properties, you can double click on your PC’s token (Violet in this case) and change the values.  The important ones for this macro are Strength (17), MeleeDamageDie (10), MeleeProficiency (3), MeleeEnhancement (0) and Level (2).  I’ve set the rest of them as well, as you can see in this image of Violet’s token properties.
Token Properties

Now that Violet has values for Strength and so on, we can use them in our macro and then just edit Violet’s properties when she levels up or gets a new sword.  This requires somewhat fancier programming in the MapTool macro – beginning with the idea of a variable.

To establish a variable in a MapTool macro, you can do something as simple as writing: [MyVariable=10].  This would establish a variable called MyVariable and assign it a value of 10, which you could then use later in your macro (such as [MyOtherVariable = MyVariable + 5], giving MyOtherVariable a value of 15).  If you write it just like that, though, MapTool with send a message to the chat window with the value of the variable.  So a random “Violet: 10” would pop up.  Since we don’t want to actually send anything to the chat window when we declare the variable, we will denote this line as being hidden from chat by putting h: at the beginning of the declaration:

[h: MyVariable=10]

Technically this h: is a “roll option” in the MapTool lingo.  Remember that these macros are fundamentally constructed to roll dice, though you can also send text to the chat window and do more complex things.  There are lots of roll options you can use at the beginning of your bracketed code, such as gm: or just g: to show the result of the roll in the chat window for the GM but to hide it from the players.  In any case, we’ll be using lots of hidden lines in our macros since we don’t want every calculation showing up in chat – just the results.

Next, we need to know how to get the value of the properties that we’ve set for Violet so we can use them in our macro.  Fortunately, MapTool has a function called getProperty that does exactly this.  To figure out Violet’s melee proficiency bonus (which goes into the calculation of the attack bonus), we use the following code:

[h: Prof=getProperty(“MeleeProficiency”)]

This creates a variable called Prof, which is equal to the value of the property called MeleeProficiency.  Yes, the quotes and the parentheses are required.

What about Violet’s strength modifier?  We need to get the value of the Strength property, subtract ten from it, divide that by two and then round down.  Here’s the code to do all that:

[h: SkillMod=FLOOR((getProperty(“Strength”)-10)/2)]

The FLOOR function does the rounding down (CEIL or CEILING would round up).  Note that I’m calling this SkillMod to make it easier to re-use this code for other attacks that might use other skills, such as the Ranged Basic Attack that would use Dexterity.  Using similar logic to get some other properties, we’re able to write code that will let us calculate the attack bonus and damage bonus for the melee basic attack:

[h: SkillMod=FLOOR((getProperty(“Strength”)-10)/2)]

[h: DamageDie=getProperty(“MeleeDamageDie”)]
[h: HalfLevel=FLOOR(getProperty(“Level”)/2)]
[h: Prof=getProperty(“MeleeProficiency”)]
[h: Enh=getProperty(“MeleeEnhancement”)]

[h: AttackBonus=SkillMod+HalfLevel+Prof+Enh]
[h: DamageBonus=SkillMod+Enh]

Now we can go back to our earlier prettified macro and substitute in the AttackBonus and DamageBonus variables.  We can also use the ROLL function to take advantage of the fact that the damage die is now a variable rather than hard coded.  With the ROLL function, you tell MapTool the number of dice and the number of sides on each die you want to roll, so a d20 would be [ROLL(1,20)].  Put the lines of code above first, followed by these:

<b>Melee Basic Attack</b><br>
Attack: <b>[d20+AttackBonus]</b> versus AC<br>
Hit: <b>[ROLL(1,DamageDie)+DamageBonus]</b> damage

The output will look exactly the same as before, but now we shouldn’t have to touch the macro when things change for Violet.

There’s still one little wrinkle in our plans here, though – what happens if the d20 for the attack roll comes up on a natural 20?  That, my friends, would be a critical hit and should result in maximum damage.  It’s entirely possible to roll a natural 20 with this macro and not notice, in which case you might just take the regular result of the damage roll rather than taking the maximum possible damage.  To fix this, we need to get a little fancier.

I’ll start by saying that I like the ToolTip mouse-over function that shows players the breakdown of the die roll.  It’s not just a 22, it’s a d20 that came up on 15 plus an attack bonus of 7.  We’re getting into some programming that is going to have to roll the attack one time and then store the result as a variable, which means that when we show that variable, we’ll lose the d20 ToolTip.  So, things are going to look a little different because I’m going to start explicitly printing out the breakdown of the attack and damage rolls.

We’re going to need to roll the d20 for the attack once and store the result.  While we’re at it, we might as well roll the damage die once and store the result, along with figuring out what the max damage would be in case of a crit.  Below the earlier lines where we were defining variables, we add these lines:

[h: d20roll=d20]
[h: DamageRoll=roll(1,DamageDie)]

[h: AttackRoll=d20roll+AttackBonus]
[h: MaxDamage=DamageDie+DamageBonus]
[h: RegularDamage=DamageRoll+DamageBonus]

Now we’ve defined the result of rolling a d20 for the attack as a variable called d20roll and the result of rolling the damage die as a variable called DamageRoll.  This means that we can output the result of the attack roll and then check to see if there was a critical hit.  If there was a crit, we want to call out this fact and make sure the damage is maxed.  If not, we want to print the normal damage roll output.  This means that we need to get into the IF function in MapTool.  I won’t go into all of it here – I’ll just show the final version.  The gory details of using IF statements in MapTool can be found in the excellent MapTool wiki, so I won’t rehash them.

<b>Melee Basic Attack</b><br>
Attack: [d20roll] + [AttackBonus] = <b>[AttackRoll]</b> versus AC<br>
[if(d20roll==20), CODE:
{<font color=Red>–CRITICAL HIT–</font><br>
Damage: [DamageDie] + [DamageBonus] = <b>[MaxDamage]</b> damage
};
{Damage: [DamageRoll] + [DamageBonus] = <b>[RegularDamage]</b> damage}
]
Yes, this is a little bit complicated.  Basically, I print the name of the attack and the result of the attack roll (broken down into the d20 and the attack bonus).  I then check to see if there was a crit.  If there was, I print –CRITICAL HIT– in red (that’s the <font folor=Red> and </font> HTML tags) and then print the max damage breakdown.  If there wasn’t a crit, I print the normal damage breakdown.  The square brackets, curly brackets, parentheses and colons all have to be handled just right, and the CODE statement is a little touchy, too.  The wiki can explain it all.

In the end, we’re left with a snazzy little macro that efficiently handles melee basic attacks with critical hits, getting all of its information from the character token’s properties.  I haven’t included code to check for extra damage from a magical weapon on a critical hit, but that would be easy enough.  It would require a new property that tells you what the bonus damage die from your weapon is and then some extra code in the MaxDamage calculation to account for it.  As they say in textbooks, this is left as an exercise for the reader. Similarly, making this into a macro for Ranged Basic Attack is as simple as replacing the word Strength with Dexterity and Melee with Ranged in the macro code.

I hope you find this macro construction process to be helpful.  In my next macro article, I’ll show you how I’ve programmed in multi-attack abilities.   The final version of the Melee Basic Attack macro is below.

[h: SkillMod=FLOOR((getProperty(“Strength”)-10)/2)]

[h: DamageDie=getProperty(“MeleeDamageDie”)]
[h: HalfLevel=FLOOR(getProperty(“Level”)/2)]
[h: Prof=getProperty(“MeleeProficiency”)]
[h: Enh=getProperty(“MeleeEnhancement”)]

[h: AttackBonus=SkillMod+HalfLevel+Prof+Enh]
[h: DamageBonus=SkillMod+Enh]

[h: d20roll=d20]
[h: DamageRoll=roll(1,DamageDie)]

[h: AttackRoll=d20roll+AttackBonus]
[h: MaxDamage=DamageDie+DamageBonus]
[h: RegularDamage=DamageRoll+DamageBonus]

<b>Melee Basic Attack</b><br>
Attack: [d20roll] + [AttackBonus] = <b>[AttackRoll]</b> versus AC<br>
[if(d20roll==20), CODE:
{<font color=Red>–CRITICAL HIT–</font><br>
Damage: [DamageDie] + [DamageBonus] = <b>[MaxDamage]</b> damage
};
{Damage: [DamageRoll] + [DamageBonus] = <b>[RegularDamage]</b> damage}
]
MapTool Macros – Basic dice macros

As promised, it’s time I share some of what I’ve learned in putting together MapTool macros for my D&D Fourth Edition campaign.  My characters are a dragonborn swordmage, a deva druid and an eladrin rogue adventuring through the Keep on the Shadowfell.  They’re second-level characters, so they don’t have too many powers yet, but they have enough powers to require me to write some interesting macros for their attacks.

Before I go farther, I should mention that the MapTool wiki has great macro writing resources.  That’s how I learned most of what I’ve figured out so far.  So, be sure to check that resource out as well.

I’ll start with some simple campaign macros – about as simple as MapTool macros can get.  Every macro in MapTool is tied either to a token (token macros), a campaign (campaign macros) or to your MapTool program itself (global macros).  I personally haven’t created any global macros yet, and most of the really interesting macros I’ve made so far are tied to tokens (mostly the player character tokens), but let’s start with a simple campaign macro – a button that will let anyone in the game roll a d20 with one click.

In order to create a Campaign macro, you have to be able to see the Campaign window (usually a skinny little window near the bottom of your MapTool screen).  If you can’t see it, go to the Window menu in MapTool and click Campaign.  The Campaign window starts off pretty much empty.  To create a new campaign macro, right click in the Campaign window and select Add New Macro.  This will cause a little button with the label (new) to appear in the window.  Go ahead and click that button.

Nothing happened?  Well, that’s because the macro starts off with no code to execute by default.  We’ll fix that.  Right click on the (new) button and select Edit.  The window below should pop up.

New MacroNow you’re writing a macro.  Begin by changing the label in the top box from (new) to something more descriptive – in this case, let’s call it “d20” (you don’t need the quotes).  You can leave the Group and Sort Prefix boxes blank for now (they’re optional).  The meat of the action is in the Command box below.  We want this macro to show the result of a d20 roll in the chat window for whoever presses the button.  If you want this to be dead simple, all you need to do is type [d20] (in square brackets, just like I’ve done) into the Command box and click OK.  This will change the name of the button to d20.  When you click it now, you’ll get something like this in the chat window:

OnlineDM: 7

If you mouse over the number in the chat window, you’ll see ToolTip text that reads:

<< d20 = 7 >>

This tells whoever is interested that the 7 in the text box is the result of a d20 roll.

This is all right, but we can do better.  The command [d20] in square brackets tells MapTool to randomly generate a number between 1 and 20 and output the result to the chat window (with a ToolTip that shows that it’s the result of a d20 roll) as a message from whoever hit the button.  Just looking at the result, though, you can’t really tell that it’s a d20 roll.  Let’s format it nice and prettily.

Right click on the d20 button and select Edit again.  This time, put the following text in the Command box:

d20 roll: <b>[d20]</b>

And then click OK.  Now when you click the button, you’ll get output that looks like this:

OnlineDM: d20 roll: 19

All we’ve done is add a little extra text that shows up in the window (“d20 roll:”) and put the result of the roll in bold face (using the <b> and </b> HTML tags to surround the text that we want to show up in bold).  It’s not absolutely necessary, but it’s a nice thing to have, especially if you’re rolling lots of dice and you want to see at a glance which number came from which die roll.

You can now create a whole set of simple dice macros for your campaign – d20, d12, d10, d8, d6 and d4 – following the same process.  (If you have a weird sense of humor, you could create d47 or whatever you like.)  You can enter something like “Basic Dice” into the Group box for each macro, which will group the buttons together in a little box within the Campaign window that’s labeled “Basic Dice”.  You can also specify the order in which the buttons will appear within that box by using the Sort Prefix box in each macro.  I’ve given the d20 button the Sort Prefix of 1, so it shows up first, and then gone in decreasing dice values from there (d12 is 2, d10 is 3, etc.).  Feel free to go from d4 to d6 and on up to d20 if you prefer.

It’s worth noting that all of these simple dice macros are totally optional.  You could just type “/roll d20” into the chat window, getting output that reads something like:

* OnlineDM rolls: d20 => 9

Personally, I prefer the buttons.  They’re way quicker.  The /roll command also lets you do things like /roll 2d8 + 2d6 + 5, getting output such as:

* OnlineDM rolls: 2d8+2d6+5 => 3 + 5 + 5 = 13

For that sort of thing, though, I’m going with fancy-schmancy attack macros.  Tune in for the next post!

MapTool macros – simple monster attacks

Over the past few days, I have become intensely interested in the MapTool macro language.  I started with the desire to have one-click access to my monsters’ attack powers.  I decided to write a macro for each monster that would create an attack roll (d20 plus whatever the monster’s attack modifier is) and a damage roll.  I’d add in text describing additional effects on a hit and even some buttons for non-attack macros just to remind myself what the powers could do (such as an Ooze’s ability to shift its speed).  For all of these attacks, I don’t want them showing up on the players’ chat boxes (hiding them behind the DM screen, so to speak), so I have all of the results go only to the GM.  Here is an example – an Adult Kruthik’s Claw attack:

[gm: “Attack roll: “]
[gm: 1d20+8] [gm: ” versus AC<br>”]
[gm: “Damage roll: “]
[gm: 1d10+3]

The fact that everything is within brackets that begin with “gm:” is the way that the output is hidden from the players.  Because the text is within these brackets, it must be enclosed in quotation marks (outside of brackets, you don’t need to put your text in quotes – it will just show up to everyone in the chat window).  Note that this also applies to the line break indicator from HTML <br> – outside of brackets you can just write it as <br>, but inside brackets it has to be put within quotation marks as “<br>”.  The dice programming is pretty straightforward.  1d20+8 is just what you think it would be.  The output from this macro will look something like this:

Kruthik Adult: Attack roll: 24 versus AC
Damage roll: 6

Here’s a slightly more involved example – the Kruthik Adult’s Toxic Spikes attack.

[gm: “Recharge 5/6; Result: “] [gm: d6 ] [gm: “<br>”]
[gm: “Two attacks against 2 different creatures<br>”]
[gm: “Ranged 5<br>”]
[gm: “Attack 1: “]
[gm: 1d20+7] [gm: ” versus AC; “]
[gm: 1d8+4]
[gm: ” damage and ongoing 5 poison damage and slowed (save ends both)<br>”]
[gm: “Attack 2: “]
[gm: 1d20+7] [gm: ” versus AC; “]
[gm: 1d8+4]
[gm: ” damage and ongoing 5 poison damage and slowed (save ends both)”]

The first line reminds me that this is a power that recharges on a roll of 5 or 6 on a d6 and then rolls a d6 to tell me whether the power recharges or not this turn.  If it doesn’t and I’ve already used it in this encounter, then I’ll just ignore the rest of the output.  The next two lines just remind me about what the power does (two attacks against two different creatures, within a range of five squares).  Then the macro generates two separate attack rolls, with the damage for each put on the same line.  There’s also some extra text explaining the ongoing damage and slowing effect.  The output is as follows:

Recharge 5/6; Result: 5
Two attacks against 2 different creatures
Ranged 5
Attack 1: 23 versus AC; 10 damage and ongoing 5 poison damage and slowed (save ends both)
Attack 2: 14 versus AC; 12 damage and ongoing 5 poison damage and slowed (save ends both)

Another example: the Blue Slime’s Stench Pulse burst attack:

[gm: “Once per encounter only.<br>”]
[gm: “Attack roll: “]
[gm: 1d20+6 ] [gm: ” versus Will<br>”]
[gm: “Hit: Targets are dazed and weakened (save ends both)”]

This just rolls the attack a single time, even though there could be several targets in the burst.  By D&D rules, each target should have a separate attack roll.  So, I would need to click the button once per target.  That’s okay, but it’s not very efficient, and the “Hit” line will be reprinted for each target instead of just one time.

Now, I hadn’t noticed this problem when I first put this macro together – it only became clear after I had put together some player character attack power macros.  Maybe my players will want to roll their own dice and telling the table what their results are, but I couldn’t resist – I wanted to program their powers in MapTool macros.  That’s for my next post.