MapTool – updated and new macros

I’ve spent a little time bringing the macros on my web site up to date with the latest versions that I’m using in my own games. You can see all of my macro code here.

A few changes of note:

  • Healing macro for PCs now handles healing surges and non-surge healing in one macro
  • Properties have been updated so that daily power tracking works properly (fun fact; having a property called D4 instead of Daily4 creates problems in a program that recognizes D4 as a four-sided die)
  • Added code to allow for encounter, X-times-per-encounter (such as Healing Word) and daily power tracking
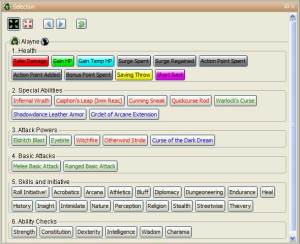
  • Added macros for toggling states such as Dazed, Marked, etc.
  • Added short rest, extended rest, death saving throw and second wind macros
  • Revamped monster properties so that the items that need to be set manually are all grouped together (this makes for faster monster token creation)

I also realized that my list of macros on that page was getting insanely long, so I created an index at the top of the page that will let you jump directly to whatever macro you’re looking for. For convenience’s sake, I’ve reproduced that list below.

If there are any MapTool macros that you’re looking for but that you don’t see here, please let me know – I’m always looking for excuses to write new macros!

Links to individual macros:

Length of 4e combat – Decision time, not calculation time

Geek Ken has a post over at This is My Game today talking about an idea for speeding up combat. He suggests doing away with rolling dice for damage and instead having fixed damage for each attack with some variety for crits, near-crits and barely-hits. The variety sounds like fun, but as I commented on that post, I don’t think the time it takes to roll and add up damage adds much to the problem of long combats.

What slows down combat is the time it takes to make decisions.

When I first started my Friday night online campaign in August 2010 with first-level characters, combat seemed to move at a pretty good pace. Lately, I’ve noticed that we’ve had some battles that have taken two hours to finish.

What has changed? The PCs are now eighth level rather than first level, and they have a lot more powers to choose from each turn. They have more interrupts on one another’s turns. They have magic item abilities to think about.

It’s probably also true that I haven’t had quite as much time to prepare for sessions as I did back in August, so maybe I’m fumbling around a little more on the bad guys’ turns. But I think I fumbled around back then, too, because I was a new DM. The time it takes me to run the monsters’ turns now is probably similar to what it was back then.

One of the reasons I’m so confident that it’s about decision-making time rather than mechanical time to roll and add dice is that we use MapTool macros that automatically handle the rolling and adding. When the fighter decides to use Crushing Surge, he clicks one button and the attack roll and damage roll show up for all to see, with the math done. Even if he’s rolling 12 dice for damage, it takes no longer than a single die.

What to do about this? Well, I don’t really know. Suggestions to streamline the math of combat won’t help me, since the computer is handling that part. Could I raise monster damage and lower monster hit points/defenses? That’s a possibility. I can have monsters flee or surrender when the fight is clearly lost (and I do that where appropriate).

In the end, it takes time for players to decide what they want to do on their turn. I have great players, and they pay attention and keep their heads in the game. They just have a lot of options at their disposal, and they enjoy the process of making the best decision on their turn. That’s the fun of a game that’s tactics-heavy, and I don’t want to take that away from the players. But it sure does take a long time!

MapTool – Stupidly complex multi-attack macro

I haven’t posted any MapTool macros in a while, but I just finished writing one that ended up being so stupidly complex that I just had to share it with the world.

First a disclaimer: Yes, I am aware that there are wonderful MapTool frameworks out there that will help automate everything and make it so that I barely need to touch any macros.  I write my own macros just for the fun of it because I’m nerdy like that.  I share them here on my blog because I know there are some other nerdy people out there who might be able to use some of my learnings in their own macros.

Okay, here’s the situation.  There’s a tiefling wizard coming up in a battle for my Friday night War of the Burning Sky campaign.  It’s not a big boss or anything like that, just an ordinary bad guy.  This creature has several different attack powers, as you might expect with a wizard.  The one particular attack power that I’m about to show you is called Dancing Lightning

  • Dancing Lightning involves three attacks (separate attack rolls, separate damage rolls) against three different creatures.
  • This is a recharge power, recharging on a 6.
  • As a tiefling, the creature gets a +1 bonus to attack rolls against bloodied targets.
  • The wizard has a magic staff with a daily power that she can use whenever she uses Dancing Lightning.  If she uses the daily, she deals some bonus damage to creatures in a close blast 3 (which might be some of the same creatures targeted by the attack, or it might not).

Now, I could handle this with separate macros to track just the recharging or just the daily power, and I could decide not to worry about the +1 to attack rolls against bloodied targets.  But instead I decided to go all-in and make this one macro handle everything.

First, the recharge bit:

[h: RechargeTarget=6]
[h: RechargeRoll=d6]
[if(R1!=1), CODE:
 {[if(RechargeRoll<RechargeTarget), CODE:
 {[g: assert(1==0,add("Recharge roll = ", RechargeRoll, ". The power fails to recharge."),0)]
 };{}]
 };{[setProperty("R1",0)]}
]

This is my standard recharge code.  It sets the target number for recharging at 6.  It rolls a d6 and stores the result as RechargeRoll.  It then checks a property on the token called R1 (which is equal to 1 when the battle begins and is set to zero after the power has been used).  If R1 is not equal to 1 (that is, it’s zero because the power has already been used at least once), then the macro checks to see if the recharge roll was at least 6.  If not, it uses the ASSERT function to give an error message (no recharge) and the macro ends.  If the recharge roll is 6, then the macro moves on.  Finally, if R1 was equal to 1 (that is, if the power hadn’t been used yet this battle), the macro sets it to zero so that it won’t work next time unless it recharges.

Next, the standard attack macro setup stuff:

[h: AttackName="Dancing Lightning"]
[h: AttackBonus=14]
[h: Defense="Reflex"]
[h: NumDice=2]
[h: DamageDie=6]
[h: DamageBonus=5]
[h: DamageString="lightning damage."]
<b>[AttackName]</b><br>

Here I set up the name of the attack to be displayed, the attack bonus, the defense that is being attacked, the number of damage dice I’m going to roll, the size of the damage die, the number I’m adding to the damage dice and the text that I want to display after the damage number (in this case, “lightning damage”).  The last line displays the name of the attack in the chat window in bold type and then inserts a line break.  Simple stuff.  I only bother using these variables because for most attacks I just set these things at the top of my code and then I’m done.

Now we get into the stuff for the first actual attack and damage roll:

[h: x=input("FoeBloody|No,Yes|Is the first target bloodied?|RADIO|VALUE=STRING")]
[h: abort(x)]
[h: AttackBonus=if(FoeBloody=="Yes",AttackBonus+1,AttackBonus)]
[h: DamageRoll=roll(NumDice,DamageDie)]
[h: d20roll=d20]
[h: AttackRoll=d20roll+AttackBonus]
[h: MaxDamage=NumDice*DamageDie+DamageBonus]
[h: RegularDamage=DamageRoll+DamageBonus]

The first line above will result in me getting a pop-up dialog box that asks if the first target is bloodied.  The second line will end the macro if I click “Cancel” in that pop-up.  The third line checks to see if I said the first target was bloodied; if so, it adds 1 to the attack bonus (the tiefling ability).After that, the macro does a damage roll (2d6 in this case). It does a d20 roll for the attack, adding the attack bonus and calling it AttackRoll.  It calculates the maximum possible damage (in case of a crit) as well as the regular damage (from the damage roll plus the bonus).  Again, pretty simple.

Next, I display the results of the first attack in the chat window:

Attack 1: [d20roll] + [AttackBonus] = <b>[AttackRoll]</b> versus [Defense]<br>
[if(d20roll==20), CODE:
 {<font color=Red>--CRITICAL HIT--</font><br>
 Hit 1: [NumDice*DamageDie] + [DamageBonus] = <b>[MaxDamage]</b> [DamageString]
 };
 {Hit 1: [DamageRoll] + [DamageBonus] = <b>[RegularDamage]</b> [DamageString]}
]

The first line shows something like: “Attack 1: 7 + 14 = 21 versus Reflex”  Then I check to see if there was a critical hit.  If so, I display the maximum damage (along with a crit message); otherwise, I show the damage that was rolled for this attack.  Again, standard stuff from my regular attack macros.

After this, I repeat those last two sections (starting with the FoeBloody piece) for the second and third attacks (changing the language to “second target,” “Attack 2,” “Hit 2,” and so on).  I put a couple of line breaks in between as well.

Finally, there’s the piece of code to deal with whether I want to use the bonus daily damage in a close blast 3 or not.  Generally I’ll just use it at the first opportunity, of course – this is a recharge 6 power, which means it’s highly unlikely that I’ll get a second chance to use it.  But hey, for the sake of completeness, I wanted the option to be built in to the macro.

[if(E2==1), CODE:
 {[h: x=input("UseDaily|Yes,No|Use the daily close blast 3 power now?|RADIO|VALUE=STRING")]
 [h: abort(x)]
 [if(UseDaily=="Yes"),CODE:
 {[h: E2=0]
 <br><br><i>Quarterstaff of Storms</i>: Each enemy in a close blast 3 takes an additional [d8] lightning and thunder damage.
 }; {}
 ]
 };
 {}
]

This one is very messy to look at, mainly because it uses nested IF statements (an IF within an IF).  It first looks at a property of the wizard token called E2 (this is for her second encounter power – the first is Infernal Wrath).  If E2 equals one, that means that I haven’t already used this daily yet, in which case the code moves on to ask me if I want to use it this time.  It does so with another pop-up dialog box:

Now, if I do choose to use the daily power, the macro sets E2 equal to zero (to show that the power has been used up).  It then inserts two more line breaks, displays the name of the daily power in italics and then says what happens to the enemies in the blast (including the damage roll).  Note that if E2 were equal to zero (meaning that the daily item power had already been used), then the rest of the code is skipped over.

When I run the power, the output in the chat window looks like this:

And the finished macro in all its glory is as follows:

[h: RechargeTarget=6]
[h: RechargeRoll=d6]
[if(R1!=1), CODE:
 {[if(RechargeRoll<RechargeTarget), CODE:
 {[g: assert(1==0,add("Recharge roll = ", RechargeRoll, ". The power fails to recharge."),0)]
 };{}]
 };{[setProperty("R1",0)]}
]

[h: AttackName="Dancing Lightning"]
[h: AttackBonus=14]
[h: Defense="Reflex"]
[h: NumDice=2]
[h: DamageDie=6]
[h: DamageBonus=5]
[h: DamageString="lightning damage."]

<b>[AttackName]</b><br>

[h: x=input("FoeBloody|No,Yes|Is the first target bloodied?|RADIO|VALUE=STRING")]
[h: abort(x)]
[h: AttackBonus=if(FoeBloody=="Yes",AttackBonus+1,AttackBonus)]
[h: DamageRoll=roll(NumDice,DamageDie)]
[h: d20roll=d20]
[h: AttackRoll=d20roll+AttackBonus]
[h: MaxDamage=NumDice*DamageDie+DamageBonus]
[h: RegularDamage=DamageRoll+DamageBonus]

Attack 1: [d20roll] + [AttackBonus] = <b>[AttackRoll]</b> versus [Defense]<br>
[if(d20roll==20), CODE:
 {<font color=Red>--CRITICAL HIT--</font><br>
 Hit 1: [NumDice*DamageDie] + [DamageBonus] = <b>[MaxDamage]</b> [DamageString]
 };
 {Hit 1: [DamageRoll] + [DamageBonus] = <b>[RegularDamage]</b> [DamageString]}
]

[h: "Second Attack"]
[h: x=input("FoeBloody|No,Yes|Is the second target bloodied?|RADIO|VALUE=STRING")]
[h: abort(x)]
[h: AttackBonus=if(FoeBloody=="Yes",AttackBonus+1,AttackBonus)]
[h: DamageRoll=roll(NumDice,DamageDie)]
[h: d20roll=d20]
[h: AttackRoll=d20roll+AttackBonus]
[h: MaxDamage=NumDice*DamageDie+DamageBonus]
[h: RegularDamage=DamageRoll+DamageBonus]
<br><br>
Attack 2: [d20roll] + [AttackBonus] = <b>[AttackRoll]</b> versus [Defense]<br>
[if(d20roll==20), CODE:
 {<font color=Red>--CRITICAL HIT--</font><br>
 Hit 2: [NumDice*DamageDie] + [DamageBonus] = <b>[MaxDamage]</b> [DamageString]
 };
 {Hit 2: [DamageRoll] + [DamageBonus] = <b>[RegularDamage]</b> [DamageString]}
]


[h: "Third Attack"]
[h: x=input("FoeBloody|No,Yes|Is the third target bloodied?|RADIO|VALUE=STRING")]
[h: abort(x)]
[h: AttackBonus=if(FoeBloody=="Yes",AttackBonus+1,AttackBonus)]
[h: DamageRoll=roll(NumDice,DamageDie)]
[h: d20roll=d20]
[h: AttackRoll=d20roll+AttackBonus]
[h: MaxDamage=NumDice*DamageDie+DamageBonus]
[h: RegularDamage=DamageRoll+DamageBonus]
<br><br>
Attack 3: [d20roll] + [AttackBonus] = <b>[AttackRoll]</b> versus [Defense]<br>
[if(d20roll==20), CODE:
 {<font color=Red>--CRITICAL HIT--</font><br>
 Hit 3: [NumDice*DamageDie] + [DamageBonus] = <b>[MaxDamage]</b> [DamageString]
 };
 {Hit 3: [DamageRoll] + [DamageBonus] = <b>[RegularDamage]</b> [DamageString]}
]

[if(E2==1), CODE:
 {[h: x=input("UseDaily|Yes,No|Use the daily close blast 3 power now?|RADIO|VALUE=STRING")]
 [h: abort(x)]
 [if(UseDaily=="Yes"),CODE:
 {[h: E2=0]
 <br><br><i>Quarterstaff of Storms</i>: Each enemy in a close blast 3 takes an additional [d8] lightning and thunder damage.
 }; {}
 ]
 };
 {}
]

MapTool states should differ for online and in-person play

I’ve been running my online Dungeons and Dragons 4th Edition game for several months now, and MapTool has been fantastic for running the game.  The players have macros for their powers and abilities, we can keep track of hit points electronically, etc.  It’s also great because it’s easy to keep track of all of the conditions that can be put onto a character – bloodied, prone, marked, cursed, ongoing damage, weakened, dazed… the list goes on and on.  My MapTool states for the online game consist of little icons that can show up over a token in a 3 by 3 grid (so there can be up to nine states on a token at once).

A token that is granting combat advantage, dazed, slowed, taking ongoing damage, marked, cursed and bloodied

I love this about MapTool for in-person games that I run using my projector, too.  Unfortunately, it’s much harder to make out the details on a monster token when I’m using the projector because I have to keep the map zoomed pretty far out in order to project a grid with 1-inch squares.  This means that it’s really hard for the characters to see all of the states on a creature.  Is that guy bloodied?  Is he marked?  What about prone?

The solution here is a combination of using bigger states and using different states.

  • Bloodied: The most important state.  Instead of an icon on the image, use a red circle around the token
  • Prone: A purple triangle (actually a yield sign)
  • Marked: A blue or green X (have two different marks available in case you have multiple defenders in your party)
  • Cursed/Quarried/Oathed/etc.: An orange cross
  • Other: Normal icons, but in a 2 by 2 grid instead of 3 by 3 (so they’re bigger)

The most important states for players to be able to see clearly are those that are most likely to affect their interaction with a creature.  They have to know if it’s bloodied, prone, marked, or subject to a striker ability (quarry, etc.).  It’s nice to know if the bad guy is dazed or has -2 to its defenses or it’s slowed, but not AS important.  The really important conditions, therefore, should get big, prominent marks across the face of the token.  The less-important conditions can rely on the 2 by 2 grid (at the very least, you as the DM can still zoom in on them on your screen to see what they are.

The easily-visible conditions can be tailored to your own campaign, of course.  Every defender should have his or her own color of marks, but they can all use the same symbol (since a new mark will override an old one, you’ll never have to worry about making multiple marks visible).  If you have multiple strikers that can put conditions on a creature, you’ll want to use multiple shapes (maybe a cross for one and a diamond for another).  Assassin shrouds are tricky – I haven’t yet come up with a good way to keep track of how many are on a creature, but fortunately my regular games don’t include any assassins (though I see them occasionally at convention games).

Bottom line: Icons are great for understanding what a particular symbol means, but they’re hard to see at a distance.  Colorful shapes are better for in-person games with a projector.

MapTool macros: Improved tracking of encounter/daily powers

I’ve been having fun playing with my MapTool campaign file recently.  One of my latest improvements is to add actual tracking for encounter powers and daily powers so that the players can know which powers they’ve used and which are still available.

In an earlier post I described my addition of code to the encounter and daily power macros that would give the player an error message if they tried to use a power that had already been used.  The code is basically as follows:

[h, if(E1==0), CODE:
{[assert(1==0,add(“This power has already been expended.”),0)]
};{[h: E1=0]}
]

Each macro will need its own E1, E2, E3, Daily1, Daily2, Daily3, etc. property to modify and check.  This is nice, but the player only figures out that they can’t use the power again if they try to do so.  What would be even better? A visual cue to show the player that the power is gone.

Enter the MetaMacro!  I didn’t learn until recently that MapTool macros can change the macro button itself.  One of the simplest things to change is the background color of the button.  I want the button to turn dark gray after a power is used up, so:

[h: setMacroProps(getMacroButtonIndex(), “color=darkgray”) ]

This piece of code uses the setMacroProps function to set the color property to “darkgray”.  The setMacroProps function takes two arguments: the index number of the macro whose button you want to change, and then a string that says what property you want to change and what you want the new value to be.

I didn’t know that each macro on a token has an index number, but it’s true.  I’m not sure how they’re assigned (perhaps the order in which you create them).  Fortunately, there’s a function you can use to get MapTool to tell you the index number of the macro you’re currently running.  That’s the getMacroButtonIndex() function that you see above.  It takes no arguments, and it just gives you the index number of the button.  Perfect!

Witchfire has been expended; Otherwind Stride is still available

Next, I had to write some code to turn the buttons back to their original color when the character takes a short rest (encounter powers only) or an extended rest (both encounter and daily powers).  This ended up being quite a bit trickier, but I finally figured it out.

[h, foreach(currentMacroName, getMacros()), CODE:
{
[h, foreach(currentMacroIndex, getMacroIndexes(currentMacroName)), CODE:
{
[h: myProps=getMacroProps(currentMacroIndex)]
[h: currentButtonColor=getStrProp(myProps, “color”)]
[h: currentFontColor=getStrProp(myProps, “fontColor”)]
[h: encounterPower=if(currentFontColor==”red” || currentFontColor==”purple”, 1, 0)]
[h: changeThisButton=if(currentButtonColor==”darkgray” && encounterPower==1, 1, 0)]
[h, if(changeThisButton==1): setMacroProps(currentMacroIndex, “color=default”) ]
}]
}]

Okay, what’s going on here? This piece of code loops through every macro on the token (that’s the first line), gets the index number for that macro (that’s the third line, counting the curly bracket as line 2), then checks to see if that macro needs to have its color changed.  That involves getting a string containing all of the properties for the macro (getMacroProps(currentMacroIndex)) and extracting the button color and font color for that macro.

In my campaign, the buttons for attack macros and special abilities use the default color for their background and a color-coded system for the text (green for at-will powers, red for encounter powers, purple for twice-per-encounter powers and blue for daily powers).  The short rest macro only resets encounter and twice-per-encounter powers, so it checks to see if the button is currently dark gray (expended) and the font is red or purple.  If so, it changes the color back to the default.  Otherwise, such as with a daily power, it leaves the button alone.

The same piece of code for extended rests looks like this:

[h, foreach(currentMacroName, getMacros()), CODE:
{
[h, foreach(currentMacroIndex, getMacroIndexes(currentMacroName)), CODE:
{
[h: myProps=getMacroProps(currentMacroIndex)]
[h: currentButtonColor=getStrProp(myProps, “color”)]
[h: currentFontColor=getStrProp(myProps, “fontColor”)]
[h: encounterOrDaily=if(currentFontColor==”red” || currentFontColor==”blue” || currentFontColor==”purple”, 1, 0)]
[h: changeThisButton=if(currentButtonColor==”darkgray” && encounterOrDaily==1, 1, 0)]
[h, if(changeThisButton==1): setMacroProps(currentMacroIndex, “color=default”) ]
}]
}]

Pretty much the same thing, except now it looks for fonts that are red, purple OR blue.

By the way, I’m aware that there are complete campaign frameworks out there, such as Rumble’s, and I’ve talked about them in an earlier post.  They’re great and very cool and they do everything that my code does and more.  But I write macros for the joy of it, and I love to learn about the language of MapTool.  My posts are intended to help other do-it-yourselfers out there who want to write their own code because they enjoy it.  If this isn’t for you, I highly recommend using a pre-packaged campaign framework – they’re quite slick!

In future posts I’ll talk more about my Short Rest and Extended Rest macros, and the concurrent improvements I’ve made to the healing macro.  Please let me know if there are particular macros that you’d like to hear about!

MapTool macros: Tracking encounter/daily powers

Update 10/7/2010: I’ve written another post that expands and improves on this one.

Update 3/29/2011: I’ve updated the daily properties from D1-D10 to Daily1-Daily15.

Over the past few weeks as I’ve continued running my online campaign through the War of the Burning Sky saga, I’ve made some tweaks to my MapTool framework.  Part of this has been driven by one of my players, who has also been using MapTool in her own game and has had some good ideas for improving the player character tokens.

Specifically, she suggested adding buttons for every character ability, even if it didn’t involve rolling dice, just so the players would remember that those abilities existed.  She also added some notes to her character sheet to remind her of things like her damage resistance and so on.  Good thinking!  I plan to do this for the rest of the PC tokens.

I’ve starting making some other changes as well.  I’ve added a Saving Throw button for each character.  Yes, it’s generally just a d20 roll and we do have buttons for that, but one character has an artifact that gives him a +2 bonus to saving throws, so I figured we might as well have a button that includes any modifiers to saves.

I’ve added a set of buttons for ability checks (Strength check, Dexterity check, etc.).  These don’t come up as often as skill checks, but they do come up enough to make it worthwhile to add macros for them.

I’ve also decided that it’s time to code up the tracking of encounter and daily powers.  I’d love it if I had an easy way for a character to tell at a glance which powers hadn’t been used yet, but failing that I can at least add logic to let the player know, “Sorry, you’ve already used that power.”  Here’s how I’ve done it:

  • I’ve added properties E1 through E15 for each character (I can add more later if PCs have more than 15 encounter powers).  These have default values of 1.
  • I’ve also added Daily1 through Daily15 for dailies (default of 1) and S1 through S3 (default value of 2) for special twice-per-encounter powers (Healing Word, etc.).
  • Note that you can’t use D1, D2, etc. because MapTool will recognize those as dice rolls (like d6 and d20).
  • In each encounter/daily/special power macro I’ve added a bit of code that looks something like this:

[h, if(E1==0), CODE:
{[assert(1==0,add(“This power has already been expended.”),0)]
};{[h: E1=0]}
]

That code checks to see if the property for that power has been expended (equal to zero) and if so uses the ASSERT function with a false condition (1==0) to display a message and exit the macro.  If it hasn’t been expended, it sets the property to 0 (or reduces it by 1 in the case of twice-per-encounter powers).  Note that each encounter power uses a different property (E1, E2, etc.).

Finally, I’ve created a Short Rest macro that resets all of the E and S properties back to their default values.  I plan to eventually add a function to the Short Rest macro that lets the player specify how many surges they want to spend and restores that many hit points, but one thing at a time.  I’ll need to add an Extended Rest macro at some point as well, refreshing dailies, healing surges, etc.

What macros am I missing here?  Are there things that I should be adding for my PCs?  I’m feeling pretty good about the direction my campaign is going, and I’m having a great time with it so far!

War of the Burning Sky Session 8

My online group gathered for its eighth session in the War of the Burning Sky campaign yesterday evening.  Eight sessions for a group of strangers spread across the US plus one person in London – that’s pretty impressive.  I honestly expected when I first gathered folks for an online campaign that people would flake out, drop out, not show up, etc.  But my players are flat-out awesome, and I love them.

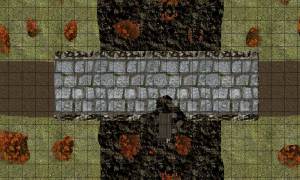
The session began with the party having recently entered the Fire Forest.  They had easily defeated some fiery bats, and now found themselves faced with a precarious-looking bridge.The bridge had clearly collapsed in one area, with the wreckage of a wagon visible in the canyon 60 feet below.
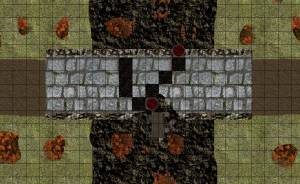
None of the players had enough Dungeoneering skill to identify the weak points, so Fudrick the gnome shaman started heading across.  He soon learned that if all of the weak points were stepped on and the monsters living beneath the bridge were revealed, it would look like this:

Fudrick’s reflexes weren’t quick enough to jump out of the way of the collapsing stones, and he fell 60 feet, taking 33 damage. His maximum hit points were only 37.  Ouch.

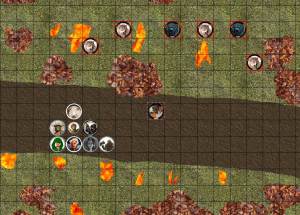
The bat swarms sleeping under the bridge were alerted by this, but I granted everyone in the party a full round of initiative before adding the bats.  Some of the characters started working together to tie two ropes together to lower to poor Fudrick.  Others moved forward to attack.  Jaks, the minotaur druid, used perception to identify two more fragile squares.  However, on the next round when the swarms moved in, Jaks hit with an attack that let him shift – and he shifted right onto one of those weakened squares!  Down he went, falling unconscious.

It looked grim for a while, but the healers in the party got Jaks up on his feet and out of the canyon while the defenders handled the swarms.  It made for a pretty exciting fight!

Next, the party was confronted by a hell hound who dropped a bone at their feet.  The bone had a message saying that they should “leave the case” (a case of military secrets they were trying to get through the forest) and take the bone if they wanted to escape with their lives.  They quickly discovered a loophole – the message didn’t say the plans had to be IN the case!  This let them avoid combat with the hell hound and his fiery wolf friends and also gave them some quest XP to boot – not bad!After that, the party was confronted by the devil who had written the message on the bone.  He wasn’t happy about the empty case and he attacked, but the PCs beat him up easily before he teleported away.

We ended the session after the gang met a dragonborn sorceror who was researching the magic of the fire forest and agreed to help him collect some mushrooms so that he could complete a ritual to quench the fire in a nearby glade with a dryad.  I hadn’t prepared the next encounter area, so we called it a night a little early.

I definitely am enjoying the fire forest adventure in this campaign.  It allows for a lot of branching and meaningful player decisions.  Most of those choices will come later, but there are some even now.  It helps to have such a great group of players!

MapTool – Improved macros and properties

I’ve written before about some of my basic MapTool macros and the properties that I use in my own campaign.  I’ve also mentioned that there are some dedicated people out there who have written campaign frameworks that are ready-made for Fourth Edition (though I’m having more fun creating my own).

Now that I’ve played through a session with more players (eight!) and another player who already knew a lot about MapTool and had some tips for me, I’ve changed around my basic macros and properties.

First, the download links:

So, what’s new?

Properties

I’ve added some new properties since my first pass, and changed some others around

  • I’ve made the defenses all appear on one line on the character sheet pop-up (saves space and is easier to read)
  • I show hit points as “Current/Maximum + Temp” all on one line (so it might look like 22/34 + 0)
  • I broke down and added a He/She pronoun property
  • I added an Armor Penalty property so that default skills would be easier to calculate (you still have to add racial/class bonuses and training manually)
  • I got rid of the Melee / Ranged properties and went with Weapon 1 / Weapon 2 / Weapon 3 (which will work in case I have a dual-melee wielder who also has a ranged weapon available)
  • For monster properties, I added a flag for recharge powers that starts at 1 and turns to zero after the power’s first use
  • Also for monsters I added a line that will let me add text to the monster’s character sheet listing any trained skills

No huge changes there – just a few little things that make things nicer.  As an example, take a look at a character sheet with my old properties versus new:

Old character sheet

New character sheet

Macros

My macros are just overall better now, in lots of little ways.

  • First, I discovered that I don’t have to use the getProperty function every time I want to get the value of a property in a macro – I can just use the name of the property!  So, instead of [h: HP=getProperty(“HitPoints”)] and then using HP as a variable, I can just use HitPoints as a variable in my macro without having to get its value.  This makes my skill check macros in particular a lot simpler: Acrobatics = <b>[d20+Acrobatics]</b>
  • I switched to the new properties for weapons, of course.
  • I took into account the fact that on a crit a magic weapon deals an extra die of damage PER PLUS.  Easy enough – the bonus damage is now [CritBonus=roll(Enh,CritDamageDie)] (where Enh is the weapon or implement’s enhancement bonus – this used to just be 1 in my old macros)
  • I edited the structure of my attack macros so that all of the lines I need to edit are right at the top (in general – some attacks need more customization).  This means that I use a variable for the name of the attack, another variable for the name of the defense that the attack is going after (AC, Reflex, etc.) and another variable for the text that accompanies the damage (such as “damage, and the target is slowed (save ends).”)  This makes it much more efficient to set up new character attacks, be they PCs or monsters.
  • I learned to use the input() function to make the boxes that pop up to ask a player how many hit points they gained or how many targets they’re attacking a little bit nicer looking.  I also use the abort() function to let a player back out of one of these powers without getting an error message.
  • Most excitingly, I’ve changed the initiative macro to first of all let each player roll their own initiative, and second to automatically add them to MapTool’s built-in initiative tracker.  It’s not as slick as the D&D 4e Combat Tracker (which I need to talk about in a future post), but it’s so convenient to have it right there in MapTool.

The more I use MapTool, the better I get at it.  Now I just need to actually set up my next adventure for this Friday night!

MapTool campaign frameworks

After I had done a lot of work to start building macros for my D&D game that I’m running in MapTool, I discovered something – it’s not necessary to reinvent the wheel if you don’t want to.  It turns out that a number of people on the MapTool forums have created what are known as campaign frameworks.

A campaign framework is a work of art.  It’s a MapTool campaign file that contains within it everything you need to run a campaign under a given rule set (D&D Fourth Edition, d20 System, as well as other RPGs).  The particular framework I’ve played around with is from a MapTool forum user called Rumble.  His framework for D&D 4th Edition is in this post.

The framework is basically a campaign template.  If you want to start a new campaign, you start with the template file.  When you open the file, you’ll see something like this:

Rumble FrameworkWhat you see here is several pre-made tokens on the top part of the screen, some campaign macros (including those that will let you import character or monster info), and some macros for the sample PC token that’s selected.  The campaign file has an extensive set of properties to keep track of the sort of things my properties do and then some.  For instance, I hadn’t thought of keeping track of action points or experience points in the character sheet, but this property set does it.

Furthermore, the macros that are built in for both PC and monster tokens are all-encompassing and way cool.  They include everything I’ve done (hit point management, attack powers, skills) as well a bunch of things I haven’t done (delaying one’s turn, pulling up a formatted character sheet and power cards).  There are even macros to make editing the character stats easier, rather than having to directly fiddle around with properties.  The attack macros take into account who the target is, figure out their defenses, establish whether the attack hits or not, and so on.  It’s very, very detailed, and from what I understand it all works!

So, I learned that I don’t have to write all of these macros from scratch – others have done it for me.  Macro-writing over, right?

Nope.

See, I LIKE writing macros!  I’m not a professional programmer, but I’m pretty good at programming.  When it’s for a hobby, it’s something I just enjoy doing.  Plus, I like the idea of being able to customize my macros for my players.

Now, I would be foolish if I completely ignored the existence of excellent MapTool frameworks like Rumble’s.  If I’m having trouble with my own macros, I can see how Rumble implemented something.  I’ll certainly take inspiration from some of his ideas (such as tracking XP and action points).  But I don’t feel like using a pre-packaged setup like this because then I would deprive myself of the fun of discovering how to write my own MapTool macros.

All that said, if you’re not into the idea of writing your own macros for the pleasure of writing them and you just want a bunch of macros that work for your D&D 4e game, start your campaign from a template like this one.  There are lots of others on the MapTool forum for a variety of games, and they look fantastic to me.  I love the MapTool community!

MapTool Macros – Damage and healing

Edit 7/19/2010: Since I first wrote this post, I have learned more about MapTool macros, and you can find the improved information at this post.  However, I’ve left the original post below for posterity – and as an example of how to learn how to improve your macro writing, rather than just giving the finished product.

During our first actual gaming session with MapTool, I was pleasantly surprised to discover that my players liked keeping track of their characters’ hit points within the program, right on the character sheet that pops up whenever they would mouse over their character’s token.  They did this despite the fact that changing their HP involved double-clicking the token, navigating to the Properties tab of the Edit Token dialog, deleting the current HitPoints value and entering the new value.

Given that they like keeping track of HP in MapTool, I figured the least I could do would be to make it easier for them.  I wanted to create a button that would let them decrease their HP and another button that would let them heal.  And while I COULD have stopped there, I got into it and wanted to make this even slicker.

Before I could put the new macros into action, I had to edit my characters’ properties.  I needed the MaxHP value (so that healing couldn’t take the character above it).  And while I didn’t technically NEED the Bloodied value to be on the character sheet (macros could calculate it based on MaxHP), I discovered that MapTool will let you specify factors that are derived from other factors.  Here are the properties I now use for the Health section of my characters’ stat sheets:

Health properties

*@—–HealthStats—–:-
*@HitPoints:10
*@TempHP:0
*@MaxHP:10
@BloodiedHP:{FLOOR(MaxHP/2)}
*@SurgesLeft:6
*@SurgeValue:{FLOOR(MaxHP/4)}
@DailySurges:6

Note that the * means that the variable will be displayed on the mouse-over character sheet and the @ means that it will be visible only by the token’s owner and the GM.  (Side note: This means that my players won’t be able to see stats for monsters, since they don’t own the monster tokens – this is good.)  The header line (HealthStats) is technically a property with an assigned value of “-“, which I’ve added just for looks on the pop-up sheet (there’s a separate section now for defenses and so on).  SurgeValue isn’t used in my macros, but I wanted it on the sheet so my players could look it up easily whenever they spend a surge.

These macros ended up getting more complex than I intended for them to be, so I’ll just put the finished versions below and then discuss each one.  I’ll start with the macro that adds temporary hit points, as it’s the simplest.

Temporary hit points macro

[h: TempsAdded=AmountOfTempHPGained]
[h: CurTemps=getProperty(“TempHP”)]

[if(CurTemps>=TempsAdded), CODE:
{Already has [CurTemps] temporary hit points, so no temps were  added.};
{[h: setProperty(“TempHP”,TempsAdded)]
Now has [TempsAdded] temporary hit points.}
]

This macro first creates a prompt that asks the player to enter a value for AmountOfTempHPGained.  There are ways using the INPUT command to make this look prettier, but I haven’t bothered with them yet.  Once the player has said how many temps they’re gaining (let’s say 3), that’s stored as TempsAdded.  The macro finds out how many temps the player has at the moment (CurTemps) and then checks to see if the new temps are greater than the old.  Since temporary hit points don’t stack in D&D 4e (if you have 5 and gain 3 more, you just have 5, not 8), the macro simply prints a “no new temps for you” message if they already have at least as many as they’re adding.  Otherwise, it sets the TempHP value on the character sheet to the amount of temps that were added and tells the player the new total.  Not too hard.

Next up is the macro to gain actual hit points – the healing macro.

Healing macro

[h: Heal=AmountOfHPGained]
[h: CurHP=getProperty(“HitPoints”)]
[h, if(CurHP>=0), CODE:
{[NewHP=CurHP+Heal]};
{[NewHP=Heal]}
]

[h, if(NewHP>getProperty(“MaxHP”)), CODE:
{[NewHP=MaxHP]
[Heal=MaxHP-CurHP]};{}
]

[h: setProperty(“HitPoints”,NewHP)]
[h: Bloodied=getProperty(“BloodiedHP”)]

Gains [Heal] hit points and is at <b>[NewHP]</b> hit points.

[if(NewHP>Bloodied && CurHP<=Bloodied && CurHP>0), CODE:
{She is no longer bloodied.
[h: setState(“Bloodied”,0)]};
{}
]
[if(CurHP<=0 && NewHP<=Bloodied), CODE:
{She is no longer dying, but she is still bloodied.
[h: setState(“Unconscious”,0)]};
{}
]
[if(CurHP<=0 && NewHP>Bloodied), CODE:
{She is no longer dying, and she is no longer bloodied.
[h: setState(“Unconscious”,0)]
[h: setState(“Bloodied”,0)]};
{}
]

[if(NewHP==MaxHP), CODE: {She is at maximum health.}; {}]

This one starts like the last one, popping up an input box that asks the player to say how many hit points they’re gaining, saving that number as Heal.  It then gets the character’s current HP.

  • If current HP is greater than zero, the macro sets the player’s HP to the current HP plus the healed amount.
  • If current HP is less than zero, the macro follows D&D 4e rules by setting the player’s life total to the healed amount (healing starting from zero rather than from a negative number).

The macro also checks to see if the healing would put the character’s hit points at or above their maximum hit points; if so, it only heals up to the maximum.  It prints a message with the amount of HP healed and the new HP total.

The macro also gets the PC’s bloodied value from the character sheet and prints out some additional messages depending on where the character started with HP and where they ended up.

  • If the PC was conscious but bloodied and is not bloodied any more, the macro prints a message saying as much and then removes the “Bloodied” state from the character (which shows up in my campaign as a little red icon in the corner of the token).
  • If the PC started off dying and ended up not dying but still bloodied, the macro says as much and then removes the “Unconscious” state from the character (which shows up in my campaign as a gray X across the character’s portrait).
  • If the PC started off dying and ended up unbloodied, the macro says so and removes both the “Bloodied” and “Unconscious” states from the character.

Finally, if the PC ends up at maximum hit points, the macro says that, too.  This is helpful in cases where the amount healed is less than the amount entered because the full amount would have put the PC above their max HP.  This way, the player understands what happened.

Now for the damage macro.  I originally wrote this one before the healing macros, and I forgot about temporary hit points when I wrote it, so it had to be re-done.  This has made it rather complex in appearance.

Damage macro

[h: Dmg=AmountOfDamageTaken]
[h: CurHP=getProperty(“HitPoints”)]
[h: CurTemps=getProperty(“TempHP”)]
[h: Bloodied=getProperty(“BloodiedHP”)]
[h: Dead=-1*Bloodied]

[if(CurTemps==0),CODE:
{
[h: NewHP=CurHP-Dmg]
Takes [Dmg] damage and is at <b>[NewHP]</b> hit points.
[h: setProperty(“HitPoints”,NewHP)]
};
{
[if(Dmg<=CurTemps), CODE:
{
[h: setProperty(“TempHP”,CurTemps-Dmg)]
[h: NewHP=CurHP]
Takes [Dmg] damage, losing [Dmg] temporary hit points.  She how has [CurTemps-Dmg] temporary hit points and <b>[CurHP]</b> regular hit points.
};
{
[h: HPDmg=Dmg-CurTemps]
[h: NewHP=CurHP-HPDmg]
[h: setProperty(“TempHP”,0)]
[h: setProperty(“HitPoints”,CurHP-HPDmg)]
Takes [Dmg] damage, losing [CurTemps] temporary hit points and [HPDmg] regular hit points.  She now has no temporary hit points and <b>[NewHP]</b> regular hit points.
}
]
}
]

[if(NewHP<=Bloodied && CurHP>Bloodied && NewHP>0), CODE:
{She becomes bloodied.
[h: setState(“Bloodied”,1)]};
{}
]

[if(NewHP<=0 && NewHP>Dead && CurHP>0), CODE:
{She is now dying.
[h: setState(“Unconscious”,1)]};
{}
]

[if(NewHP<Dead), CODE:
{She is dead.
[h: setAllStates(0)]
[h: setState(“Dead”,1)]};
{}
]

All right, let’s break this down.  This macro starts by asking the player how much damage they’re taking.  It pulls in the current hit points, current temporary hit points and bloodied value from the character sheet and calculates the “Dead” HP value (the negative of the bloodied value).  The code then branches.

  • If the player doesn’t have any temps right now, the new HP is set to the old HP minus the damage taken, and the player is told how much damage is taken and where their hit points stand now.
  • If the player does have temporary hit points, the macro checks to see whether they’ll all be used up by the damage or not.
  • If they have more temps than they’re taking in damage, the damage is subtracted from the temps and the player is told how much damage they took, how many temps they have left and what their total HP is.
  • If the damage is enough to eat all of the temps and then some, the temps are wiped out, the remainder is subtracted from the actual hit points, and a message tells the player what happened.

Now the branches are done (the player has gotten a message telling them how much damage they took and where their HP situation is now).  The rest of the code checks to see if the character went from unbloodied to bloodied, conscious to unconscious, or alive to dead.  If any of those happen, the proper states are set and the proper messages are sent to the text window.

Finally, I realized that players will probably want to keep track of their healing surges as well, so I created a simple little macro to let them remove a surge from their total (note that actually gaining hit points is handled independently through the healing macro above).  Having done that, I figured I might as well create a macro to let them add a surge back (useful in case they click the “spend a surge” button by accident or take an extended rest).  The code for these is as follows:

Remove a surge:

[h: CurSurges=getProperty(“SurgesLeft”)]

[if(CurSurges>0), CODE:
{[h: setProperty(“SurgesLeft”,CurSurges-1)]
Spends 1 healing surge.  She has [CurSurges-1] [if(CurSurges!=2, “surges”, “surge”)] remaining.
};
{Has no healing surges left to spend.}
]

Regain a surge:

[h: CurSurges=getProperty(“SurgesLeft”)]

[if(CurSurges<getProperty(“DailySurges”)), CODE:
{[h: setProperty(“SurgesLeft”,CurSurges+1)]
Regains 1 healing surge.  She has [CurSurges+1] [if(CurSurges!=0, “surges”, “surge”)] remaining.
};
{Already has her full daily allotment of [CurSurges] healing surges.}
]

You’ll note that these macros do a couple of minorly fancy things.  First, they check to make sure that the player either has a surge left to spend or isn’t already at their maximum surge value on the adding side.  Second, they appropriately handle the singular/plural on surge/surges.  I didn’t bother with this on the hit points macro, so there you can see things like “Violet: Takes 10 damage and is at 1 hit points.”  Annoying, but not worth fixing because the code is messy enough already!

In case you were wondering, yes, I did use feminine pronouns throughout these macros because all three of my players are using female characters (despite the fact that one player is male).  If this were not the case, I could:

  • Awkwardly switch to gender-neutral pronouns
  • Edit the pronouns in the macros independently for each character
  • Create a property that indicates whether the character is male or female and then edits the pronouns appropriately

If I were doing this for broad distribution, I’d take the latter approach.  In my small game, though, I’ll probably go with the second approach if a male character ever comes up.

I’ve stored these macros in a package (along with skill checks, which I’ll cover in a later post) in case you’re interested (available here or on the downloads page).  I’m excited to see how my players will like them!